
Fabric chicken pattern for decoration is a delightful sewing project that combines creativity, simplicity, and farmhouse charm into one beautiful handmade piece.
One of the reasons this project remains popular among sewing enthusiasts is its versatility. Fabric chickens can be displayed on shelves, dining tables, kitchen counters, tiered trays, baskets, or seasonal centerpieces.
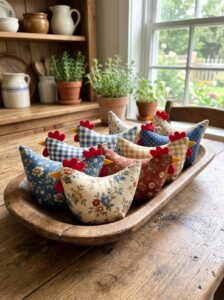
Another wonderful advantage of sewing decorative fabric chickens is the freedom to customize every detail. You can mix floral prints, gingham, polka dots, linen textures, or patchwork fabrics to create completely unique designs. Adding embroidered eyes, decorative buttons, lace, ribbons, raffia bows, or miniature flowers transforms every finished chicken into a handcrafted decoration full of personality and charm.
Choosing Materials and Preparing Your Fabric Chicken Pattern for Decoration
Before starting your Fabric chicken pattern for decoration, gather all the materials needed for the project. Quilting cotton is one of the most recommended fabrics because it is easy to sew, durable, and available in hundreds of attractive prints. Linen blends and lightweight canvas fabrics also create beautiful results while providing additional structure.
Prepare coordinating fabrics for the body, wings, comb, beak, and tail. Using contrasting colors makes each feature stand out beautifully. Traditional farmhouse colors such as red, cream, mustard, beige, sage green, and soft gray create timeless decorative pieces that complement many interior styles.
In addition to fabric, you will need polyester fiberfill stuffing, matching sewing thread, fabric scissors, sewing clips or pins, a fabric marker, a hand sewing needle, and optional fusible interfacing if you prefer a firmer finished decoration. Organizing all supplies before beginning helps the project progress smoothly.
Print or draw a simple chicken template consisting of the body, wings, comb, beak, and optional tail feathers. Carefully cut each template piece and trace them onto the wrong side of your chosen fabrics while paying attention to fabric grain direction.
If you would like extra texture, quilt the fabric before cutting the pattern pieces. Light straight-line quilting or decorative quilting stitches provide visual interest while making the finished chicken slightly firmer and more durable.
Once every piece has been cut, arrange them on your work surface before sewing. Double-check that mirrored pieces have been cut correctly and that all decorative details are ready for assembly. Good preparation minimizes mistakes and creates a more enjoyable sewing experience.
Step-by-Step Guide to Sewing the Fabric Chicken Pattern for Decoration
Begin by placing the two body pieces with their right sides facing together. Pin or clip the edges carefully to prevent shifting while sewing. Stitch around the outline using a consistent seam allowance, leaving a small opening along the bottom for turning and stuffing.
After stitching, carefully trim excess seam allowance and clip the curved sections without cutting through the stitching. These small clips allow the curves to lie smoothly once the fabric is turned right side out, creating a more professional appearance.
Turn the body right side out through the opening and gently shape all curved areas using a blunt turning tool or the rounded end of a pencil. Smooth corners and curves carefully to avoid stretching the fabric.
Stuff the chicken gradually using polyester fiberfill. Add small amounts at a time rather than large handfuls to achieve even firmness. Proper stuffing helps the chicken stand nicely while maintaining a soft and attractive shape.
Close the turning opening with a hidden ladder stitch or a neat machine stitch if the seam will remain hidden underneath the decoration. Taking time with this final seam greatly improves the finished appearance.
Next, attach the wings, comb, beak, and tail. These details can be sewn by machine before assembly or hand stitched afterward depending on your preferred construction method. Finally, embroider the eyes or attach small safety eyes if the decoration is intended for display rather than children’s toys.
Creative Ways to Personalize Your Fabric Chicken Pattern for Decoration
The traditional red-and-white farmhouse chicken is always a favorite, but the Fabric chicken pattern for decoration can easily be adapted to countless decorative styles. Floral cotton prints create soft spring decorations, while plaid fabrics produce cozy rustic designs that complement country kitchens beautifully.
Patchwork fabrics offer another charming option. Combining several coordinating prints allows you to use fabric scraps while creating colorful decorative chickens that showcase quilting-inspired creativity. Every chicken becomes completely unique through thoughtful fabric placement.
Decorative embellishments add even more personality. Lace trim around the wings, tiny wooden buttons, raffia bows, miniature fabric flowers, embroidery, or rustic twine all enhance the handmade appearance without making the project overly complicated.
Seasonal themes provide endless inspiration. Pastel fabrics are perfect for Easter decorations, while warm orange, brown, and mustard tones complement autumn displays. Christmas-inspired chickens can feature festive fabrics with holly prints, stars, or red-and-green color palettes.
Different sizes also increase versatility. Small chickens decorate tiered trays, medium versions brighten shelves and tables, while oversized fabric chickens become charming centerpiece decorations or decorative pillows for farmhouse-inspired interiors.
If you enjoy gift-making, create matching sets featuring several coordinating chickens with different fabric combinations. Beautiful gift baskets containing handmade fabric chickens make thoughtful presents for birthdays, housewarmings, holidays, Mother’s Day, or anyone who appreciates handcrafted home décor.
Finishing Techniques and Tips for Long-Lasting Decorative Results
Taking your time during cutting greatly improves the final result. Accurate cutting ensures symmetrical pieces that fit together smoothly, making assembly much easier from beginning to end.
Always press your fabric before cutting and again after sewing each major seam. Pressing creates crisp edges, reduces bulk, and gives your finished Fabric chicken pattern for decoration a polished, professional appearance.
Choose high-quality polyester thread that coordinates well with your fabrics. Strong thread improves durability while producing smooth, consistent stitches that hold the decoration together through years of display.
If your chicken will be displayed standing upright, consider inserting a small weighted pouch filled with clean plastic pellets or dried beans into the base before completing the stuffing. This extra weight helps the decoration remain stable on shelves or tables.
Store your finished decorations away from direct sunlight to help preserve fabric colors. Occasional gentle dusting with a soft cloth or lint roller keeps them looking fresh without damaging delicate embellishments or embroidery.
Most importantly, enjoy the creative process. Every completed Fabric chicken pattern for decoration reflects your imagination, sewing skills, and personal style. Handmade decorations always add warmth and individuality to a home while creating lasting memories through craftsmanship.
FAQ About Fabric Chicken Pattern for Decoration
Is the Fabric chicken pattern for decoration suitable for beginners?
Yes. This project uses simple sewing techniques including basic seams, stuffing, and hand finishing, making it an excellent choice for beginners who want to improve their sewing skills.
Which fabric works best?
Quilting cotton is highly recommended because it is stable, easy to sew, and available in countless attractive prints. Linen blends and lightweight canvas fabrics also produce beautiful decorative results.
Can I sew this project by hand?
Yes. Although a sewing machine makes the project faster, careful hand stitching can produce equally attractive decorative chickens with a little extra time and patience.
What stuffing should I use?
Polyester fiberfill is the most common choice because it creates soft, even shaping while remaining lightweight and washable if needed.
Can I make different sizes?
Absolutely. Simply enlarge or reduce the template proportionally to create miniature ornaments, medium table decorations, or larger decorative pieces for shelves and centerpieces.
How can I make the chicken stand upright?
Adding a small weighted pouch inside the bottom before closing the stuffing opening helps the decoration remain stable on flat surfaces.
Can I personalize the design?
Yes. Different fabrics, embroidery, ribbons, lace, buttons, flowers, and seasonal colors allow endless creative customization while maintaining the recognizable chicken shape.
Can handmade fabric chickens be sold?
Yes. Decorative fabric chickens are popular at craft fairs, handmade markets, seasonal events, and gift shops. Personalized color combinations and coordinated collections often attract even more interest from customers.
Conclusion
The Fabric chicken pattern for decoration is a wonderful sewing project that combines creativity, practical sewing techniques, and timeless farmhouse style. Throughout this tutorial, you learned how to prepare materials, cut accurate pattern pieces, sew the body, add stuffing, attach decorative details, and personalize your finished chicken with beautiful embellishments and fabric combinations. These simple steps make it possible to create charming handmade decorations suitable for every season and every home.
Whether you are sewing a single decorative chicken for your own kitchen or creating an entire collection for gifts or craft fairs, this project offers endless opportunities for creativity and personal expression.
Every completed Fabric chicken pattern for decoration showcases the beauty of handmade craftsmanship while adding warmth and personality to your décor. If you enjoyed this tutorial, we would love to hear your honest opinion. Feel free to share your experience, your creative ideas, and your suggestions for future sewing projects.