
Twisted Post Quilt Tutorial is a timeless quilting project that combines bold geometric shapes with elegant movement, creating a table runner that instantly becomes the centerpiece of any dining table, hallway console, or seasonal decoration.
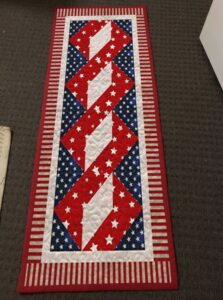
One of the greatest advantages of this Twisted Post Quilt Tutorial is its versatility. Although the sample shown features patriotic red, white, and blue fabrics with stars and stripes, the same design works beautifully with Christmas prints, floral collections, autumn colors, modern solids, batiks, or even elegant neutral fabrics.
Another reason this project is so popular is that it offers an excellent opportunity to practice accurate cutting, precise seam allowances, and careful pressing. Every section builds upon the previous one, allowing the illusion of twisting posts to emerge naturally as the blocks come together. Whether you are creating this runner for your own home, giving it as a thoughtful handmade gift, or preparing items for a craft fair, this Twisted Post Quilt Tutorial delivers professional-looking results while remaining enjoyable from beginning to end.
Choosing Fabrics and Preparing Your Quilt Pieces
Before cutting any fabric, spend a little time selecting colors that provide strong contrast. The twisting illusion depends heavily on light, medium, and dark values working together. If the fabrics blend too closely in value, the visual movement becomes less noticeable.
The featured project uses patriotic prints, with red star fabric forming the central twisted sections, blue star fabric creating the corner triangles, and white fabric adding brightness between each twist. A coordinating striped border frames the entire runner beautifully.
For a runner similar to the one shown, prepare quilting cotton fabrics in three main colors along with border fabric, backing fabric, batting, coordinating thread, rotary cutter, quilting ruler, cutting mat, sewing machine, quilting pins, and an iron.
Carefully press all fabrics before cutting. Smooth fabric produces much more accurate pieces and prevents slight distortions that can become noticeable later during assembly.
Using a rotary cutter and quilting ruler, cut long strips according to your desired runner dimensions. From these strips, cut rectangles, squares, and triangles that will become the repeating twisted units. Accuracy during this stage greatly simplifies the entire construction process.
Lay every cut piece on a design wall or large table before sewing. Organizing the pieces in advance allows you to verify color placement and ensures that each twisted section flows correctly from top to bottom.
Sewing the Twisted Post Blocks Step by Step
Begin by sewing the center rectangles to the matching angled pieces. Use a consistent ¼-inch seam allowance throughout the project to keep every unit perfectly sized.
After sewing each seam, press carefully. Many quilters prefer pressing seams to one side, while others enjoy pressing them open for flatter intersections. Either method works well as long as you remain consistent.
Continue building each twisted unit by adding the contrasting side triangles. These pieces create the illusion that the center strip is twisting around itself instead of remaining flat.
Trim each completed unit if necessary. Even slight inconsistencies can multiply over several repeated blocks, so checking measurements after every section helps maintain accuracy.
Arrange all completed units vertically before joining them together. Look carefully to ensure every twist points in the same direction. Rotating a single block accidentally can interrupt the beautiful flowing movement of the finished runner.
Once satisfied with the arrangement, sew the units together one row at a time. Press between each addition to maintain a smooth, flat quilt top with crisp intersections.
Adding Borders, Quilting, and Finishing Details
After completing the quilt center, measure both the length and width before cutting border strips. Measuring rather than estimating helps prevent wavy borders.
Attach the inner border first if your design includes one. Sew opposite sides first, press, then repeat for the remaining sides to maintain balanced dimensions.
Next, add the decorative outer border. The striped border shown in the sample enhances the patriotic appearance while framing the twisting design beautifully and adding visual balance.
Create your quilt sandwich by layering the backing fabric right side down, batting in the middle, and the quilt top facing upward. Smooth every layer carefully to eliminate wrinkles and bubbles.
Secure the layers with safety pins, quilting clips, or temporary spray adhesive before quilting. Proper basting prevents shifting while stitching decorative quilting lines.
Finish the project by trimming excess batting and backing before attaching the binding. Fold the binding neatly over the edges and stitch securely by machine or by hand for a polished finish that will withstand years of use.
Tips for Achieving Professional Results
Always double-check measurements before cutting multiple pieces. Correcting a mistake early saves both fabric and time throughout the project.
Maintain a consistent seam allowance during every step. Even tiny variations can affect how well the blocks fit together, especially in geometric quilt designs like this one.
Take time to press instead of ironing aggressively. Lifting and lowering the iron reduces stretching and helps preserve the shape of every unit.
Choose quilting designs that complement rather than overpower the twisted pattern. Simple meandering, gentle loops, straight-line quilting, or soft swirls all work beautifully while allowing the pieced design to remain the focal point.
If you’re making the runner as a gift, consider adding a personalized fabric label to the back with the recipient’s name and the completion date. Handmade details make every quilt even more meaningful.
Most importantly, enjoy the process. The beauty of this Twisted Post Quilt Tutorial lies not only in the finished runner but also in the satisfaction of watching the twisting illusion appear one carefully sewn block at a time.
FAQ About Twisted Post Quilt Tutorial
Is the Twisted Post Quilt Tutorial suitable for beginners?
Yes. Beginners with basic rotary cutting and straight sewing experience can successfully complete this project by working carefully and maintaining accurate seam allowances.
What fabrics work best for this quilt?
High-quality quilting cotton is recommended because it cuts accurately, presses well, and produces crisp seams.
Can I make the design larger?
Absolutely. Simply repeat additional twisted blocks to create a longer table runner or expand the design into a lap quilt or bed quilt.
Why is contrast important?
The twisting illusion depends on light and dark fabrics standing apart. Strong contrast makes the three-dimensional effect much more noticeable.
What batting should I use?
Cotton batting provides a traditional appearance, while cotton-poly blends create slightly more loft. Either option works well depending on personal preference.
Which quilting pattern complements this design?
Straight-line quilting, gentle curves, loops, feathers, or simple free-motion quilting all enhance the project without distracting from the twisted blocks.
How do I keep my blocks accurate?
Use an accurate quarter-inch seam allowance, press after each seam, and measure frequently throughout construction.
Can I use fabric scraps?
Yes. This design is an excellent scrap quilt project as long as the fabrics maintain enough color contrast to preserve the twisting effect.
Conclusion
This Twisted Post Quilt Tutorial demonstrates how thoughtful fabric placement, accurate cutting, and careful sewing can create an eye-catching optical illusion that looks far more complicated than it actually is.
Throughout this guide, you learned how to choose fabrics with strong contrast, prepare precise quilt pieces, assemble the twisted blocks step by step, add borders, quilt the layers, bind the edges, and apply finishing techniques that give the runner a polished, professional appearance.
By following each stage patiently, you can confidently recreate a beautiful quilted table runner inspired by the project shown in the photo while adapting the colors and prints to match any season or home décor. Handmade quilting is always a rewarding journey, and every finished project reflects both creativity and craftsmanship. If you enjoyed this tutorial, please leave your honest opinion about the project and share your suggestions or tips. Your feedback can inspire future quilting tutorials and help other quilters create beautiful handmade pieces with confidence.