
Macramé fish bracelet pattern is a beautiful handmade accessory that combines traditional knotting techniques with a charming fish-shaped design.
One of the reasons the Macramé fish bracelet pattern has become increasingly popular is its versatility. The fish symbol represents hope, harmony, abundance, and freedom in many cultures, making it a wonderful decorative element for everyday jewelry.
Another advantage of this project is that it requires only a few basic supplies while allowing you to practice essential macramé knots. As you work through the design, you’ll become more confident with knot tension, symmetry, and shaping techniques. Throughout this tutorial, you’ll learn how to prepare your materials, create the fish body, shape the fins and tail, assemble the bracelet, and add professional finishing touches. By following each step carefully, you’ll soon have a handmade bracelet that looks elegant and lasts for years.
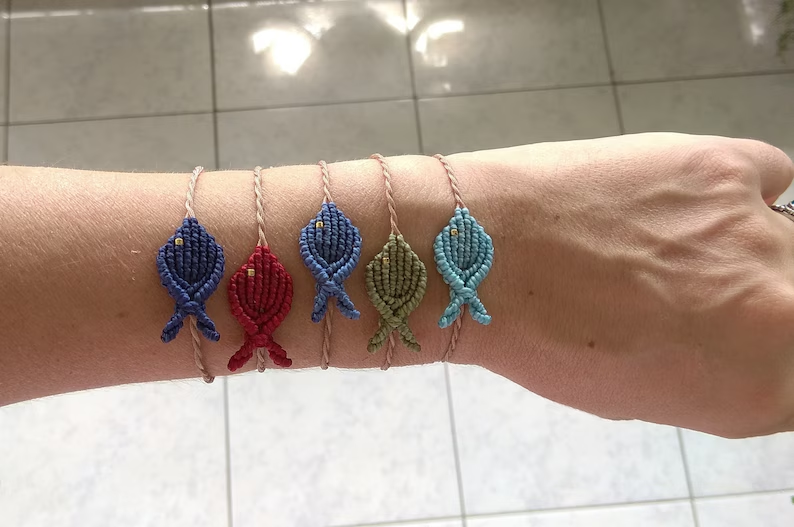
Choosing Materials and Preparing for the Macramé Fish Bracelet Pattern
Selecting quality materials is the first step toward creating a beautiful Macramé fish bracelet pattern. Waxed polyester cord, cotton macramé cord, or nylon cord all work well because they are durable, flexible, and easy to knot. A cord thickness between 0.8 mm and 1 mm is ideal for detailed bracelet designs.
Choose colors that complement your personal style. The bracelets shown in the photo feature shades of navy blue, burgundy, sky blue, olive green, and lavender, creating a soft and elegant collection. Neutral colors offer a minimalist look, while brighter shades produce playful summer accessories.
Before cutting your cords, determine the finished bracelet size. Most adult bracelets measure between 6.5 and 8 inches, excluding the adjustable closure. Cut two working cords approximately 120 cm (47 inches) long and one center cord about 35 cm (14 inches) long.
Additional supplies include sharp scissors, measuring tape, a clipboard or macramé board, sewing pins or clips, and a lighter if using synthetic cord to seal the ends. Wooden or metal beads may also be added for decorative accents if desired.
Keeping even tension throughout the project is essential. Loose knots may cause the fish shape to lose definition, while overly tight knots can distort the bracelet. Practicing a few square knots before beginning helps establish a comfortable rhythm.
Finally, organize your workspace so the cords remain untangled during knotting. A clean, well-lit surface makes it easier to maintain symmetry and accurately follow each step of the Macramé fish bracelet pattern.
Step-by-Step Macramé Fish Bracelet Pattern Instructions
Begin by securing the center cord to your macramé board using pins or tape.
Fold the two long working cords in half and attach them around the center cord using a Lark’s Head Knot. This forms the starting point for the bracelet.
Create the adjustable bracelet cord first by tying approximately 20 alternating Square Knots. Continue until the bracelet strap reaches about half of the desired finished length.
Now begin shaping the fish.
Separate the working cords into left and right sections.
Tie one Square Knot.
Repeat another Square Knot directly below it.
Continue adding four to six Square Knots while gradually tightening the center area. This forms the head of the fish.
To widen the fish body, slightly increase the spacing between the outer cords before tying the next series of Square Knots. This subtle adjustment naturally creates the rounded center portion.
For additional texture, alternate Square Knots with Half Square Knots for several rows. This variation gives the fish body an attractive woven appearance while maintaining structural stability.
Once the body reaches the desired width, begin narrowing the design by gradually pulling the outer cords inward. Tie two more Square Knots while reducing the spacing between cords.
To create the tail, divide the cords into two equal groups.
On the left side, tie three Half Hitch Knots diagonally downward.
Repeat on the right side in the opposite direction.
Finish each tail section with two small Square Knots, allowing the ends to flare slightly. Trim the cords evenly to create a neat forked tail.
Repeat the same process if making multiple fish along a collection of bracelets, varying colors for each design while maintaining identical proportions.
Complete the second bracelet strap using alternating Square Knots until both sides match in length.
Finish the bracelet by creating an adjustable sliding closure. Overlap both bracelet ends and wrap a separate short cord around them using six to eight Square Knots. Trim the excess cord and secure the ends neatly.
Tips for Professional Results and Creative Customization
Consistent knot tension is one of the most important aspects of successful macramé. Try to tighten each knot with equal pressure to maintain an even fish shape throughout the bracelet.
If you’re making several bracelets as gifts, prepare all your cords before beginning. Batch preparation saves time and ensures consistent sizing across every bracelet.
Color combinations dramatically affect the final appearance. Ocean-inspired blues and greens emphasize the fish theme, while pastel shades create delicate spring accessories. Earth tones produce a rustic, handcrafted style.
Tiny beads can be incorporated as decorative fish eyes. Slide a small bead onto the center cord before tightening the surrounding knots. This simple detail adds personality without overwhelming the design.
To create a more textured fish body, alternate rows of Square Knots with Spiral Half Knots. The slight twist introduces movement while maintaining the recognizable fish silhouette.
Always inspect the finished bracelet carefully before trimming the cords. Check knot security, bracelet symmetry, and closure functionality to ensure your Macramé fish bracelet pattern is both attractive and durable.
Creative Ways to Wear and Gift Your Macramé Fish Bracelet Pattern
The Macramé fish bracelet pattern makes a thoughtful handmade gift for friends, family members, teachers, or anyone who appreciates handcrafted jewelry. Because each bracelet is made by hand, every piece carries a unique personal touch.
These bracelets also work beautifully as friendship bracelets. Create matching sets in different colors so each person receives a bracelet reflecting their personality while maintaining the same symbolic fish design.
Beach vacations and summer events are perfect opportunities to wear fish-themed macramé jewelry. The lightweight construction pairs naturally with casual outfits, linen clothing, and seaside accessories.
For craft fairs and handmade markets, offering the Macramé fish bracelet pattern in multiple color combinations can attract a wide variety of customers. Displaying several coordinated shades together creates an appealing presentation.
Children and teenagers often enjoy collecting colorful macramé bracelets. By using bright cords and smaller sizes, you can easily adapt the pattern for younger wearers while maintaining the same construction method.
As your confidence grows, experiment with larger fish designs, double-layered bracelets, metallic cords, or additional decorative knots. Every variation allows you to develop your own creative style while expanding your macramé skills.
FAQ
Is the Macramé fish bracelet pattern suitable for beginners?
Yes. Beginners who are familiar with basic Square Knots and Half Hitch Knots can successfully complete this project with patience and careful knot placement.
Which cord is best?
Waxed polyester cord is one of the most popular choices because it holds knots securely, resists fraying, and produces clean, professional results.
How long should I cut the cords?
For an average adult bracelet, two working cords around 120 cm (47 inches) and one center cord approximately 35 cm (14 inches) provide sufficient length.
Can I add beads?
Absolutely. Small beads can be used as fish eyes or decorative accents along the bracelet without changing the overall construction.
How do I make the bracelet adjustable?
Create a sliding closure using six to eight Square Knots tied around the overlapping bracelet ends. This allows the bracelet to fit different wrist sizes comfortably.
Can children make this bracelet?
Older children with adult supervision can enjoy making this project after learning the basic macramé knots.
What colors work best?
Blue, turquoise, olive green, lavender, burgundy, and neutral beige are all excellent choices. Mixing complementary shades creates especially attractive bracelets.
Can I sell bracelets made from this pattern?
Yes. Handmade bracelets created using your own craftsmanship can be sold at local markets, craft fairs, or online handmade shops, provided you respect any applicable pattern licensing if using a commercial pattern source.
Conclusion
The Macramé fish bracelet pattern is a relaxing and rewarding project that combines traditional macramé knotting with a charming symbolic design. Throughout this tutorial, you learned how to choose the right materials, prepare your cords, master the basic knots, shape the fish body and tail, create an adjustable bracelet, and personalize the finished piece with different colors and decorative accents. These simple techniques allow you to create elegant handmade jewelry that is both meaningful and durable.
As your confidence grows, you’ll discover countless ways to customize this bracelet by experimenting with new color palettes, textured knots, bead embellishments, and creative finishing details. Every completed bracelet becomes a unique reflection of your creativity while helping you strengthen your macramé skills.
I hope this Macramé fish bracelet pattern inspires you to begin your next handmade project. If you enjoyed this tutorial, please leave your honest opinion and share your sincere suggestions. Your feedback can inspire other crafters and help shape future macramé pattern tutorials.