
Crochet four-leaf clover pattern is a delightful project that combines creativity, symbolism, and simple crochet techniques into a charming handmade design.
One of the greatest advantages of this project is its simplicity. Because each leaf is worked using basic crochet stitches, beginners can confidently practice essential techniques while producing an elegant finished piece.
This complete guide explains every stage of creating a beautiful Crochet four-leaf clover pattern, from selecting the right materials to crocheting each leaf, shaping the stem, joining all the sections neatly, and adding finishing touches. By following the instructions carefully and maintaining even stitch tension, you will create a lovely clover that can be used in countless handmade projects while improving your crochet skills with every stitch.
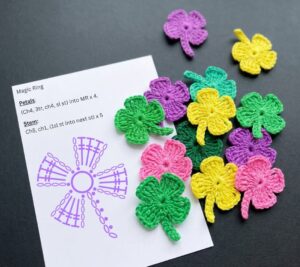
Choosing Materials for a Crochet Four-Leaf Clover Pattern
The first step toward a successful Crochet four-leaf clover pattern is selecting suitable materials. Cotton yarn is one of the best choices because it creates crisp stitch definition, holds its shape well, and produces clean edges that beautifully highlight the clover’s distinctive leaves.
Choose a crochet hook that corresponds to your yarn weight. Many crocheters prefer using a hook slightly smaller than the yarn label recommends. This creates tighter stitches, giving the finished clover a firm, polished appearance that works especially well for appliqués and accessories.
Prepare a tapestry needle for weaving in yarn ends neatly after completing the project. Since the finished clover is relatively small, carefully hidden yarn tails help achieve a clean professional result.
Small embroidery scissors make trimming yarn easy and precise. Keeping your finishing work neat greatly improves the final appearance of the clover.
Stitch markers are optional but can be useful if you are still learning to recognize stitch placement, especially when working multiple leaves from a central ring.
Finally, choose a rich green yarn shade that resembles a natural clover. You can also experiment with lighter spring greens, variegated greens, or even metallic yarn for festive decorations and seasonal projects.
Step-by-Step Crochet Four-Leaf Clover Pattern Instructions
Begin your Crochet four-leaf clover pattern by creating a magic ring. This technique forms a tightly closed center that allows all four leaves to connect naturally while eliminating any visible opening in the middle.
Chain three to begin the first leaf. Work several stitches into the magic ring using a combination of double crochet, treble crochet, double crochet, and chain stitches. Finish the leaf with a slip stitch back into the ring to secure the shape.
Repeat the same sequence three additional times until four identical leaves surround the center. Maintaining consistent stitch counts for every leaf helps create a balanced and symmetrical finished clover.
After completing the fourth leaf, gently tighten the magic ring by pulling the yarn tail. This closes the center securely while bringing all four leaves together into the classic clover shape.
To crochet the stem, chain approximately eight to twelve stitches depending on your desired length. Return along the chain using slip stitches or single crochet stitches to create a neat, slender stem that complements the leaves.
Fasten off the yarn, leaving a short tail for weaving in the end. Carefully hide all loose yarn tails using a tapestry needle so both the front and back of the clover remain tidy and attractive.
Crochet Stitches Used in the Crochet Four-Leaf Clover Pattern
The Crochet four-leaf clover pattern uses several fundamental crochet stitches that beginners can learn quickly while still producing an elegant finished design.
The magic ring creates the secure center where all four leaves are joined. Mastering this technique is useful for many crochet projects, including flowers, amigurumi, coasters, and appliqués.
Chain stitches form the starting point for each leaf and are also used when crocheting the stem. Keeping chain tension even helps maintain a consistent appearance throughout the project.
Double crochet stitches build much of each leaf’s rounded shape. Their moderate height creates gentle curves that resemble the natural outline of a clover leaf.
Treble crochet stitches provide additional height near the center of each leaf, giving it a fuller and more realistic appearance while maintaining graceful proportions.
Slip stitches are used to join leaves back to the center ring, complete the stem, and create smooth transitions between sections. These small stitches also help maintain the clean structure of the finished motif.
Creative Ideas for Your Crochet Four-Leaf Clover Pattern
One of the most enjoyable aspects of a Crochet four-leaf clover pattern is its versatility. A finished clover can easily become an appliqué for blankets, tote bags, sweaters, hats, scarves, and baby clothing.
Small clovers also make wonderful keychains. Simply attach a split ring or lobster clasp to the stem, and you’ll have a charming lucky accessory that is lightweight and easy to carry every day.
If you enjoy home décor, crochet multiple clovers in different shades of green and connect them into festive garlands. These decorations work beautifully for spring celebrations, seasonal displays, and St. Patrick’s Day decorating.
Bookmarks are another creative option. Attach a single clover to the top of a crocheted chain or narrow cord to create an elegant handmade gift for book lovers.
You can also incorporate clovers into greeting cards, gift wrapping, or scrapbook projects by sewing or gluing them onto paper crafts for a unique handmade touch.
For crafters who sell handmade items, the Crochet four-leaf clover pattern offers an affordable project requiring minimal yarn while appealing to customers who appreciate symbolic, seasonal, and decorative crochet accessories.
FAQ
Is the Crochet four-leaf clover pattern beginner-friendly?
Yes. This project mainly uses basic crochet stitches and simple shaping techniques, making it an excellent project for beginners who want to practice essential crochet skills.
Which yarn works best?
Cotton yarn is highly recommended because it provides excellent stitch definition, durability, and helps the leaves maintain their shape beautifully.
Can I make the clover larger?
Absolutely. Using thicker yarn and a larger crochet hook naturally increases the finished size while preserving the same stitch pattern.
What crochet stitches are required?
Most versions use a magic ring, chain stitches, slip stitches, double crochet, treble crochet, and occasionally single crochet for the stem.
Can I use the clover as an appliqué?
Yes. The finished clover can easily be sewn onto blankets, clothing, bags, hats, pillows, and many other handmade projects.
How long does it take to complete?
Most crocheters can finish one clover in approximately 20 to 45 minutes depending on their experience and the yarn being used.
Is this a good project for leftover yarn?
Definitely. Because the clover requires only a small amount of yarn, it is an excellent stash-busting project that helps reduce leftover materials.
Can I sell finished crochet clovers?
Yes. Handmade crochet clovers remain popular at craft fairs, seasonal markets, and online handmade shops. Professional finishing and careful stitching help increase their overall appeal.
Conclusion
The Crochet four-leaf clover pattern is a beautiful project that combines meaningful symbolism with enjoyable crochet techniques. Throughout this guide, you learned how to choose suitable materials, create a secure magic ring, crochet four balanced leaves, shape a neat stem, assemble the entire motif, and personalize the finished clover for many creative uses. Because it relies primarily on fundamental crochet stitches, this project is accessible for beginners while still offering endless opportunities for experienced crocheters to explore different textures, colors, and decorative finishes.
Whether you use your clover as an appliqué, keychain, bookmark, seasonal decoration, or thoughtful handmade gift, every completed piece celebrates creativity while strengthening your crochet skills. Small projects like this are perfect for practicing precision, improving stitch consistency, and building confidence for larger crochet designs in the future.
I hope this complete Crochet four-leaf clover pattern tutorial has inspired you to pick up your crochet hook and create your own lucky handmade clover. If you enjoyed this article, please leave your honest opinion and share your suggestions for future crochet tutorials. Your feedback is greatly appreciated and helps inspire even more creative ideas for the crochet community.