
Carpenter’s Star Quilt Pattern is one of the most admired quilt designs among quilting enthusiasts because it combines bold geometric shapes with timeless elegance.
The beauty of the Carpenter’s Star Quilt Pattern lies in its versatility. It can be sewn using soft pastels for a delicate nursery quilt, rich autumn colors for seasonal décor, or bold contrasting prints for a dramatic centerpiece.
Another reason why the Carpenter’s Star Quilt Pattern continues to be a favorite is that it teaches several essential quilting techniques without becoming overwhelming. Careful cutting, accurate seam allowances, matching points, and organized assembly all contribute to a polished finish. By working patiently through each stage, you will gain valuable quilting experience while creating a beautiful project that can be enjoyed for many years or even passed down as a treasured family heirloom.
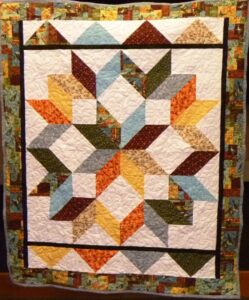
Choosing Fabrics and Preparing Your Carpenter’s Star Quilt Pattern
Before beginning your Carpenter’s Star Quilt Pattern, spend time selecting fabrics that create strong visual contrast. Since the large star is the focal point of the quilt, using both light and dark fabrics allows the star points to stand out clearly. Solid fabrics, tone-on-tone prints, and subtle textures often produce especially crisp results.
For a throw-sized quilt similar to the one shown, prepare approximately 2 yards of background fabric, 2½ yards of feature fabrics for the star, and about ½ yard for the binding. You will also need batting and backing fabric that extends several inches beyond the quilt top on every side.
A rotary cutter, self-healing cutting mat, acrylic quilting ruler, quilting clips or pins, sewing machine with a quarter-inch presser foot, iron, and ironing board are all essential tools. Accurate cutting is one of the most important foundations of a successful Carpenter’s Star Quilt Pattern, so ensure your ruler and blade are in excellent condition.
Press your fabric before cutting to eliminate wrinkles that may affect measurement accuracy. Smooth, flat fabric allows each square and triangle to remain consistent throughout the construction process.
Carefully label each group of cut pieces as you work. Organizing fabrics into separate stacks prevents confusion later when assembling the many units that create the finished star.
Finally, double-check every measurement before cutting. Taking a few extra minutes during preparation greatly reduces mistakes and helps every point align beautifully during assembly.
Step-by-Step Construction of the Carpenter’s Star Quilt Pattern
Begin your Carpenter’s Star Quilt Pattern by cutting the required squares according to your preferred quilt size. Many quilters create the design using combinations of large squares that are later transformed into half-square triangles and flying geese units. Precision at this stage makes the remainder of the project significantly easier.
Create the half-square triangle units by placing two contrasting squares with right sides together. Draw a diagonal line across the lighter fabric, sew a quarter-inch seam on both sides of the line, then cut along the marked line. Press each unit carefully toward the darker fabric before trimming them to identical measurements.
Next, construct the flying geese units that form the dramatic outer points of the star. Align the small corner squares carefully, stitch along the marked diagonal lines, trim excess fabric, and press thoroughly after every seam. Consistent pressing helps maintain sharp, flat blocks.
Lay all completed units on a design wall or large flat surface before sewing rows together. This step allows you to verify that the colors alternate correctly and that every star point faces the proper direction before permanent assembly begins.
Sew the units together row by row using a precise quarter-inch seam allowance. Match every intersection carefully, pinning where necessary to keep points aligned. Press each completed row flat before joining it to the next row.
Once all rows have been connected, press the completed quilt top thoroughly. Add borders if desired, layer the quilt top with batting and backing, baste securely, quilt using your preferred design, trim the edges evenly, and finish by attaching the binding with neat mitered corners.
Color Planning and Creative Design Ideas
One of the most exciting aspects of the Carpenter’s Star Quilt Pattern is experimenting with color placement. High contrast creates dramatic stars that immediately capture attention, while softer color transitions produce a more subtle and elegant appearance.
Traditional color palettes often include navy, burgundy, forest green, cream, and deep gold. These timeless combinations highlight the classic character of the pattern and work beautifully in both rustic and traditional interiors.
Modern interpretations frequently use grayscale fabrics, jewel tones, or vibrant rainbow palettes. Contemporary fabric collections with bold prints can create stunning visual movement without losing the recognizable star shape.
Scrappy versions of the Carpenter’s Star Quilt Pattern allow quilters to use leftover fabric pieces from previous projects. Combining numerous coordinating prints adds personality while making excellent use of fabric scraps that might otherwise remain unused.
Adding multiple borders provides additional opportunities for creativity. A narrow accent border followed by a wider outer border can beautifully frame the large center star while increasing the overall quilt size.
If you wish to personalize your quilt even further, consider custom quilting designs. Feather motifs, echo quilting, swirling vines, straight-line quilting, or star-themed stitching patterns all enhance the finished project while adding texture and dimension.
Finishing Techniques and Tips for Professional Results
Maintaining an accurate quarter-inch seam allowance throughout the Carpenter’s Star Quilt Pattern is essential. Even slight inconsistencies can affect the alignment of star points and reduce the overall precision of the finished quilt.
Press after every seam instead of waiting until several sections have been completed. Proper pressing—not ironing back and forth—helps preserve accurate block dimensions while preventing distortion.
Take time to square every unit before moving to the next construction stage. Trimming blocks to identical measurements ensures that rows fit together smoothly with minimal adjustments.
When layering the quilt sandwich, smooth each layer carefully from the center outward to eliminate wrinkles or puckers. Secure the layers thoroughly with safety pins or temporary basting spray before quilting.
Choose a quilting design that complements rather than overwhelms the beautiful geometry of the Carpenter’s Star Quilt Pattern. Straight-line quilting emphasizes the clean angles of the star, while gentle curves soften the overall appearance.
After attaching the binding, inspect the quilt closely for any loose threads or unfinished stitching. A final pressing gives the quilt a crisp, polished appearance that highlights every carefully pieced star point and showcases your craftsmanship.
FAQ
Is the Carpenter’s Star Quilt Pattern suitable for beginners?
Yes. Although it requires careful cutting and accurate piecing, beginners who work patiently and follow each step can successfully complete this project.
What fabrics work best for this quilt?
High-quality quilting cotton is the most popular choice because it is stable, easy to sew, and available in endless color combinations.
How important is fabric contrast?
Very important. Strong contrast helps define the star shape and makes the finished quilt visually striking.
Can I make the quilt larger or smaller?
Absolutely. You can adjust the finished size by changing the dimensions of the blocks or by adding additional borders around the completed quilt top.
What quilting design works well with this pattern?
Straight-line quilting, echo quilting around the star, feather motifs, and free-motion swirls all complement the geometric layout beautifully.
How much fabric is typically required?
Fabric requirements vary depending on the finished size, but a throw-sized quilt generally requires several yards of background, feature fabrics, batting, backing, and binding.
Can I use fabric scraps?
Yes. Scrappy versions of the Carpenter’s Star Quilt Pattern are extremely popular and create colorful, one-of-a-kind quilts.
How long does it take to finish this quilt?
The timeline depends on your experience and available sewing time, but many quilters complete the project over several weekends while enjoying each stage of the process.
The Carpenter’s Star Quilt Pattern remains one of the most rewarding quilting projects because it combines classic design, precise piecing, and endless creative possibilities.
Throughout this guide, you learned how to choose suitable fabrics, prepare accurate cuts, construct half-square triangles and flying geese, assemble the star step by step, experiment with color placement, and finish the quilt with professional techniques. By taking your time and focusing on accuracy, you can create a stunning quilt that becomes both a practical household item and a lasting piece of handmade art.
We hope this tutorial inspires your next quilting project. If you enjoyed this article, please leave your honest opinion in the comments and share your suggestions or ideas for future quilting tutorials. Your feedback is greatly appreciated and helps us continue creating helpful content for quilting enthusiasts around the world.