
Easy Crochet Puppy Pattern for Beginners is one of the most enjoyable projects for anyone who loves creating handmade toys with yarn.
Crocheting stuffed animals, also known as amigurumi, has become increasingly popular because it allows crafters to transform basic stitches into charming handmade creations.
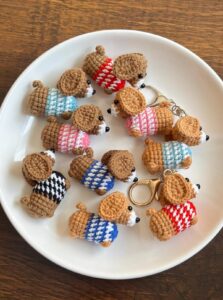
One of the greatest advantages of this Easy Crochet Puppy Pattern for Beginners is its flexibility. You can easily change the yarn color to create different dog breeds, experiment with ear shapes, or add accessories like scarves, bows, collars, or tiny sweaters. Every finished puppy becomes unique, reflecting your creativity while helping you gain confidence with every stitch you complete.
Gather Your Materials and Learn the Basic Stitches
Before beginning your Easy Crochet Puppy Pattern for Beginners, gather medium-weight cotton or acrylic yarn, a suitable crochet hook (usually 3.5 mm to 4 mm), fiberfill stuffing, safety eyes, a yarn needle, scissors, and stitch markers. These basic supplies are enough to complete your adorable puppy.
Beginners should feel comfortable with several simple stitches before starting. The pattern mainly uses chain stitches (ch), magic ring (MR), single crochet (sc), increase (inc), invisible decrease (dec), slip stitch (sl st), and fastening off (FO). These are fundamental stitches used in countless amigurumi projects.
Always use a stitch marker at the beginning of each round. Since amigurumi is usually worked in continuous spirals, the marker helps prevent losing your place and keeps the stitch count accurate throughout the project.
Begin with the head because it is the largest part of the puppy. Working from the top downward allows you to shape the face naturally while keeping your rounds even and symmetrical.
Head Pattern
Round 1: MR, 6 sc into the ring (6)
Round 2: inc around (12)
Round 3: (sc, inc) repeat around (18)
Round 4: (2 sc, inc) repeat around (24)
Round 5: (3 sc, inc) repeat around (30)
Rounds 6–11: sc around (30)
Round 12: (3 sc, dec) repeat around (24)
Round 13: (2 sc, dec) repeat around (18)
Insert safety eyes between Rounds 8 and 9 with approximately six stitches between them before continuing. Stuff the head firmly while maintaining its rounded shape.
Crochet the Puppy Body, Legs, and Tail
The body is slightly smaller than the head, giving the puppy a cute oversized appearance that many amigurumi enthusiasts love. Continue working in continuous rounds while checking your stitch count regularly.
Body Pattern
Round 1: MR, 6 sc (6)
Round 2: inc around (12)
Round 3: (sc, inc) repeat around (18)
Round 4: (2 sc, inc) repeat around (24)
Rounds 5–9: sc around (24)
Round 10: (2 sc, dec) repeat around (18)
Round 11: (sc, dec) repeat around (12)
Stuff the body firmly before closing.
For each leg, begin with a magic ring containing six single crochet stitches. Increase to twelve stitches, then crochet several rounds evenly before lightly stuffing. Make four identical legs for a balanced appearance.
The puppy’s tail is one of the easiest parts. Chain six, then work single crochet back along the chain or create a tiny tube using six stitches in continuous rounds. Sew it securely onto the back of the body.
Take your time stuffing every piece evenly. Consistent stuffing prevents lumps while helping the puppy maintain a professional shape after assembly.
Make the Ears, Muzzle, and Assemble Your Puppy
The floppy ears give this Easy Crochet Puppy Pattern for Beginners its charming personality. Depending on your preference, you can create longer ears for breeds like Beagles or shorter ears for terrier-inspired puppies.
Ear Pattern (Make Two)
Round 1: MR, 6 sc
Round 2: inc around (12)
Rounds 3–6: sc around (12)
Flatten the ear without stuffing and sew onto each side of the head.
Muzzle Pattern
Round 1: MR, 6 sc
Round 2: inc around (12)
Round 3: sc around (12)
Stuff lightly before sewing beneath the eyes.
Use black embroidery thread to create the nose with several horizontal stitches. Then add a simple vertical stitch below the nose followed by a small curved smile.
Attach the head securely to the body using matching yarn. Stitch slowly around the neck, making sure the head remains centered and stable.
Finally, sew the legs, ears, muzzle, and tail into place. Before tightening each stitch completely, check the overall symmetry from different angles to ensure everything looks balanced.
Personalize and Finish Your Crochet Puppy
One of the most exciting parts of the Easy Crochet Puppy Pattern for Beginners is customizing the final result. Tiny details can completely transform the puppy’s personality and make every project feel original.
Use different yarn colors to represent popular dog breeds. Brown, cream, black, gray, white, or spotted combinations all create beautiful results. You can even mix multiple shades to imitate your own pet.
Add small accessories like miniature scarves, bows, flowers, sweaters, bandanas, or tiny collars. These finishing touches make the crochet puppy even more adorable while giving you extra opportunities to practice creative crochet techniques.
If the toy is intended for babies or toddlers, replace safety eyes with embroidered eyes. This creates a child-friendly project while maintaining an equally cute appearance.
After completing the assembly, gently shape the puppy with your hands. Massage the stuffing evenly so the body feels smooth and balanced from every direction.
Most importantly, enjoy the creative process. Every puppy you crochet teaches new skills, improves stitch consistency, and builds confidence for future amigurumi projects.
FAQ
Is this really an Easy Crochet Puppy Pattern for Beginners?
Yes. The project mainly uses beginner-friendly stitches such as single crochet, increases, decreases, chain stitches, and slip stitches.
How long does it take to complete this crochet puppy?
Most beginners finish the project in one or two days, while experienced crocheters may complete it within a few hours.
What is the best yarn for this project?
Cotton and acrylic yarn are both excellent choices. Cotton offers clear stitch definition, while acrylic provides a softer finish.
Can I use a different hook size?
Yes. Just remember that changing the hook size may alter the finished dimensions of the puppy. Choose a hook that produces tight stitches so the stuffing does not show through.
How much stuffing should I use?
Stuff each piece firmly enough to hold its shape but avoid overfilling, which may stretch the stitches and reveal the stuffing.
Can I sell puppies made from this pattern?
In most cases, handmade finished items may be sold if they are your own work. However, always respect any licensing terms associated with the specific pattern you are using.
How can I make the puppy look more realistic?
Experiment with different ear lengths, embroidered facial expressions, color combinations, and gentle shaping while assembling the pieces.
What should I do if my stitch count becomes incorrect?
Count your stitches after every round, use stitch markers consistently, and correct mistakes immediately before continuing.
Conclusion
Creating an Easy Crochet Puppy Pattern for Beginners is a wonderful way to learn the fundamentals of amigurumi while making an adorable handmade companion. Throughout this guide, you learned how to gather the right materials, work the essential crochet stitches, crochet the head, body, legs, ears, muzzle, and tail, assemble every piece correctly, and personalize your puppy with creative details that make it truly unique.
With patience and regular practice, each new project will become neater, faster, and even more enjoyable. We hope this tutorial inspires you to continue exploring the world of crochet and to create many lovable handmade puppies.
If you enjoyed this article, please leave your honest opinion in the comments and share your suggestions. Your feedback helps improve future crochet tutorials and inspires new creative ideas for everyone in the crafting community.