
Necktie-shaped fabric keychain pattern is a creative and beginner-friendly sewing project that transforms small fabric scraps into a stylish and practical handmade accessory.
One of the greatest advantages of making a Necktie-shaped fabric keychain pattern is that it allows you to reuse leftover fabrics that might otherwise go to waste.
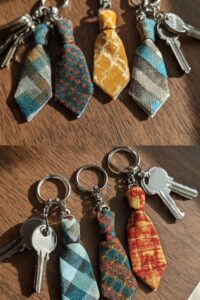
This tutorial explains every stage needed to recreate the project shown in the photo, from selecting suitable fabrics and cutting the tie shape to assembling, sewing, stuffing lightly if desired, and attaching the keyring hardware. Throughout this guide, you will discover practical sewing tips that improve the final finish while learning techniques that can be applied to many other handmade accessories. If you enjoy creating useful crafts with a professional appearance, this Necktie-shaped fabric keychain pattern will quickly become one of your favorite projects.
Choosing Fabrics and Preparing the Pattern
The first step in creating a beautiful Necktie-shaped fabric keychain pattern is selecting the right fabric. Medium-weight cotton is one of the best choices because it is easy to sew, presses well, and holds its shape. Denim, linen, canvas, quilting cotton, or fabric scraps with attractive prints also produce wonderful results.
Before cutting your fabric, press it carefully with an iron. Wrinkle-free fabric allows for more accurate cutting and cleaner seams, which is especially important for small projects like this miniature necktie.
To recreate the project shown in the photo, draw a simple necktie template on paper. A finished keychain usually measures approximately 12 to 15 cm (4¾ to 6 inches) long and about 4 cm (1½ inches) wide at the widest point. Fold the paper in half before cutting so both sides remain perfectly symmetrical.
Place the paper template on two layers of fabric with the right sides facing together. Trace around the template using a washable fabric marker or tailor’s chalk before cutting.
If you would like the keychain to feel firmer, cut one matching piece of lightweight fusible interfacing. Fuse it to the wrong side of one fabric piece according to the manufacturer’s instructions before sewing.
Finally, gather the remaining materials: matching thread, sewing machine or needle for hand sewing, scissors, sewing pins or clips, fabric turning tool, iron, polyester stuffing (optional), keyring hardware, and a small fabric loop or ribbon for attaching the metal ring.
Sewing the Miniature Necktie
Place both fabric pieces together with the right sides facing inward. Carefully align every edge and secure the layers with clips or fine sewing pins to prevent shifting while stitching.
Using a seam allowance of approximately 0.6 cm (¼ inch), sew around the entire tie shape. Leave a small opening of about 3 cm (1¼ inches) along one straight side so the project can be turned right side out after sewing.
Reduce bulk by trimming the seam allowance slightly, especially around the pointed tip and narrow neck area. Clip the corners carefully without cutting through the stitches. This allows the miniature necktie to lie flat after turning.
Turn the fabric right side out using a chopstick, blunt knitting needle, or fabric turning tool. Gently push out the pointed end until it becomes crisp and symmetrical without damaging the fabric.
Press the entire tie thoroughly with an iron. This step transforms the project, giving it sharp edges and a smooth professional appearance before the final stitching.
If you prefer a slightly padded keychain, insert a very small amount of polyester fiberfill before closing the opening. Otherwise, leave it flat for a more elegant and modern look similar to the project shown in the photo.
Finishing the Keychain Like a Professional
Close the turning opening using either a ladder stitch by hand or a narrow machine topstitch close to the edge. A neat closure greatly improves the finished appearance.
Create a small fabric loop measuring approximately 5 cm (2 inches) long or use a sturdy ribbon. Fold it in half and secure it at the top of the necktie where the knot would normally appear.
Insert the loop securely between several rows of stitching to ensure it can withstand daily use when attached to keys or bags.
Slide a metal split keyring through the fabric loop after the stitching is complete. Choose silver, gold, black, or antique bronze hardware depending on the overall style you want to achieve.
To make the Necktie-shaped fabric keychain pattern even more attractive, decorate it with decorative topstitching, embroidery, initials, small buttons, tiny labels, or fabric appliqués. These personal details transform a simple project into a memorable handmade gift.
Inspect the finished keychain carefully. Trim loose threads, press once more if necessary, and confirm that every seam is secure before using or gifting the accessory.
Creative Ideas and Helpful Sewing Tips
One of the best features of the Necktie-shaped fabric keychain pattern is its versatility. You can create classic business-style neckties using striped fabrics or playful versions using colorful prints, floral designs, polka dots, or novelty fabrics.
These miniature necktie keychains make thoughtful handmade gifts for Father’s Day, birthdays, graduations, weddings, retirement celebrations, teachers, coworkers, and anyone who appreciates handcrafted accessories.
Because the project uses very little fabric, it is perfect for reducing waste. Small quilting leftovers, denim scraps, shirt fabric, or recycled clothing can all become beautiful miniature neckties.
If you plan to sell handmade crafts, this project is ideal for craft fairs and online shops. It is inexpensive to produce, quick to sew, lightweight for shipping, and appeals to customers looking for practical handmade gifts.
Experiment with different dimensions to create unique collections. Smaller versions work well as zipper pulls, while larger neckties can become decorative ornaments for gift bags or backpacks.
Most importantly, enjoy the creative process. Every completed Necktie-shaped fabric keychain pattern improves your sewing accuracy, builds confidence with precision stitching, and encourages you to explore even more fabric scrap projects in the future.
FAQ
Is the Necktie-shaped fabric keychain pattern suitable for beginners?
Yes. This project uses straight seams, basic cutting techniques, and simple assembly, making it an excellent introduction to sewing small fabric accessories.
Which fabric works best?
Quilting cotton is the most beginner-friendly option, but denim, linen, canvas, and recycled shirt fabric also produce excellent results.
Do I need interfacing?
Interfacing is optional, but it helps the keychain keep its shape and gives it a more professional finish.
Can I sew this project entirely by hand?
Absolutely. While a sewing machine speeds up the process, careful hand stitching can produce equally beautiful results.
Should the keychain be stuffed?
Not necessarily. Most necktie keychains remain flat, but adding a tiny amount of polyester stuffing creates a softer three-dimensional appearance.
How can I personalize the keychain?
You can add embroidery, initials, decorative stitches, appliqués, fabric labels, buttons, or choose fabrics that reflect the recipient’s personality.
What size should the finished keychain be?
Most finished necktie keychains measure between 12 and 15 cm in length, although you can adjust the template to create larger or smaller versions.
Is this a good project for using fabric scraps?
Yes. It is one of the best scrap fabric projects because it requires only small pieces while producing an attractive and practical handmade accessory.
Conclusion
The Necktie-shaped fabric keychain pattern is a simple yet elegant sewing project that combines creativity, practicality, and sustainability. Throughout this tutorial, you learned how to select suitable fabrics, prepare an accurate template, cut the pieces, sew the miniature necktie, trim and turn the fabric correctly, press for crisp edges, attach the keyring hardware, and add personalized finishing touches for a professional result.
This project is perfect for beginners, experienced sewists, gift makers, and anyone who enjoys transforming fabric scraps into beautiful handmade accessories. With patience and attention to detail, you can create durable and stylish keychains that are both meaningful and functional.
e hope this guide inspires your next sewing project. If you enjoyed this tutorial, please leave your honest opinion and share your suggestions. Your feedback helps improve future sewing guides and inspires even more creative handmade ideas for everyone.