
Bee quilt pattern is a delightful quilting project that combines cheerful colors, nature-inspired details, and timeless patchwork techniques into a beautiful handmade creation.
One of the reasons the Bee quilt pattern has become so popular is its versatility. The same block can be repeated to create quilts of different sizes, allowing beginners and experienced quilters to customize the finished project according to their needs.
This tutorial explains every step needed to complete your own Bee quilt pattern, from selecting fabrics and cutting accurate pieces to assembling the quilt top and adding the finishing touches. The instructions are written using beginner-friendly language while also including useful techniques appreciated by experienced quilters. By working carefully through each stage, you will create a quilt that features crisp seams, balanced blocks, and beautiful quilting details that highlight the adorable bee design.
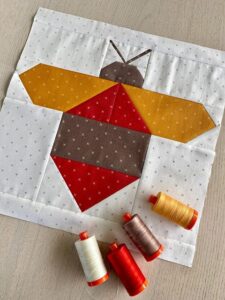
Choosing Fabrics and Preparing the Bee Quilt Pattern
The first step toward a successful Bee quilt pattern is selecting quality quilting cotton. Cotton fabrics are stable, easy to sew, and provide excellent durability. Choose bright yellow prints for the bee bodies, black fabrics for the stripes, white or cream fabrics for the wings, and soft background fabrics that allow the bees to stand out.
A balanced color palette makes a significant difference in the final appearance. Combining solid fabrics with subtle prints creates visual interest without overwhelming the bee blocks. Floral fabrics, tiny polka dots, and honey-themed prints work especially well together.
Before cutting, wash and press every fabric if desired. Although many quilters prefer working with unwashed fabric, prewashing can help reduce future shrinkage and remove excess dye from darker prints. Pressing ensures accurate measurements and cleaner cuts.
Use a rotary cutter, acrylic ruler, and self-healing cutting mat for precise cutting. Accurate pieces make block assembly much easier and help every seam align perfectly during construction.
For one bee block, prepare the following fabric pieces:
Background: 4 squares measuring 4½” × 4½”, 2 rectangles measuring 2½” × 6½”
Bee body: 2 yellow rectangles measuring 2½” × 4½”, 2 black rectangles measuring 2½” × 4½”
Bee wings: 2 white squares measuring 3½” × 3½”
Optional flower fabrics: assorted 2½” squares for decorative corner blocks.
Arrange all pieces on a design board before sewing. Seeing the complete layout allows you to adjust color placement and achieve a balanced quilt before stitching begins.
Sewing the Bee Blocks Step by Step
Begin by constructing the bee body. Sew one yellow rectangle to one black rectangle using a ¼-inch seam allowance. Press the seam toward the darker fabric. Repeat with the remaining rectangles to create the striped body.
Join both striped units together so the alternating colors form the bee’s body. Press carefully and verify that all edges remain square. Trimming slightly may improve accuracy if necessary.
Create the wings using the white squares. Draw a diagonal line on the wrong side of each square, place them on the upper corners of the body unit, sew directly on the marked line, trim the excess fabric leaving a ¼-inch seam allowance, then press open. This technique creates elegant angled wings with very little bulk.
Add the background rectangles to each side of the bee body. Sew slowly and maintain an even seam allowance throughout the process. Accurate seams ensure that every finished block remains the same size.
Attach the remaining background squares to complete the full block. Press each seam after sewing rather than waiting until the end. Frequent pressing keeps the block flat and improves overall accuracy.
Repeat these steps until you have enough bee blocks for your desired quilt size. A baby quilt may require only twelve blocks, while a lap quilt or bed quilt can include many more arranged in creative layouts.
Assembling the Quilt Top
Once all of your Bee quilt pattern blocks are complete, place them on a large table, design wall, or even the floor to experiment with different layouts. Moving the blocks around before sewing allows you to balance colors, prints, and background fabrics so the finished quilt has a harmonious appearance. Take your time during this stage because a thoughtful arrangement often makes the quilt look even more professional.
Separate the blocks into rows according to your chosen layout. Label each row with small sticky notes or numbered clips so the order remains correct while sewing. This simple organizational step prevents accidental block swaps and keeps the assembly process smooth from beginning to end.
Sew the blocks together one row at a time using a consistent ¼-inch seam allowance. After completing each row, press the seams in alternating directions. This technique allows the seams to nest together when joining the rows, creating sharper intersections and reducing bulk throughout the quilt.
Join the completed rows carefully, matching every seam before stitching. Use quilting pins or clips to hold the layers securely in place. Sewing slowly across seam intersections improves accuracy and helps every bee block line up beautifully.
If you would like to make the quilt larger, add coordinating sashing between the blocks. Strips measuring 2½ inches wide create a clean frame around each bee and make the individual blocks stand out. Cornerstones in matching yellow or floral prints can add even more visual interest.
Finish the quilt top by adding borders. A narrow inner border in black followed by a wider yellow or floral outer border complements the Bee quilt pattern perfectly. Measure each border carefully before attaching it to avoid stretching or rippling, ensuring the quilt remains flat and square.
Quilting, Binding, and Finishing Touches
After completing the quilt top, prepare the quilt sandwich by layering the backing fabric right side down, the batting in the middle, and the quilt top right side up. Smooth each layer carefully to eliminate wrinkles before securing everything with safety pins or temporary spray adhesive.
Choose a quilting design that enhances the cheerful bee theme. Simple straight-line quilting is perfect for beginners and gives the quilt a clean, modern appearance. More experienced quilters may enjoy free-motion quilting with swirls, flowers, leaves, loops, or even honeycomb-inspired motifs that beautifully complement the Bee quilt pattern.
Begin quilting from the center of the quilt and gradually work outward. This method helps distribute the fabric evenly and minimizes puckers. Sew at a comfortable pace and check the back of the quilt occasionally to ensure smooth, even stitches throughout the project.
Trim the excess batting and backing fabric after quilting is complete. Use a long ruler and rotary cutter to create perfectly straight edges before attaching the binding. Clean edges make the final finishing process much easier and contribute to a polished appearance.
Cut binding strips measuring 2½ inches wide, join them with diagonal seams, press them in half lengthwise, and sew them around the quilt using a ¼-inch seam allowance. Fold the binding to the back and hand stitch or machine stitch it securely for a neat finish that will withstand years of use.
Finally, inspect your completed quilt carefully. Clip loose threads, press the quilt gently, and admire your beautiful handmade creation. Your finished Bee quilt pattern can become a cozy blanket, a decorative wall hanging, a thoughtful baby gift, or a treasured family keepsake that celebrates both creativity and traditional quilting craftsmanship.
Frequently Asked Questions
Is the Bee quilt pattern suitable for beginners?
Yes. This project primarily uses basic patchwork techniques, straight seams, and simple shapes, making it an excellent choice for beginners who want to improve their quilting accuracy while creating an attractive finished quilt.
What fabric works best for this project?
High-quality quilting cotton is the preferred choice because it is stable, easy to sew, durable, and available in countless coordinating prints and colors.
What batting should I use?
Cotton batting provides a traditional appearance and natural feel, while cotton-polyester blends offer additional loft and durability. Either option works well depending on the finished look you prefer.
How large can I make the quilt?
The Bee quilt pattern is highly customizable. Simply create additional blocks to produce a baby quilt, lap quilt, throw, twin quilt, queen quilt, or even a king-size quilt.
Can I use fabric scraps?
Absolutely. This design is ideal for scrap quilting because the bees, flowers, and background pieces can all be created using smaller fabric cuts left over from previous quilting projects.
Which quilting design looks best?
Straight-line quilting is timeless and beginner-friendly, while free-motion flowers, leaves, loops, swirls, and honeycomb patterns beautifully emphasize the bee theme.
How should I care for the finished quilt?
Wash the quilt using a gentle cycle with mild detergent and cold water. Tumble dry on low heat or lay it flat to dry. Proper care helps preserve the colors, stitching, and overall beauty of your handmade quilt for many years.
Conclusion
Creating a Bee quilt pattern is a rewarding quilting experience that combines creativity, precision, and the timeless charm of handmade craftsmanship. Throughout this tutorial, you learned how to select coordinated fabrics, accurately cut every piece, assemble detailed bee blocks, arrange the quilt top, quilt the layers together, and complete the project with professional binding techniques. Each step contributes to a finished quilt that is both beautiful and durable.
This project also demonstrates how simple geometric shapes can be transformed into an eye-catching design inspired by nature. Whether you choose classic yellow and black fabrics or experiment with your own creative color palette, your finished quilt will reflect your personal style while celebrating the joy of quilting. As your skills continue to grow, you can easily adapt this design into larger quilts, table runners, wall hangings, cushions, or seasonal home décor.
I hope this Bee quilt pattern tutorial has inspired you to begin your next quilting project with confidence. Thank you for following this guide from start to finish. If you enjoyed this article, please leave your honest opinion, share your experience with the pattern, and send your suggestions. Your feedback is always appreciated and helps inspire even more creative quilting tutorials in the future.