
Crocheted fish pattern is a creative and enjoyable crochet project that combines simple stitches with charming details to create an adorable handmade fish.
One of the greatest advantages of making a Crocheted fish pattern is that it requires only a small amount of yarn, making it an excellent stash-busting project.
This tutorial explains every stage of creating your own Crocheted fish pattern, from selecting materials to assembling the finished piece. The instructions use beginner-friendly crochet stitches while also introducing shaping techniques that help improve your overall crochet skills. By following the step-by-step pattern below, you will learn how to crochet the body, shape the tail, attach the fins, and add the final decorative details that bring your fish to life. With patience and creativity, you can create a beautiful crochet fish that is both decorative and durable.
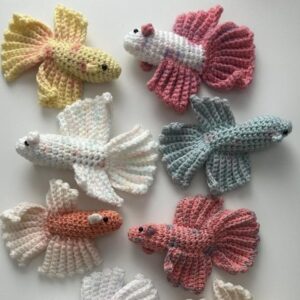
Choosing Materials and Starting the Crochet Fish
The first step in making a beautiful Crocheted fish pattern is selecting the right yarn. Cotton yarn provides excellent stitch definition and is ideal for appliques and decorations, while acrylic yarn creates a softer fish suitable for toys and ornaments. Choose bright colors such as orange, yellow, blue, turquoise, pink, or green to create a cheerful underwater theme.
Select a crochet hook that matches your chosen yarn. A 2.5 mm to 4 mm hook works well for lightweight yarns, while a 4 mm to 5 mm hook is suitable for worsted-weight yarn. Using a slightly smaller hook than recommended helps create tighter stitches that keep the stuffing securely inside the fish.
Before beginning, gather all the necessary supplies, including stuffing, scissors, stitch markers, a yarn needle, embroidery thread for facial details, and safety eyes if the fish is intended as decoration. If making the fish for babies or toddlers, embroidered eyes are the safest option.
Begin with a magic ring.
Round 1: Make 6 single crochet (sc) into the magic ring. Join with a slip stitch. (6)
Round 2: Work 2 sc in each stitch around. (12)
Round 3: 1 sc, increase. Repeat around. (18)
Round 4: 2 sc, increase. Repeat around. (24)
Continue increasing evenly until the fish reaches the desired body width. Maintain consistent stitch tension throughout the project to create a smooth and symmetrical body shape. Using stitch markers at the beginning of each round makes it easier to keep track of your progress.
Crocheting the Body and Shaping the Fish
After completing the increases, crochet one single crochet into each stitch around for several rounds without increasing. These rounds create the rounded body of the Crocheted fish pattern. The exact number of rounds depends on the size of fish you wish to make, but most decorative fish require six to eight straight rounds.
Begin decreasing gradually to taper the body. Work 2 sc, invisible decrease around the round. Continue decreasing evenly while lightly stuffing the fish as you go. Adding stuffing little by little produces a smoother finish than filling the body at the very end.
To create the tail, flatten the remaining opening after the body is stuffed. Crochet across both layers using single crochet stitches. This closes the body while providing a sturdy base for the tail fin.
Create the tail by chaining 10 stitches. Work back along the chain using single crochet, half double crochet, double crochet, half double crochet, and single crochet to form one curved fin. Repeat the same process on the opposite side to create a balanced tail.
Crochet two small side fins separately. Start with a chain of five stitches, then work one single crochet, one half double crochet, one double crochet, one half double crochet, and one single crochet. Sew each fin securely onto both sides of the body using matching yarn.
Finally, crochet a small top fin using the same technique and attach it to the center of the fish. Embroider a smiling mouth and decorative stripes if desired. At this stage, your Crocheted fish pattern already begins to display its unique personality and vibrant appearance.
Adding Details and Customizing Your Crocheted Fish Pattern
Now that the body is complete, it is time to personalize your Crocheted fish pattern with decorative details. This is where your creativity can truly shine. Use contrasting yarn colors to create stripes, spots, or scales that resemble tropical fish, clownfish, or even fantasy-inspired sea creatures. Small embroidered details can completely transform the final appearance.
To create embroidered scales, use a yarn needle and a slightly darker shade of yarn. Stitch small “V” shapes or overlapping semicircles across the body, starting from the tail and working toward the head. This simple technique adds texture without making the fish bulky.
If you prefer a more playful design, crochet tiny bubbles separately by making a magic ring with six single crochet stitches. These small circles can be attached around the fish if you are creating a wall decoration, nursery mobile, or ocean-themed garland.
Another fun option is adding small seaweed decorations. Chain 20 stitches using green yarn, then work two single crochet stitches into each chain to create a naturally curly effect. Sew one or two pieces near the fish if you are making a decorative hanging.
Experiment with different yarn textures to achieve unique results. Cotton yarn creates crisp stitch definition, while chenille yarn gives the fish a soft, plush appearance. Metallic or glitter yarn can also be used sparingly to create shimmering fins that resemble fish scales reflecting sunlight underwater.
After attaching every decorative piece, inspect your project carefully. Secure all loose ends, reinforce the fins and tail with extra stitches if needed, and lightly shape the fish with your hands. Taking a few extra minutes during finishing will greatly improve the durability and professional appearance of your Crocheted fish pattern.
Finishing, Care Tips, and Creative Uses
Once your Crocheted fish pattern is finished, gently shape it by hand to ensure the stuffing is evenly distributed. If necessary, add a little more fiberfill through a small opening before closing it completely. A well-shaped fish looks balanced and holds its form for years.
These crochet fish are incredibly versatile. They can be used as keychains, backpack charms, nursery decorations, children’s toys, party favors, holiday ornaments, garlands, or appliques for blankets, bags, and cushions. Their compact size makes them perfect for using leftover yarn from previous crochet projects.
If you plan to give the fish to a young child, always choose embroidered facial features instead of plastic safety eyes. This simple adjustment increases safety while maintaining the adorable look of the finished project.
To keep your crochet fish looking beautiful, wash it gently by hand using cool water and mild detergent. Press out excess water with a towel instead of twisting the project, then allow it to dry flat. Proper care helps preserve the shape, stitches, and vibrant colors.
As your confidence grows, try making fish in different sizes simply by changing the yarn weight and hook size. Smaller versions make wonderful keychains, while larger fish can become soft plush toys or decorative pillows for an ocean-themed room.
Most importantly, enjoy the creative process. Every completed Crocheted fish pattern helps improve your crochet skills while allowing you to create a unique handmade piece that reflects your personal style and imagination.
Frequently Asked Questions
Is this Crocheted fish pattern suitable for beginners?
Yes. The pattern mainly uses beginner-friendly stitches such as single crochet, increases, decreases, and simple shaping techniques. It is an excellent project for learning how to crochet three-dimensional toys.
What yarn is best for this project?
Cotton yarn provides excellent stitch definition, while acrylic yarn creates a softer finish. Both are great choices depending on how you plan to use the finished fish.
How long does it take to make one fish?
Most crocheters can complete one fish in approximately two to four hours, depending on the size of the project and their level of experience.
Can I make different types of fish?
Absolutely. By changing the colors, fin shapes, embroidery, and facial details, you can create tropical fish, clownfish, goldfish, angelfish, or completely imaginative sea creatures.
Can I sell finished crochet fish?
Yes. Handmade crochet fish are popular at craft fairs, gift shops, and online marketplaces. Many customers appreciate unique handmade decorations and toys.
How can I make the fish larger?
Use thicker yarn and a larger crochet hook while following the same stitch sequence. You can also add additional increase rounds and straight rounds to create a larger body.
What can I use the finished fish for?
A Crocheted fish pattern is perfect for nursery décor, baby mobiles, keychains, educational toys, ocean-themed garlands, gift toppers, backpack charms, seasonal decorations, and handmade gifts for family and friends.
Conclusion
Creating a Crocheted fish pattern is a rewarding crochet project that combines creativity, practical techniques, and colorful design. Throughout this tutorial, you learned how to choose the right materials, crochet the body using basic stitches, shape the tail and fins, add decorative details, and finish your project with professional-looking touches. These techniques can also be applied to many other amigurumi and crochet toy projects, helping you continue developing your crochet skills.
One of the greatest advantages of this project is its versatility. You can easily customize the colors, textures, and decorative elements to create fish that match different themes, seasons, or personal preferences. Whether you make a single fish or an entire collection, every finished piece becomes a unique handmade creation filled with personality and charm.
I hope this Crocheted fish pattern tutorial has inspired you to start your own crochet project with confidence. Thank you for following this guide from beginning to end. If you enjoyed this article, please leave your honest opinion, share your experience with the pattern, and send your suggestions. Your feedback is greatly appreciated and helps inspire even more creative crochet tutorials for the future.