
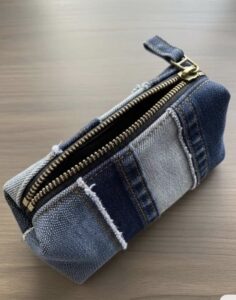
Jeans toiletry bag pattern is the perfect project for anyone who enjoys transforming old denim into beautiful and practical accessories.
One of the greatest advantages of making your own Jeans toiletry bag pattern is the ability to customize every detail according to your personal needs.
In this complete tutorial, you will learn how to transform recycled denim into a beautiful toiletry bag using simple sewing techniques and carefully planned construction steps. Every stage has been explained in a beginner-friendly way while maintaining professional sewing practices. By the end of this guide, you will have a durable organizer perfect for storing cosmetics, toiletries, travel essentials, craft supplies, or everyday accessories while giving new life to an old pair of jeans.
Choosing Materials and Preparing Your Denim Fabric
The first step in creating your Jeans toiletry bag pattern is selecting the right denim. Medium-weight denim from old jeans works exceptionally well because it is durable without being too bulky. Avoid overly stretched denim if possible, as stable fabric provides a cleaner finished structure.
Wash and iron the jeans before cutting any pieces. Prewashing removes dirt, softens the fabric, and prevents unexpected shrinking after the project is completed. Pressing the denim flat also makes measuring and cutting much more accurate.
For this project, cut two exterior denim rectangles measuring approximately 11 inches wide by 7 inches high (28 cm × 18 cm). These dimensions create a medium-sized toiletry bag suitable for travel or daily organization. You may increase or reduce these measurements depending on your desired finished size.
Cut two lining pieces using cotton fabric in the exact same dimensions as the denim exterior. Cotton lining adds a neat interior finish while making the bag lighter and easier to clean. If desired, choose waterproof lining fabric for additional protection against moisture.
To help the bag maintain its shape, cut two pieces of fusible interfacing measuring 11 × 7 inches (28 × 18 cm). Apply the interfacing to the wrong side of the denim using the manufacturer’s recommended pressing instructions. This reinforcement provides excellent structure without making the project excessively stiff.
Finally, prepare a zipper measuring approximately 10 inches (25 cm), matching sewing thread, fabric clips or pins, scissors, a rotary cutter if available, a ruler, and a sewing machine equipped with a denim or universal needle. Having all materials organized before sewing makes the process much smoother.
Sewing the Main Body of the Toiletry Bag
Begin assembling your Jeans toiletry bag pattern by attaching one denim exterior piece to one lining piece with the zipper sandwiched between them. Place the denim right side facing up, position the zipper with the teeth facing downward, then place the lining right side facing down. Stitch carefully using a zipper foot for neat results.
Repeat the same process on the opposite side of the zipper using the remaining denim and lining pieces. Once both sides are sewn, press the fabric away from the zipper and topstitch close to the zipper edge. This simple step keeps the fabric from catching when opening and closing the bag.
Open the zipper halfway before sewing the remaining seams. This is an important detail because it allows the bag to be turned right side out after stitching. Many beginners forget this step, making turning the bag much more difficult.
Arrange the exterior denim pieces right sides together and the lining pieces right sides together. Carefully align every edge and secure them with clips or pins before stitching around the entire perimeter.
Leave an opening of about 4 inches (10 cm) along the bottom edge of the lining. This opening will later be used to turn the finished bag right side out after all seams have been completed.
Stitch slowly around the project using approximately a ⅜-inch (1 cm) seam allowance. Reinforce the beginning and ending of each seam with backstitching to ensure long-lasting durability, especially since toiletry bags experience frequent handling.
Creating the Boxed Corners and Professional Finishing
The characteristic shape of the Jeans toiletry bag pattern comes from boxed corners. To create them, flatten one corner so that the side seam aligns perfectly with the bottom seam, forming a triangle. Measure approximately 2 inches (5 cm) across the point and draw a straight line.
Sew directly across the marked line, then trim away the excess fabric while leaving about ¼ inch (6 mm) beyond the seam. Repeat the same process for all four corners, including both the exterior and lining. These boxed corners give the bag depth and allow it to stand upright.
Carefully turn the bag right side out through the opening left in the lining. Gently push out each corner using a blunt turning tool or a chopstick without stretching the seams.
Close the opening in the lining using either a ladder stitch by hand or a narrow machine seam close to the folded edge. Both methods produce clean and secure results, although invisible hand stitching offers a more polished appearance.
Push the lining neatly inside the denim exterior and smooth all edges with your fingers. Press the finished bag carefully using medium heat appropriate for both denim and lining fabric to achieve crisp edges and a professional finish.
Finally, zip and unzip the bag several times to confirm that everything operates smoothly. The result should be a sturdy, spacious organizer with clean corners, balanced proportions, and a professional appearance suitable for daily use.
Creative Ideas for Customizing Your Jeans Toiletry Bag Pattern
One of the best features of the Jeans toiletry bag pattern is its flexibility. You can easily personalize the design by using different sections of recycled jeans, including back pockets, decorative seams, belt loops, or even embroidered details already present on the original garment.
Adding an exterior pocket from the original jeans creates extra storage for small items like lip balm, tissues, or travel-sized accessories. This simple addition also preserves the authentic denim character that makes recycled projects so charming.
If you enjoy patchwork, combine several shades of denim into geometric panels before cutting the main bag pieces. Mixing light and dark denim creates visual interest while making excellent use of leftover fabric scraps.
Decorative topstitching using contrasting thread can dramatically enhance the finished appearance. Traditional golden denim thread gives the project an authentic jeans-inspired style, while colorful thread creates a more playful and modern look.
For additional convenience, sew a small fabric handle onto one side of the bag before assembling the exterior. A wrist strap makes carrying the toiletry bag easier during travel and allows it to be hung when necessary.
You can also personalize the finished bag with fabric labels, embroidered initials, decorative patches, metal rivets, or simple quilting lines. These thoughtful details transform a practical organizer into a unique handmade accessory that reflects your personal style.
Frequently Asked Questions
Is the Jeans toiletry bag pattern suitable for beginners?
Yes. This project is beginner-friendly for anyone familiar with straight seams, zipper installation, and basic sewing machine operation. It is an excellent introduction to sewing structured bags.
What size should the finished bag be?
The suggested measurements create a medium-sized toiletry bag approximately 10 inches wide, 6 inches high, and 4 inches deep after sewing. These dimensions can easily be adjusted to suit your personal needs.
Can I use old jeans for this project?
Absolutely. Recycled denim is one of the best materials for this project because it is durable, sustainable, and gives every bag a unique appearance.
Do I need interfacing?
While the project can be completed without interfacing, adding fusible interfacing greatly improves the structure, helping the bag keep its shape even when empty.
Which zipper works best?
A standard nylon zipper measuring about 10 inches (25 cm) is ideal because it is flexible, easy to sew, and durable for everyday use.
Can I add waterproof lining?
Yes. Waterproof lining is an excellent choice for storing cosmetics, toiletries, or travel products that may occasionally leak.
How do I clean the finished bag?
Hand washing or using a gentle machine cycle with mild detergent is generally recommended. Allow the bag to air dry completely before using it again.
Can I sell bags made from this pattern?
Certainly. Handmade denim toiletry bags are popular at craft fairs, online handmade marketplaces, and gift shops due to their durability, practicality, and eco-friendly appeal.
Conclusion
The Jeans toiletry bag pattern is a rewarding sewing project that combines creativity, sustainability, and everyday functionality. Throughout this tutorial, you learned how to prepare recycled denim, cut accurate fabric pieces, install a zipper, sew the main body, create professional boxed corners, and finish the bag with clean construction techniques. You also discovered several creative customization ideas, including decorative pockets, patchwork panels, contrasting topstitching, handles, and personalized embellishments that make every project unique.
By following these step-by-step instructions, you can confidently create a durable and stylish denim toiletry bag that is perfect for organizing cosmetics, travel essentials, sewing supplies, or everyday accessories. Beyond creating a practical item, this project also gives new life to old jeans while helping you improve your sewing skills with techniques that can be applied to many future bag-making projects.
I hope you enjoyed this guide and feel inspired to make your own Jeans toiletry bag pattern. If you decide to sew this project, please leave your honest opinion about the tutorial and share your suggestions or creative ideas. Your feedback is always appreciated and may inspire other sewing enthusiasts to begin their own handmade denim creations.