
Fabric scissor holder pattern is one of the most practical sewing projects for anyone who loves quilting, patchwork, embroidery, or everyday sewing.
If you have ever searched for an easy sewing project that uses small fabric scraps, a Fabric scissor holder pattern is an excellent choice.
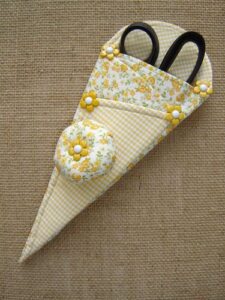
The project shown in the photo features a neat, well-shaped fabric holder designed to fit sewing scissors comfortably. The clean stitching, carefully selected fabric, and soft structure create an elegant accessory that looks professional while remaining simple to sew. Even if you are just beginning your sewing journey, you can successfully recreate this project by following each step carefully. The process is enjoyable, requires minimal supplies, and offers plenty of opportunities to personalize the final result with decorative stitching, embroidery, quilting, labels, lace, or colorful fabric combinations.
Choose the Best Materials for Your Fabric Scissor Holder Pattern
Start by selecting a high-quality cotton fabric for both the exterior and lining. Cotton is easy to sew, holds its shape well, and comes in countless beautiful prints. Quilting cotton is one of the best options because it is durable while remaining soft enough for everyday use.
Choose a coordinating lining fabric that complements the exterior. Using two different prints creates visual interest and gives the finished project a polished appearance. You may also use matching fabrics if you prefer a minimalist design.
To give the holder its structure, cut a piece of lightweight fusible interfacing. Iron the interfacing onto the wrong side of the exterior fabric before sewing. This simple step helps the holder maintain its shape over time.
If you prefer extra protection for your scissors, add a thin layer of batting between the exterior and lining fabrics. The batting creates a lightly padded finish that feels soft while helping to protect delicate scissor blades.
Good-quality thread is just as important as quality fabric. Matching thread creates invisible seams, while contrasting thread can become a decorative design feature that highlights topstitching around the edges.
Before cutting your fabric, press everything carefully with an iron. Smooth fabric produces more accurate cuts and cleaner seams, making the entire project easier to assemble while improving the professional appearance of the finished Fabric scissor holder pattern.
Prepare and Sew the Fabric Scissor Holder Pattern
Begin by measuring your sewing scissors carefully. Add approximately 1 inch (2.5 cm) around the scissors to allow for seam allowances and comfortable movement inside the holder. Draw the outline on paper first to create a reusable template before cutting your fabric.
Using the paper template, cut one exterior fabric piece, one lining piece, one interfacing piece, and, if desired, one batting piece. Keeping all pieces identical ensures the holder will align perfectly during assembly and reduces the need for adjustments later.
Fuse the interfacing to the wrong side of the exterior fabric according to the manufacturer’s instructions. If you are adding batting, place it behind the exterior fabric and secure it with a few quilting stitches or temporary spray adhesive before sewing.
Place the exterior fabric and lining fabric with their right sides facing together. Stitch around the edges using a ¼-inch seam allowance, leaving a small opening along one side so the project can be turned right side out after sewing.
Trim the seam allowances and carefully clip any curved sections without cutting through the stitching. This helps the curves lie flat once the holder is turned. Turn the project right side out through the opening and gently push out the corners using a blunt tool.
Press the entire holder with a warm iron until all seams are crisp and smooth. Fold the holder according to the shape shown in the photo, sew the side seams to create the pocket, and finish with a neat line of topstitching around the edges for added durability and a professional finish.
Customize Your Fabric Scissor Holder Pattern with Creative Details
One of the greatest advantages of making your own Fabric scissor holder pattern is the ability to personalize every detail. You can coordinate the fabric with your sewing room, match an existing sewing kit, or create seasonal designs for holidays and special occasions.
Decorative quilting adds both beauty and structure. Simple straight-line quilting, diagonal stitching, or small diamond patterns can transform a basic holder into an elegant handmade accessory while keeping the layers securely in place.
Embroidery is another wonderful option. Stitch initials, floral motifs, hearts, sewing-themed designs, or inspirational words onto the exterior fabric before assembling the holder. These small details make every piece unique.
Consider adding lace, ric-rac trim, piping, or decorative ribbon along the edges before sewing the lining. These embellishments provide extra texture without making the project difficult, even for beginners.
A fabric loop or small tab can be sewn into one corner, allowing the holder to hang from a pegboard, sewing cabinet, or wall organizer. This practical addition keeps your scissors easy to find while adding a charming decorative element.
For gift-giving, choose fabrics that reflect the recipient’s personality. Bright floral prints, classic patchwork fabrics, modern geometric patterns, vintage-inspired cottons, or cheerful seasonal colors all create beautiful handmade gifts that any sewing enthusiast will appreciate.
Tips for Finishing, Using, and Caring for Your Fabric Scissor Holder Pattern
Once your Fabric scissor holder pattern is complete, take a few extra minutes to inspect every seam and trim any loose threads. Small finishing touches make a noticeable difference and give your handmade accessory a polished, professional appearance. A carefully finished project is also more durable and will withstand daily use for years.
Test the fit by inserting your sewing scissors into the holder. The scissors should slide in easily while remaining secure when the holder is turned upside down. If the fit is too loose, you can sew a slightly deeper side seam. If it feels too tight, adjust your paper template before making another holder.
Topstitching is an important final step. Besides adding decorative detail, it strengthens the edges and helps the holder keep its shape after repeated use. Sew slowly and maintain an even distance from the edge for a clean, consistent finish.
To keep your fabric scissor holder looking beautiful, clean it gently whenever necessary. Most cotton fabrics can be hand-washed with mild soap and cool water. Allow the holder to air dry completely before placing your scissors back inside to prevent moisture from affecting the blades.
This project is also ideal for organizing different types of scissors. You can make separate holders for embroidery scissors, quilting scissors, fabric shears, pinking shears, and small craft scissors. Choosing different fabric prints for each holder makes identification quick and easy while adding color to your sewing room.
As your sewing skills improve, you can experiment with larger versions, quilted finishes, magnetic closures, snap buttons, or decorative appliqués. Every new version helps you practice sewing techniques while creating useful accessories that make your crafting space more organized and enjoyable.
Frequently Asked Questions
1. What fabric is best for a Fabric scissor holder pattern?
Medium-weight quilting cotton is one of the best choices because it is durable, easy to sew, and available in many beautiful designs. Adding lightweight interfacing helps the holder keep its shape.
2. Can beginners make this project?
Absolutely. This project uses basic sewing techniques such as straight stitching, turning fabric, pressing seams, and simple topstitching, making it ideal for beginners.
3. Do I need batting?
Batting is optional. While the holder can be made without it, adding a thin layer provides extra padding and better protection for your scissors.
4. Can I use fabric scraps?
Yes. One of the greatest advantages of a Fabric scissor holder pattern is that it requires only small pieces of fabric, making it perfect for reducing waste and using leftover quilting cotton.
5. How do I make the holder fit different scissors?
Simply measure your scissors before creating the paper template. Increase or decrease the pattern size according to the length and width of your scissors while maintaining enough room for easy insertion.
6. Can I sell fabric scissor holders that I make?
In many cases, yes. If you create the holder using your own sewing skills and original fabric choices, handmade scissor holders are popular items at local craft fairs, gift shops, and online handmade marketplaces. Be sure to respect any copyright restrictions if using someone else’s commercial pattern.
7. How can I decorate the holder?
You can personalize it with embroidery, quilting, appliqué, lace, buttons, ribbons, decorative labels, patchwork blocks, or contrasting fabrics. These details make every holder unique and reflect your own creative style.
8. Is this a good handmade gift?
Definitely. A handmade Fabric scissor holder pattern makes a thoughtful gift for sewists, quilters, embroiderers, crafters, teachers, and anyone who enjoys creative hobbies. Pairing it with a quality pair of scissors creates an especially memorable present.
Conclusion
Creating a Fabric scissor holder pattern is a rewarding sewing project that combines practicality, creativity, and style. Throughout this tutorial, you learned how to choose suitable materials, prepare the fabric, assemble the holder step by step, personalize it with decorative details, and finish it professionally for long-lasting use. This simple project is perfect for beginners while still offering endless customization opportunities for experienced sewists.
Beyond protecting your scissors, a handmade holder helps organize your sewing supplies, reduces wear on your tools, and adds a beautiful handcrafted touch to your workspace. Because it requires only a small amount of fabric, it is also an excellent way to use leftover materials from previous sewing projects.
I hope this guide has inspired you to create your own Fabric scissor holder pattern and enjoy the satisfaction of making a useful sewing accessory by hand. If you tried this project, I would love to hear your honest opinion. Please share your experience, leave your sincere feedback, and let me know your suggestions for future sewing tutorials. Your ideas and comments help inspire even more creative projects for the sewing community.