
Crochet mini rabbit bag pattern is a delightful project that combines creativity, functionality, and adorable design into one charming handmade accessory.
One of the reasons the Crochet mini rabbit bag pattern has become increasingly popular is its versatility. It can be customized with different yarn colors, facial expressions, flower embellishments, bows, or embroidered details to create a completely unique bag every time.
Besides being fun to crochet, this rabbit bag is also highly practical. Children love using it to carry small toys or treats, while adults often use it as a gift pouch, decorative organizer, or seasonal accessory. Handmade crochet bags always carry sentimental value because every stitch reflects time, patience, and creativity. Throughout this guide, you will learn the essential crochet stitches, discover helpful construction tips, and follow a detailed step-by-step process for creating your own beautiful rabbit bag that is both durable and attractive.
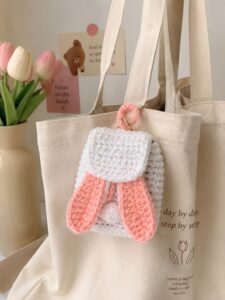
Materials, Tools, and Crochet Stitch Guide
Before beginning your Crochet mini rabbit bag pattern, gather all the necessary materials. Medium-weight cotton yarn is highly recommended because it provides excellent stitch definition, durability, and structure. Choose white, cream, gray, beige, or pastel colors for the rabbit body, along with pink yarn for the ears and black embroidery thread for the facial features. You will also need a 3.5 mm crochet hook, stitch markers, fiberfill for the ears if desired, scissors, and a tapestry needle for assembly.
Understanding the stitch abbreviations before starting will make the pattern much easier to follow. Most of the bag uses basic crochet stitches, making this project suitable for adventurous beginners and enjoyable for experienced crocheters alike.
Stitch Abbreviations:
Ch = Chain
MR = Magic Ring
Sc = Single Crochet
Hdc = Half Double Crochet
Dc = Double Crochet
Inc = Increase (2 Sc in one stitch)
Dec = Invisible Decrease
Sl St = Slip Stitch
FO = Fasten Off
Round 1:
Create a Magic Ring.
Work 6 Sc into the ring.
Join with Sl St.
(6 stitches)
Round 2:
Ch 1.
Work Inc in every stitch.
Join.
(12 stitches)
Round 3:
Sc, Inc around.
Join.
(18 stitches)
Round 4:
2 Sc, Inc around.
Join.
(24 stitches)
Rounds 5–14:
Sc evenly around without increasing to build the body of the bag. Continue checking the shape to ensure the sides remain straight and even.
Round 15:
Create the bag opening by working only part of the round according to the desired opening width. Chain across the opening to create the top edge, then continue working evenly around for two additional rounds to reinforce the opening. Fasten off and weave in all loose yarn ends neatly.
The shoulder strap can be made by chaining approximately 80–110 chains depending on the desired length. Return along the chain using Single Crochet or Half Double Crochet stitches for additional strength before sewing each end securely to the inside of the bag.
Creating the Rabbit Ears, Face, and Decorative Details
The signature feature of the Crochet mini rabbit bag pattern is undoubtedly the adorable pair of long rabbit ears. Begin each ear with a Magic Ring and gradually increase the stitches to create a gentle oval shape. After reaching the widest point, continue several rounds without increases before decreasing gradually toward the tip. Crochet two identical ears and lightly stuff them if you prefer a three-dimensional appearance.
To add the pink inner ear, crochet a smaller oval using the same shaping method or embroider the inner section directly onto the completed ear. Sew each inner ear securely onto the larger white ear before attaching them to the top of the bag. Positioning the ears symmetrically is important for achieving a balanced and polished final look.
Next, create the rabbit’s face using simple embroidery techniques. Small black French knots or embroidered circles work beautifully for the eyes, while a tiny pink triangle forms the nose. Add a short vertical stitch below the nose and several fine whiskers extending from each side of the face. These tiny details bring personality and charm to your finished rabbit bag.
To make your rabbit even more unique, consider adding small accessories such as a satin bow, a crocheted flower, tiny leaves, or a decorative button. These embellishments allow you to customize each bag according to the season, recipient, or personal style while keeping the overall design playful and elegant.
Carefully sew all components using matching yarn and small, secure stitches. Double-check that the ears, strap, and decorative pieces are firmly attached, especially if the bag is intended for children. Strong assembly significantly improves durability and ensures the finished project withstands everyday use.
Finally, inspect every seam and weave in any remaining loose ends. A neatly finished project not only looks more professional but also lasts much longer. Taking a few extra minutes during the finishing stage greatly enhances the overall quality of your handmade Crochet mini rabbit bag pattern.
Customizing, Assembling, and Finishing Your Crochet Mini Rabbit Bag
One of the greatest advantages of making a Crochet mini rabbit bag pattern is the freedom to customize every detail. While the classic version features a white rabbit with pink ears, you can experiment with soft gray, beige, brown, pastel blue, or even lavender yarn to create a unique character. Different color combinations allow you to match seasonal themes, children’s favorite colors, or holiday decorations while keeping the same easy construction method.
Assembly is one of the most important stages of the project. Before sewing the ears, face, and strap permanently, use stitch markers or sewing pins to position each piece temporarily. This allows you to step back and check the symmetry of the design. Even small adjustments can make a significant difference in the overall appearance of the finished bag, giving it a balanced and professional look.
If you would like your bag to hold its shape more firmly, consider adding a fabric lining. A lightweight cotton lining protects the crochet stitches from stretching while making the inside smoother for storing small belongings. Carefully sew the lining by hand using small hidden stitches so it remains invisible from the outside and complements the handmade finish.
The closure of the bag can also be personalized according to your needs. A simple crochet loop with a decorative button creates a classic look, while a magnetic snap offers a modern and secure closure. Wooden buttons, heart-shaped buttons, or flower buttons can add an extra decorative element without overwhelming the charming rabbit design.
Decorative embroidery is another wonderful way to personalize your project. You may add tiny flowers near one ear, embroider little hearts on the front, or stitch the recipient’s initials inside the bag. These thoughtful details transform a simple crochet accessory into a meaningful handmade keepsake that will be treasured for years.
After the entire bag has been assembled, gently block the finished project by lightly misting it with water and shaping it by hand. Allow it to dry completely on a flat surface before use. This final step smooths the stitches, improves the structure, and enhances the overall presentation of your Crochet mini rabbit bag pattern.
Creative Uses, Care Tips, and Gift Ideas
The completed Crochet mini rabbit bag pattern is much more than a cute accessory. Its compact size makes it ideal for carrying coins, lip balm, hair accessories, earbuds, small toys, keys, or other everyday essentials. Children especially enjoy using it as a playful mini purse during family outings or special occasions.
This adorable project also makes a thoughtful handmade gift for birthdays, Easter celebrations, baby showers, or holidays. Instead of giving candy or small presents on their own, place them inside the finished rabbit bag for a gift that is both practical and memorable. The reusable bag becomes part of the present itself and can be enjoyed long after the celebration.
If you sell handmade crochet items, this project is an excellent addition to your collection. Small crochet bags are popular because they require relatively little yarn while offering high visual appeal. Creating several versions in different colors and styles allows customers to choose their favorite while encouraging repeat purchases for gifts or seasonal decorations.
Proper care will help your rabbit bag remain beautiful over time. Hand wash gently using cool or lukewarm water and a mild detergent. Avoid harsh scrubbing or wringing the bag, as this may distort the stitches. Instead, carefully squeeze out excess water with a clean towel and reshape the bag before allowing it to dry naturally on a flat surface.
Store the bag in a cool, dry place away from direct sunlight for extended periods. If the ears become bent during storage, lightly dampen them and reshape them by hand. Cotton yarn generally responds very well to gentle blocking, allowing the bag to regain its original appearance with minimal effort.
Most importantly, enjoy every step of the creative process. Every completed Crochet mini rabbit bag pattern represents patience, craftsmanship, and imagination. Whether you create one for yourself, a loved one, or a customer, this cheerful project is sure to bring smiles while showcasing the timeless beauty of handmade crochet.
Frequently Asked Questions
1. Is the Crochet mini rabbit bag pattern suitable for beginners?
Yes. The project mainly uses basic crochet stitches such as Single Crochet, Slip Stitch, Chains, and simple increases and decreases, making it accessible for beginners with some basic crochet experience.
2. What yarn works best for this project?
Cotton yarn is highly recommended because it provides excellent stitch definition, durability, and structure. However, acrylic yarn can also be used if you prefer a softer finish.
3. How long does it take to complete the bag?
Most crocheters can finish the project in approximately four to eight hours, depending on their skill level, the amount of decorative detailing added, and the size of the bag.
4. Can I make the bag larger?
Absolutely. Simply continue adding increase rounds to the base and work additional rounds for the body before creating the opening. You can also lengthen the strap to suit your preferred style.
5. Can I add a zipper or lining?
Yes. A fabric lining improves durability and helps the bag keep its shape, while a zipper or magnetic snap provides additional security for the contents.
6. Is this project suitable for selling?
Yes. Handmade crochet rabbit bags are popular at craft fairs, online shops, and holiday markets. Offering several color variations can make your collection even more appealing.
7. Can children use this bag?
Yes, but ensure that all decorative pieces such as buttons or safety eyes are securely attached or replaced with embroidered details for very young children.
8. How should I clean the finished bag?
Hand wash gently using mild detergent, reshape while damp, and allow it to dry flat. Proper care will help preserve the stitches and maintain the bag’s appearance for years.
Conclusion
The Crochet mini rabbit bag pattern is a delightful project that combines creativity, functionality, and adorable design into one enjoyable crochet experience. Throughout this tutorial, you learned how to gather the appropriate materials, understand the essential crochet stitch abbreviations, construct the bag step by step, create the charming rabbit ears and facial features, personalize the finished design, and properly care for your handmade creation. Because this pattern uses fundamental crochet techniques while producing an impressive result, it is suitable for both beginners looking to improve their skills and experienced crocheters seeking a quick yet rewarding project.
Whether you crochet this mini rabbit bag as a thoughtful handmade gift, a charming accessory for a child, a seasonal decoration, or a product to sell at craft fairs, it is sure to become a favorite among your crochet creations. The endless possibilities for colors, embellishments, and finishing details allow every bag to become truly unique and reflect your personal style.
We hope this Crochet mini rabbit bag pattern has inspired you to pick up your crochet hook and enjoy creating something both practical and beautiful. If you enjoyed this tutorial, we would love to hear your honest opinion. Please share your experience, tell us how your project turned out, and leave your suggestions for future crochet patterns. Your feedback helps inspire new ideas and encourages a growing community of crochet enthusiasts to continue creating beautiful handmade pieces together.