
Fabric hat pattern projects are a wonderful way to combine creativity, practical sewing skills, and personal style into one enjoyable handmade accessory.
One of the greatest advantages of sewing a Fabric hat pattern is that it requires only a moderate amount of fabric while producing a beautiful finished accessory.
In this complete tutorial, you will learn how to create a beautiful Fabric hat pattern step by step. From choosing the best materials to assembling each section and adding professional finishing touches, every stage has been explained in simple language. By following these instructions carefully, you will be able to sew a stylish hat similar to the one shown in the photo while gaining valuable sewing experience that can be applied to many future projects.
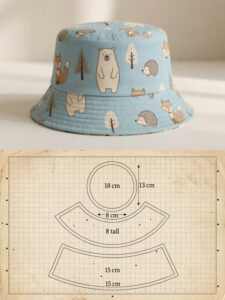
Choosing Materials and Preparing Your Fabric Hat Pattern
The success of every Fabric hat pattern begins with selecting suitable materials. Medium-weight cotton is one of the best choices because it is easy to sew, breathable, and comfortable to wear. Linen blends, lightweight canvas, chambray, and soft denim are also excellent options depending on the final style you want to achieve.
Before cutting your fabric, measure the head circumference where the hat will sit naturally. Most adult measurements range from 21 to 23 inches. Accurate measurements ensure a comfortable fit while avoiding unnecessary adjustments after assembly.
For a standard adult hat, prepare two crown pieces, one side band, one brim top, one brim bottom, and matching lining pieces. Cut identical interfacing pieces for every outer section to provide additional structure and help the hat maintain its shape over time.
Fuse lightweight or medium-weight interfacing onto the wrong side of the exterior fabric before beginning construction. This simple preparation step improves stability, prevents stretching, and creates a more professional-looking finished project.
Gather all the sewing supplies before starting. You will need matching thread, sewing scissors, rotary cutter if available, quilting ruler, pins or sewing clips, fabric marker, measuring tape, iron, ironing board, and a sewing machine with a universal needle.
Press every fabric piece immediately after cutting. Flat fabric makes sewing much more accurate, improves seam alignment, and helps every section fit together smoothly during assembly.
Step-by-Step Instructions to Sew the Hat
Begin by sewing the crown sections together with right sides facing. Stitch slowly using a ¼-inch seam allowance, matching every curve carefully. Press each seam open to reduce bulk and create a smooth rounded shape.
Next, prepare the side band by joining the short ends together to form a circle. Press the seam open and divide both the crown and band into equal quarters using pins. Matching these reference points makes attaching curved pieces much easier.
Pin the side band evenly around the crown, aligning all quarter marks. Sew slowly while easing the curves gently without stretching the fabric. Remove pins gradually as you sew for greater accuracy.
Prepare the brim by placing the upper and lower brim pieces together with interfacing attached to the outer layer. Stitch around the outside edge, trim the seam allowance slightly, clip curves where necessary, and turn the brim right side out before pressing.
Topstitch around the brim approximately ⅛ inch from the outer edge. For additional strength and decorative appeal, sew several parallel rows of stitching across the brim. These rows also help maintain its shape during regular use.
Repeat the same construction process using the lining pieces. Since the lining sits inside the hat, it generally does not require heavy interfacing, allowing it to remain soft and comfortable against the head.
Assembling and Finishing the Fabric Hat Pattern
Place the completed brim onto the lower edge of the exterior hat with right sides together. Pin evenly around the entire circumference and stitch slowly using a consistent seam allowance. Press carefully after sewing.
Insert the completed outer hat into the lining with right sides facing each other. Match all seams carefully and pin around the entire upper edge before stitching. Accurate seam matching gives the finished hat a symmetrical appearance.
Leave a small opening in the lining to turn the entire hat right side out. Carefully pull every section through the opening, taking your time around curved areas to avoid stretching or damaging the seams.
Close the opening by hand using an invisible ladder stitch or sew very close to the folded edge with your machine. Push the lining neatly inside the hat and smooth every seam before pressing thoroughly.
Topstitch around the lower edge where the brim joins the hat. This finishing stitch secures the lining, strengthens the construction, and gives the project a polished professional appearance.
Give the entire hat one final press using steam if appropriate for your chosen fabric. Shape the crown gently with your hands and allow the hat to cool completely before wearing. This final pressing step helps the hat hold its intended form.
Creative Ideas to Personalize Your Fabric Hat Pattern
One of the best aspects of a Fabric hat pattern is its versatility. You can create elegant everyday hats, children’s sun hats, gardening hats, picnic accessories, or fashionable travel hats simply by changing the fabric selection and decorative details.
Decorate the finished hat with fabric flowers, bows, embroidered initials, lace trim, decorative stitching, or handmade labels. These small additions transform a simple sewing project into a unique personalized accessory.
Seasonal fabrics create beautiful results throughout the year. Floral prints are perfect for spring, tropical cottons brighten summer outfits, plaid fabrics complement autumn wardrobes, and darker textured fabrics suit cooler weather beautifully.
If durability is important, consider reinforcing high-stress areas with additional rows of stitching. Double stitching around the brim and crown provides extra strength for hats that will be worn frequently.
This project also offers an excellent opportunity to use fabric scraps. Coordinating leftover quilting cottons can be combined creatively to produce colorful patchwork hats while reducing fabric waste.
As your sewing confidence grows, experiment with wider brims, reversible designs, contrasting linings, adjustable sizing bands, or decorative quilting. Every new version of your Fabric hat pattern will improve your skills while allowing you to express your personal style.
FAQ
Is a Fabric hat pattern suitable for beginners?
Yes. Basic sewing skills are enough to complete this project successfully. Careful pinning and slow stitching around curves make the process much easier for beginners.
Which fabric is best for sewing a fabric hat?
Medium-weight cotton is the most popular choice because it is breathable, easy to sew, and comfortable to wear. Linen blends and lightweight canvas are also excellent options.
Do I need interfacing?
Using interfacing is highly recommended. It helps the hat maintain its shape, especially around the brim and crown, while giving the finished project a more professional appearance.
Can I make different sizes?
Absolutely. Simply adjust the head circumference measurement before cutting your pattern pieces. Children’s and adult sizes follow the same construction method with different dimensions.
Can this hat be machine washed?
Yes, provided that washable fabrics and quality interfacing are used. Wash on a gentle cycle, reshape while damp, and allow the hat to air dry for best results.
How can I make the hat more decorative?
You can personalize your hat with embroidery, decorative trims, appliqués, patchwork panels, contrasting fabrics, fabric flowers, ribbons, or custom labels to create a one-of-a-kind handmade accessory.
Conclusion
Sewing your own Fabric hat pattern is a satisfying project that combines practical sewing techniques with endless creative possibilities.
Throughout this guide, you learned how to choose the right materials, prepare accurate pattern pieces, construct the crown, band, brim, and lining, assemble every section correctly, and finish the hat with professional details. By following these step-by-step instructions, you can confidently create a comfortable, durable, and stylish handmade hat that reflects your personal taste.
As your experience grows, you can experiment with new fabrics, colors, decorative elements, and sizes to make every project unique. Thank you for taking the time to read this tutorial. We would love to hear your honest opinion about this Fabric hat pattern, learn about your sewing experience, and receive your suggestions for future handmade projects and tutorials.