
Spiderweb crochet blanket pattern designs are a creative and eye-catching way to combine traditional crochet techniques with a striking geometric motif.
One of the reasons the Spiderweb crochet blanket pattern has become so popular is its versatility. Depending on your yarn colors, the finished blanket can look elegant, modern, playful, or seasonal.
This complete guide explains every stage of the crochet process using beginner-friendly stitch abbreviations and detailed instructions. You will learn how to create the center of the web, expand the circular design evenly, maintain stitch consistency, shape the blanket, and finish it with an attractive border. By the end of this tutorial, you will have the confidence to customize your own Spiderweb crochet blanket pattern while improving your crochet skills and creating a handmade blanket that is both beautiful and practical.
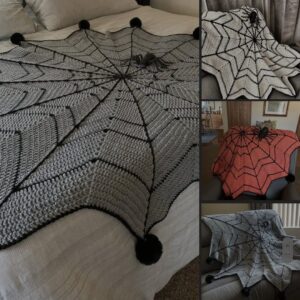
Materials and Crochet Stitch Guide
Before beginning your Spiderweb crochet blanket pattern, gather all of your supplies. Preparing your materials in advance helps the project progress smoothly and ensures consistent stitch tension.
Choose a soft worsted-weight or DK-weight yarn for a blanket that is warm without becoming too heavy. Acrylic yarn is popular because it is durable and easy to care for, while cotton blends provide excellent stitch definition.
Select a crochet hook recommended for your chosen yarn. If you prefer a softer drape, use a slightly larger hook, but always maintain even tension throughout the project.
Additional materials include stitch markers, scissors, a yarn needle for weaving in ends, and measuring tape for checking the blanket size as you crochet.
The crochet abbreviations used throughout this guide include:
ch = chain
sl st = slip stitch
sc = single crochet
hdc = half double crochet
dc = double crochet
tr = treble crochet
sp = space
FO = fasten off
Before moving to the next round, count your stitches carefully. Maintaining accurate stitch counts is essential for preserving the symmetrical spiderweb appearance as the blanket grows.
Crocheting the Spiderweb Center
Begin your Spiderweb crochet blanket pattern by creating a magic ring or chaining 4 stitches and joining them with a slip stitch to form a small circle.
Round 1: Ch 3 (counts as the first dc), work 15 dc into the center ring. Join with a sl st to the top of the beginning chain. (16 dc)
Round 2: Ch 4, dc in the same stitch, ch 2, skip one stitch, (dc, ch 2, dc) in the next stitch. Repeat around to create evenly spaced web sections.
Round 3: Sl st into the first chain space. Ch 3, work 2 dc, ch 2, 3 dc in each chain space around. Join with a slip stitch.
Round 4: Continue expanding each section by working additional groups separated by chain spaces. The repeated increases create the characteristic web structure.
Continue following the same principle for additional rounds, increasing evenly while maintaining identical spacing between every web segment. The growing circular pattern gradually forms the elegant spiderweb appearance.
Use stitch markers to identify the beginning of each round if needed. This simple habit helps maintain accurate stitch placement throughout the blanket.
Expanding the Blanket and Maintaining the Pattern
Once the center is complete, continue growing your Spiderweb crochet blanket pattern by repeating the established stitch sequence while adding increases at the same locations in every round.
Each new round should maintain equal spacing between the web lines. Consistent increases keep the blanket lying flat while preserving the balanced circular shape.
If your blanket begins to curl, you may need additional increases. If the edges become wavy, slightly reduce the number of increases in the following round.
Continue measuring the blanket periodically to ensure it reaches your desired dimensions. Lap blankets, baby blankets, and throw blankets all require different finished sizes, so planning ahead helps avoid unnecessary adjustments later.
As the blanket grows larger, gently spread it across a flat surface from time to time. This allows you to inspect the web design and identify any stitch count errors before they become difficult to correct.
Once the blanket reaches the desired size, finish the final spiderweb round with a neat slip stitch and prepare for the decorative border.
Adding the Border and Creative Customization Ideas
The border gives your Spiderweb crochet blanket pattern a polished and finished appearance while helping stabilize the outer edges.
Begin with one complete round of single crochet around the entire blanket, placing additional stitches where necessary to maintain a smooth edge.
Follow with one or two rounds of half double crochet or double crochet if you prefer a wider border. Consistent tension creates a clean, professional finish.
For a decorative touch, consider adding small picots, shell stitches, or scalloped edging. These simple borders soften the geometric web pattern while adding extra visual interest.
Experiment with color changes throughout the blanket. Gradual ombré transitions, alternating rounds, or contrasting borders all produce dramatically different finished designs while using the same basic construction method.
Once completed, weave in every yarn end carefully and lightly block the blanket if desired. Blocking helps open the stitch pattern, smooth the edges, and showcase the elegant spiderweb design beautifully.
Frequently Asked Questions
Is the Spiderweb crochet blanket pattern suitable for beginners?
Yes. Beginners who are comfortable with basic crochet stitches and working in the round can successfully complete this project with patience and careful stitch counting.
Which yarn works best?
Soft acrylic, cotton blends, or wool blends all work well depending on your preferred warmth, texture, and ease of care.
Can I make the blanket larger?
Absolutely. Simply continue repeating the established increase pattern until the blanket reaches your preferred dimensions.
Why is my blanket curling?
Curling usually indicates too few increases. Carefully review your stitch count and add the necessary increases in the following rounds.
Why are my edges wavy?
Excessive increases may cause rippling. Reducing the number of increases slightly can help the blanket lie flat again.
Can I use multiple colors?
Yes. Color changes are one of the easiest ways to personalize your blanket and create unique visual effects.
Can I wash the finished blanket?
Most acrylic and cotton yarns can be washed gently according to the manufacturer’s care instructions. Always check the yarn label before washing.
Can I sell blankets made from this pattern?
Yes. Handmade crochet blankets are popular at craft fairs and online handmade marketplaces, provided your finished products comply with applicable laws and marketplace guidelines.
Conclusion
Creating a Spiderweb crochet blanket pattern is a rewarding crochet project that combines elegant stitch work with a striking geometric design. Throughout this tutorial, you learned how to choose suitable materials, understand the essential crochet abbreviations, build the spiderweb center, expand the circular pattern evenly, maintain consistent stitch counts, add a polished border, and finish the blanket with professional-looking details. These techniques strengthen your crochet skills while allowing you to create a unique blanket that is both decorative and functional.
One of the greatest strengths of the Spiderweb crochet blanket pattern is its remarkable versatility. By experimenting with different yarn colors, border styles, blanket sizes, and decorative stitch combinations, you can create blankets that range from bold seasonal décor to timeless everyday home accessories. Whether displayed across a sofa, folded at the end of a bed, or given as a thoughtful handmade gift, every finished blanket becomes a beautiful reflection of your creativity and craftsmanship.
Thank you for reading this Spiderweb crochet blanket pattern tutorial. I hope this guide inspires you to begin your own crochet blanket and enjoy every stitch along the way. If you found this article helpful, please leave your honest opinion, share your experience with the pattern, and send your suggestions for future crochet tutorials. Your feedback is greatly appreciated and helps inspire even more creative handmade projects.