
Crochet Halloween Skull Pattern is the perfect project for crafters who love creating festive decorations with yarn while improving their crochet skills.
Crocheting seasonal decorations is an enjoyable way to celebrate special occasions while using affordable materials.
One of the greatest advantages of making your own Crochet Halloween Skull Pattern is the opportunity to personalize every detail. You can choose traditional white and black colors, create colorful sugar skull-inspired versions, or experiment with glow-in-the-dark yarn for a dramatic Halloween effect. By following this detailed tutorial, you will learn not only how to crochet the skull but also how to improve stitch consistency, shape symmetry, and finishing techniques for a polished handmade result.
Materials and Crochet Stitches Needed
Before beginning your Crochet Halloween Skull Pattern, gather all your supplies. Having everything prepared before you start makes the crocheting process smoother and more enjoyable. Cotton yarn works especially well because it creates excellent stitch definition, although acrylic yarn is also a great option for decorative projects.
Recommended materials include medium-weight yarn, a 3.5 mm or 4 mm crochet hook, scissors, a yarn needle, stitch markers, and optional fiberfill if you plan to make a three-dimensional skull. These basic supplies are commonly found in most crochet kits and are suitable for beginners and experienced crafters alike.
Understanding the basic stitches is essential before starting. The project primarily uses Magic Ring (MR), Chain (ch), Slip Stitch (sl st), Single Crochet (sc), Half Double Crochet (hdc), Double Crochet (dc), Increase (inc), and Invisible Decrease (dec). Practicing these stitches beforehand will help create a cleaner and more even finished piece.
Begin with a Magic Ring. Work 6 single crochet stitches into the ring, tighten gently, and join with a slip stitch. This creates a solid center that forms the top of the skull. The Magic Ring helps eliminate the small hole often left by traditional starting chains.
Round 2 consists of increasing in every stitch around. Crochet two single crochet stitches into each stitch, ending with 12 stitches total. This establishes the circular shape that becomes the skull’s rounded head.
Round 3 follows an increase pattern of one single crochet followed by one increase around the circle. Continue counting your stitches carefully to maintain symmetry. Consistent stitch tension is one of the secrets to achieving a professional-looking crochet project.
Step-by-Step Crochet Halloween Skull Pattern
Round 4 continues the shaping process by crocheting two single crochet stitches followed by one increase around. At this stage, the head should appear evenly rounded without curling or becoming wavy. If necessary, adjust your hook size depending on your yarn tension.
Rounds 5 through 7 are worked with one single crochet in every stitch around. These rounds build the height of the skull while maintaining the circular structure. Keep your stitch marker in place to identify the beginning of each round easily.
To begin forming the lower portion of the skull, work invisible decreases evenly around the next round. Invisible decreases provide a much smoother finish than traditional decreases, making the facial shape look cleaner and more realistic.
Create the eye sockets by leaving two oval openings. One method is to crochet chains over selected stitches and continue working around them. Another option is to embroider black yarn afterward to create eye shapes if you prefer a flatter design.
For the nose, crochet a small upside-down triangle using slip stitches and single crochet stitches or embroider it with black yarn after completing the skull. This tiny detail dramatically improves the overall appearance of the finished project.
Finish the bottom jaw by adding a row of single crochet stitches followed by small chain spaces that resemble individual teeth. You may use chain-2 spaces separated by slip stitches or alternate short stitches to achieve the desired decorative effect.
Creative Ideas to Customize Your Skull
One of the most enjoyable aspects of making a Crochet Halloween Skull Pattern is customizing the final appearance. Although classic white skulls remain popular, there are countless ways to personalize your project for different decorating styles.
Consider using cream, gray, or ivory yarn instead of bright white for a vintage appearance. Soft neutral shades create a realistic antique effect that works beautifully in rustic Halloween decorations.
For a colorful Day of the Dead-inspired project, decorate your skull with embroidered flowers, colorful outlines, or bright crochet appliqués. Vibrant colors such as pink, turquoise, orange, purple, and yellow create cheerful seasonal decorations.
Glow-in-the-dark yarn offers another exciting option. During daylight, the skull appears elegant and simple, while at night it glows, making it perfect for Halloween parties or children’s room decorations.
Small embellishments such as satin bows, miniature crochet flowers, lace edging, beads, or tiny buttons can transform each skull into a unique decorative piece. Always attach embellishments securely if the project will be handled frequently.
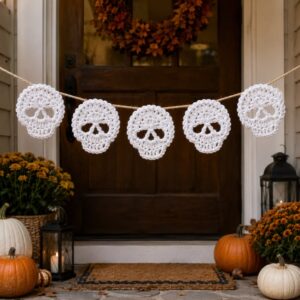
Multiple finished skulls can be joined together to create garlands, banners, table runners, wall hangings, wreaths, pillow covers, tote bag decorations, or festive blankets. The versatility of this Crochet Halloween Skull Pattern makes it ideal for many creative seasonal projects.
Tips for a Professional Crochet Finish
Maintaining even yarn tension is one of the most important factors in creating a polished crochet project. Avoid pulling the yarn too tightly or leaving stitches excessively loose. Balanced tension results in smoother shaping and cleaner stitch definition.
Always count your stitches after completing each round. Even experienced crocheters occasionally skip or accidentally add stitches. Regular counting helps prevent mistakes from becoming difficult to correct later.
Weave in yarn tails carefully using a yarn needle. Hiding loose ends inside stitches keeps the finished project neat while increasing durability. Secure every end properly, especially if the decoration will be handled frequently.
Blocking is optional but can improve the final appearance significantly. Lightly steam or wet-block the finished skull according to the yarn manufacturer’s recommendations to smooth uneven stitches and enhance symmetry.
If making multiple skulls, keep notes regarding hook size, stitch count, and yarn brand. Consistency allows every finished piece to match beautifully, especially when creating banners, garlands, or matching home décor.
Finally, enjoy the creative process. Handmade decorations reflect personality and craftsmanship. Each completed Crochet Halloween Skull Pattern becomes more than a seasonal ornament—it becomes a unique handmade keepsake that showcases your growing crochet skills.
FAQ
Is the Crochet Halloween Skull Pattern suitable for beginners?
Yes. Beginners who already know basic stitches such as chain, single crochet, and slip stitch can complete this project by following the instructions carefully.
Which yarn works best?
Cotton yarn provides crisp stitch definition, while acrylic yarn is soft, affordable, and available in many Halloween colors.
Can I make the skull larger?
Absolutely. Use thicker yarn and a larger crochet hook or continue adding increase rounds before shaping the lower portion.
How long does this project usually take?
Most crocheters finish one skull within one to three hours, depending on experience and the amount of decorative detail added.
Can I wash the finished skull?
Yes. Follow the washing recommendations for your chosen yarn. Hand washing and air drying are usually the safest methods for decorative crochet items.
What can I use the finished skull for?
It can be used as a wall decoration, appliqué, coaster, bunting, garland, ornament, pillow embellishment, gift tag, keychain, or Halloween party decoration.
How do I keep the skull flat?
Maintain consistent tension throughout the project, count stitches carefully, and block the finished piece if necessary.
Can children learn this project?
Yes, with adult supervision and basic crochet knowledge, older children and teenagers can enjoy making this fun seasonal decoration.
Conclusion
Creating your own Crochet Halloween Skull Pattern is an enjoyable way to celebrate Halloween while practicing valuable crochet techniques.
Throughout this guide, you learned which materials to use, the essential crochet stitches, the complete step-by-step construction process, creative customization ideas, and practical finishing techniques that give your project a polished appearance. Whether you choose a traditional white skull, a colorful decorative version, or a glow-in-the-dark design, every handmade piece reflects your creativity and craftsmanship.
Thank you for reading this tutorial. I hope it inspires you to start your own Crochet Halloween Skull Pattern and enjoy every stitch along the way. If you tried this project, I would love to hear your honest opinion. Please share your experience, suggestions, and creative ideas, as your feedback may inspire other crochet enthusiasts and help improve future tutorials.