
Cat quilt pattern projects are a wonderful way to combine creativity, quilting skills, and a love for cats into one beautiful handmade design.
A handmade Cat quilt pattern offers endless customization opportunities. You can create realistic cats using natural fabric colors or design playful cats with floral, polka-dot, striped, or Halloween-themed fabrics.
Quilting remains one of the most rewarding sewing hobbies because every project tells a story through fabric and color. A Cat quilt pattern is especially popular among animal lovers, making it a thoughtful handmade gift for birthdays, baby showers, housewarming presents, or holiday celebrations. By following this detailed tutorial, you will learn how to cut, assemble, sew, press, and finish your quilt block while achieving a clean and professional appearance.
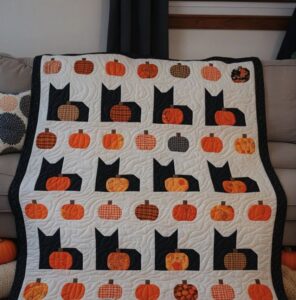
Materials and Fabric Preparation
Before starting your Cat quilt pattern, gather all the necessary materials. Preparing your supplies before sewing helps maintain accuracy and makes the quilting process much more enjoyable. High-quality quilting cotton is recommended because it presses beautifully and produces crisp seams.
For one 12-inch finished cat block, prepare one fat quarter for the cat body, one fat quarter for the background, small fabric scraps for the nose or decorative details if desired, coordinating sewing thread, rotary cutter, acrylic ruler, self-healing cutting mat, quilting pins or clips, iron, ironing board, and a sewing machine fitted with a quarter-inch presser foot.
Cut two background squares measuring 4½” x 4½”. These will become the upper corners surrounding the cat’s ears. Cut one rectangle measuring 4½” x 8½” for the body. Next, cut two squares measuring 2½” x 2½” for the ears and two background squares of the same size to complete the ear units.
To create the ears, place one background square on top of one cat fabric square with right sides together. Draw a diagonal line from one corner to the opposite corner and sew a quarter inch on each side of the line. Cut along the center line, press open, and trim if necessary. Repeat for the second ear unit.
Cut one rectangle measuring 2½” x 8½” for the top of the head and one rectangle measuring 2½” x 8½” for the lower face if your chosen design includes facial proportions similar to the reference image. Accurate cutting ensures every seam aligns perfectly.
Finally, organize all pieces on your design wall or sewing table before stitching. This simple preparation step allows you to preview the final appearance, adjust color placement, and prevent assembly mistakes before sewing begins.
Sewing the Cat Quilt Block Step by Step
Begin assembling the ear section by sewing each ear unit between the two upper background squares. Press all seams toward the darker fabric whenever possible to reduce visible shadowing beneath lighter fabrics.
Next, attach the ear section to the top head rectangle using a consistent ¼-inch seam allowance. Press carefully without stretching the fabric. Maintaining straight seams is one of the keys to producing a professional-looking Cat quilt pattern.
Sew the lower face rectangle beneath the head section. If desired, embroider whiskers, eyes, and a tiny nose after completing the quilt top rather than adding small fabric pieces during assembly. Embroidery often provides cleaner facial details.
Now attach the completed head section to the large body rectangle. Match the center points carefully before sewing. Use quilting clips or pins if needed to prevent shifting while stitching.
After assembling the main block, measure it carefully. Before adding the quilt borders or joining additional blocks, trim the unit so it measures exactly 12½” unfinished. Consistent block sizing is essential when creating larger quilts.
Press the finished block one final time using gentle upward and downward motions instead of sliding the iron. This prevents fabric distortion while producing sharp, flat seams that enhance the overall appearance of your quilt.
Creative Ways to Customize Your Cat Quilt Pattern
One of the best features of a Cat quilt pattern is its flexibility. Every finished block can look completely different simply by changing the fabric selection. Neutral fabrics create realistic cats, while colorful prints produce cheerful decorative quilts.
Consider using floral fabrics for the cat body to create a cottage-inspired quilt. Tiny flowers, pastel colors, and soft backgrounds produce a charming vintage appearance suitable for spring decorations or baby quilts.
Seasonal fabrics also work beautifully. Orange and black prints create Halloween-themed cats, while red plaid fabrics make festive Christmas kittens. Fall leaves, pumpkins, snowflakes, or hearts can coordinate with different holiday collections.
If you enjoy modern quilting, use solid fabrics combined with bold background colors. Black cats against bright white backgrounds create striking contrast, while colorful rainbow cats produce playful contemporary designs.
Personalize your quilt further by adding embroidered names, decorative bows, tiny fabric flowers, or quilted paw prints around the completed blocks. These details make each project truly one of a kind.
Multiple finished cat blocks can be combined into baby quilts, lap quilts, table runners, wall hangings, tote bags, cushion covers, placemats, or seasonal home decorations. Mixing several cat colors within one quilt creates extra visual interest.
Finishing and Quilting Your Project
Once your quilt top is assembled, layer the quilt top with batting and backing fabric. Smooth every layer carefully before pinning or basting to eliminate wrinkles and puckers during quilting.
Choose quilting designs that complement the playful nature of the Cat quilt pattern. Gentle loops, meandering stitches, paw prints, fishbone motifs, hearts, or simple straight-line quilting all work beautifully with this design.
When quilting around the cat, consider outlining the ears, head, and body with stitching approximately one-quarter inch from the seams. This subtle technique helps define the cat while adding texture to the finished quilt.
Trim the completed quilt evenly before attaching the binding. Double-fold binding made from coordinating fabric provides durability while creating a neat, polished border around the quilt.
Hand-finish or machine-finish the binding according to your preferred quilting style. Take your time when sewing the corners to achieve crisp, professional mitered edges that enhance the overall appearance.
After completing the quilt, wash it gently if desired to achieve the soft, crinkled texture many quilters love. Alternatively, leave it unwashed for a crisp display piece. Either option beautifully showcases your finished Cat quilt pattern.
FAQ
Is the Cat quilt pattern suitable for beginners?
Yes. The block uses simple shapes and basic quilting techniques, making it an excellent project for beginners who already understand accurate cutting and quarter-inch seam allowances.
What fabric works best?
One hundred percent quilting cotton is the most recommended fabric because it presses well, cuts accurately, and maintains its shape throughout construction.
What finished size should the block be?
The tutorial creates a finished 12-inch block, measuring 12½ inches before it is sewn into the quilt.
Can I make larger cats?
Absolutely. Simply enlarge every template piece proportionally or increase the block dimensions while maintaining consistent seam allowances.
Should I prewash my fabric?
Many quilters choose to prewash fabrics to remove excess dye and reduce shrinkage, while others prefer to work with unwashed quilting cotton for maximum accuracy. Both methods are widely used.
How many blocks do I need for a quilt?
That depends on the desired size. A baby quilt may require 12 to 20 blocks, while larger quilts often use 30 blocks or more combined with sashing and borders.
Can I add embroidery?
Yes. Embroidered eyes, whiskers, noses, bows, and decorative details are popular finishing touches that add personality without increasing piecing complexity.
Is this pattern suitable for gifts?
Definitely. Handmade quilts featuring a Cat quilt pattern make thoughtful gifts for cat lovers, children, family members, and anyone who appreciates handcrafted home décor.
Conclusion
Creating a beautiful Cat quilt pattern is an enjoyable quilting project that combines precise piecing with unlimited creative possibilities.
Throughout this guide, you learned how to prepare your fabrics, cut accurate pieces, assemble the block step by step, customize your cat with different fabrics, and finish your quilt with professional quilting and binding techniques. Whether you choose realistic colors, playful prints, or seasonal fabrics, every finished block reflects your creativity and quilting skills.
Thank you for reading this tutorial. I hope this step-by-step guide inspires you to create your own Cat quilt pattern and enjoy every stage of the quilting journey. If you make this project, please leave your honest opinion, share your experience, and send your suggestions. Your feedback helps inspire other quilters and contributes to creating even more helpful quilting tutorials in the future.