
Crochet chicken-shaped potholder pattern is a cheerful kitchen project that combines practical crochet techniques with a charming farmhouse-inspired chicken design.
One of the most enjoyable aspects of this Crochet chicken-shaped potholder pattern is how easily the appearance can be customized.
This detailed Crochet chicken-shaped potholder pattern explains the project from beginning to end, including the crochet stitch key, materials, body construction, shaping, wing, comb, beak, edging, assembly, and finishing. The exact finished dimensions will depend on yarn thickness, hook size, and individual tension, but a medium cotton yarn can produce a chicken approximately 7 to 9 inches across. Throughout the project, focus on creating compact stitches and keeping the piece reasonably flat. If the potholder is intended for practical kitchen use, avoid plastic embellishments, synthetic decorations, or loosely attached components that may not be appropriate near heat. A simple yarn-embroidered eye is a practical decorative choice and keeps the design cohesive.
Materials, Crochet Stitch Key, and Starting the Chicken Body
For this Crochet chicken-shaped potholder pattern, prepare approximately 80 to 120 yards of medium-weight cotton yarn for the main body, plus smaller amounts of contrasting cotton yarn for the wing, comb, beak, and decorative details. You will also need a crochet hook appropriate for your yarn, scissors, a yarn needle, and stitch markers. If you want a thicker potholder, plan to make two body panels and crochet or sew them together.
The crochet abbreviations used throughout the tutorial are MR for magic ring, ch for chain, sl st for slip stitch, sc for single crochet, hdc for half double crochet, dc for double crochet, inc for increase, and st/sts for stitch or stitches. When an instruction appears inside parentheses followed by a repeat, complete the entire sequence the stated number of times.
Begin the main body with your chosen chicken color. Make an MR, ch 2, and work 12 dc into the ring. Pull the magic ring closed and join with a sl st to the first dc. For Round 2, ch 2 and work 2 dc in each stitch around. Join with a sl st. You should now have 24 stitches forming a flat circular foundation.
For Round 3, ch 2 and repeat (1 dc in the next stitch, 2 dc in the next stitch) around. Join with a sl st. This increases the body to approximately 36 stitches. For Round 4, work (dc in the next 2 stitches, 2 dc in the next stitch) around. Join again. The expanding circle will become the broad central portion of the chicken.
Round 5 continues the controlled expansion. Work (dc in the next 3 stitches, 2 dc in the next stitch) around. If your piece begins to ripple noticeably, your personal tension may require fewer increases. If the edges curl strongly upward, you may need slightly more expansion. A flat crochet circle is the foundation of a balanced chicken body.
After completing the basic circle, lay it on a flat surface and check the shape. The piece should remain mostly flat without excessive waves. The chicken silhouette will be developed by adding shaping around selected sections rather than continuing to enlarge the entire circle evenly. This approach allows the rounded foundation to become a recognizable body while maintaining a simple construction.
Shaping the Chicken Body, Head, Tail, and Wing
To transform the circle into the body of the Crochet chicken-shaped potholder pattern, identify the upper portion where the chicken’s head will be positioned. Attach the main yarn near the upper edge and work a sequence of sc, hdc, and dc stitches across approximately one-quarter of the circumference. Taller stitches near the center of this section help create a gentle rise for the neck and head.
For the head, work several dc stitches into adjacent stitches, then transition back through hdc and sc. The exact number can be adjusted according to your preferred silhouette. The important goal is to create a noticeable rounded rise on one side of the upper body. Turn the piece occasionally and view it from a short distance to check whether the shape resembles a chicken.
On the opposite side, create the tail using several pointed stitch groups. One simple option is to work (sc, hdc, dc, ch 2, sl st) into selected stitches along the rear edge. Repeat this two or three times to produce separate tail points. Varying the height slightly can create a more natural feathered appearance without requiring separately crocheted tail pieces.
Now prepare the crochet chicken wing using a contrasting cotton yarn. Make an MR and work 8 hdc into the ring. For the next round, increase evenly until the piece forms a small oval or semicircle. You can create a feathered lower edge by alternating sc, hdc, dc, and small chain points around one side of the wing.
Position the finished wing over the center of the chicken body. Before sewing, experiment with its angle. A slightly diagonal wing often looks more natural than one placed perfectly horizontally. Using the wing-color yarn and a yarn needle, sew around the upper and side edges, leaving the textured feather edge visible if desired.
If you are making a double-layer crochet potholder, create a second plain circular or chicken-shaped panel using the same main yarn. The back does not need a decorative wing. Match the two layers carefully and secure them temporarily with stitch markers. A double layer provides more substance than a single decorative panel, although suitability for handling heat still depends on the materials and construction.
Adding the Comb, Beak, Eye, Edging, and Hanging Loop
The comb is one of the details that immediately makes the Crochet chicken-shaped potholder pattern recognizable. Attach red cotton yarn along the top of the head. Work sc, hdc, dc, ch 2, sl st into a small group of stitches to create the first point. Repeat the sequence two or three times to form a scalloped red comb.
For the beak, attach yellow, mustard, or orange cotton yarn near the front of the head. Ch 3, then work a sl st back toward the attachment point to create a small triangular projection. Another option is to crochet a tiny triangle separately and sew it securely to the body. Keep the beak compact so it does not dominate the face.
Create the eye using a small amount of dark cotton yarn and simple embroidery. Make several secure stitches in the same area until a small eye appears. Yarn embroidery is a practical choice for this project because it avoids plastic components. Secure both yarn ends carefully on the reverse side or between the two layers.
If you are joining two panels, place them with the decorative sides facing outward. Attach the main cotton yarn and work sc through both layers around the perimeter. Work additional stitches where necessary around curves and fewer stitches along areas that begin to ripple. The edging should hold the layers together without causing the potholder to curl.
To create the crochet hanging loop, choose a point along the upper back or tail. Ch approximately 12 to 18, depending on the loop size you prefer, then sl st into the same attachment area. Turn and work sc around the chain loop if you want a thicker, more durable hanger. Fasten off and weave the yarn end securely into the edge.
Give the entire chicken a final inspection. Check the comb, wing, beak, hanging loop, and embroidered eye for loose yarn ends. Gently shape the edges with your hands and flatten the potholder. If blocking is appropriate for your chosen cotton yarn, light blocking can help smooth the finished chicken crochet kitchen accessory and improve the silhouette.
Making the Potholder Durable, Attractive, and Easy to Customize
Material choice matters when making a functional Crochet chicken-shaped potholder pattern. For pieces intended to be used around warm cookware, 100% cotton yarn is generally preferred over acrylic because acrylic is synthetic and can soften or melt when exposed to sufficiently high temperatures. Always check the characteristics and care instructions of the specific yarn you use.
Thickness is equally important. A decorative chicken made from one thin crochet layer may look beautiful but should not automatically be considered adequate protection from hot cookware. For practical use, create a dense double layer or incorporate an appropriate heat-resistant layer designed for kitchen textiles. If you are uncertain about the heat protection of your finished piece, use it decoratively instead.
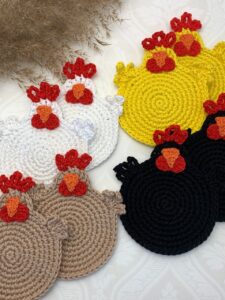
You can personalize the pattern through color without changing the construction. A white chicken with a red comb creates a familiar farmhouse look, while black and cream can feel more modern. Rust, mustard, olive, terracotta, and beige produce a warm autumn palette. Bright combinations can make the crochet chicken potholder playful and cheerful.
Scrap cotton yarn can also be used creatively. Make the body in one solid shade and create a striped or multicolored wing from shorter leftover lengths. The tail points can each have a different color, or the edging can contrast with the body. Keeping the main silhouette simple allows these small color changes to stand out.
The same pattern can be adapted into other decorative projects. Without the extra heat-resistant construction, the chicken shape can become a wall decoration, oversized coaster, table accent, farmhouse ornament, or decorative panel for a handmade kitchen towel. A smaller version can even become an appliqué for another crochet project.
Once you have completed one Crochet chicken-shaped potholder pattern, consider making a coordinated set. Changing the body and wing colors gives each chicken an individual appearance while maintaining a consistent theme. A collection can be both decorative and practical, and repeating the project is an excellent way to improve shaping, tension, embroidery, and finishing skills.
FAQ About the Crochet Chicken-Shaped Potholder Pattern
Is the Crochet chicken-shaped potholder pattern suitable for beginners?
Yes. Confident beginners who understand chains, single crochet, half double crochet, double crochet, and slip stitches should be able to complete the project. The shaping sections require attention, but they are based on familiar stitches rather than complicated techniques.
What yarn is best for a crochet potholder?
For a potholder intended for kitchen use, 100% cotton yarn is a practical choice because it is a natural fiber and generally handles heat better than common acrylic craft yarn. Always check the yarn manufacturer’s care information and use sufficient thickness for the intended purpose.
Can I use acrylic yarn for the chicken?
Acrylic can be used for a purely decorative chicken, but it is not the preferred choice for an item intended to touch hot cookware because synthetic fibers can be damaged by high heat. Cotton is the better choice for the functional version described here.
How large should the finished chicken potholder be?
Using medium-weight yarn, the project may measure approximately 7 to 9 inches across, depending on your hook size, stitch tension, number of rounds, and shaping. The exact measurement is less important than creating a comfortable size for your intended use.
Should the potholder have two layers?
A double layer creates a thicker, more substantial potholder and is recommended over a thin single crochet panel when the project is intended for practical kitchen use. However, thickness alone does not guarantee protection against every temperature.
Can I add batting between the crochet layers?
You can add an appropriate heat-resistant material designed for kitchen textile projects if you understand how it should be used. Avoid assuming that ordinary polyester filling or standard craft batting is automatically suitable for direct exposure to hot cookware.
Why is my chicken body becoming wavy?
Waviness usually indicates too many increases for your yarn, hook, or tension. Reduce the frequency of increases on the next round and gently flatten the work. Slight waviness can sometimes be corrected during edging and blocking.
Why is the body curling like a bowl?
Strong curling usually indicates that there are not enough increases. Check your stitch count and make sure you did not accidentally skip increases. Hook size and unusually tight tension can also contribute to curling.
How do I make the chicken wing stand out?
Use a contrasting yarn color and create a textured lower edge with stitches of different heights. Positioning the wing diagonally can also make it more visible. You can add a few embroidered lines to suggest individual feathers.
Can I make the chicken without a separate wing?
Yes. The wing can be embroidered directly onto the body or omitted for a simpler design. However, the separate crocheted wing adds dimension and is one of the most attractive decorative features of this chicken-shaped crochet pattern.
How can I make the comb more noticeable?
Use a strong contrasting red or burgundy yarn and create two or three pointed stitch groups. If the comb becomes too large, it may fold over, so keep each section proportional to the head.
Can I make a matching rooster potholder?
Yes. You can adapt the same body foundation by enlarging the comb, creating a more dramatic multicolored tail, and changing the wing colors. The basic circular construction remains useful for several farmhouse bird designs.
How should I wash a crochet potholder?
Follow the care instructions for the yarn used in your project. Cotton yarns often tolerate regular washing, but temperatures and drying recommendations can vary. Make sure the potholder is completely dry before storing it.
Can I use this pattern only as decoration?
Absolutely. If you make the chicken from decorative yarn or do not create sufficient protective thickness, simply use it as a crochet kitchen decoration, wall hanging, table accent, or farmhouse ornament instead of a heat-protective potholder.
How can I make a smaller chicken?
Use thinner yarn with an appropriately smaller hook or stop the body increases earlier. If you change the number of body rounds, adjust the head, wing, comb, and tail proportionally so the overall silhouette remains balanced.
How can I make the project look professionally finished?
Maintain consistent tension, count increases carefully, keep the body flat, position the wing neatly, and weave in every yarn end securely. A smooth outer edging and simple embroidery can make a significant difference in the finished appearance.
Conclusion
The Crochet chicken-shaped potholder pattern combines practical crochet construction with a cheerful chicken motif that can add handmade personality to a kitchen. Beginning with a magic ring and an expanding circle, you learned how controlled increases create the foundation before additional stitches transform the simple shape into a chicken body.
The tutorial also explained how to shape the head and tail, crochet a contrasting wing, create a red comb and small beak, embroider the eye, and finish the perimeter with a clean edging. Adding a hanging loop makes the finished crochet chicken potholder easy to display when it is not being used.
Material selection was another important part of the project. For functional kitchen use, dense cotton crochet fabric and sufficient protective thickness are important considerations. A decorative version gives you even greater freedom to experiment with yarn, colors, textures, and embellishments without treating the piece as heat protection.
You can now customize the Crochet chicken-shaped potholder pattern with farmhouse neutrals, autumn shades, bright colors, contrasting wings, or scrap cotton yarn. The same basic chicken can also inspire matching kitchen decorations, table accents, wall pieces, and other handmade projects.
If you make your own Crochet chicken-shaped potholder pattern, please leave your sincere opinion about the tutorial and share your suggestions. I would love to know which colors you would choose, whether you prefer a traditional farmhouse chicken or a colorful version, and what creative details you would add to personalize your finished project.