
Crocheted pumpkin hat pattern is a charming seasonal project that combines simple crochet techniques with the warm, playful look of an autumn pumpkin.
One of the most enjoyable aspects of a crocheted pumpkin hat pattern is the opportunity to experiment with texture and color.
This tutorial explains the complete process from choosing materials to finishing the stem and shaping the crown. Along the way, you will learn useful techniques that can be applied to many other crochet projects, including crochet ribbing, working in the back loop, measuring hat circumference, creating a neat seam, and securely gathering the top. The instructions are written using common US crochet terminology, and the stitch key is provided before construction begins. Take your time with the measurements and check the fit as you work. A carefully measured hat will be more comfortable, and consistent tension will make those attractive pumpkin ridges stand out beautifully.
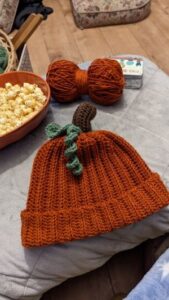
Materials, Crochet Stitch Key, and Sizing the Pumpkin Hat
For this crocheted pumpkin hat pattern, choose a soft medium-weight yarn that creates clearly defined stitches. Worsted-weight yarn is a practical option because it provides enough structure for the pumpkin ridges without making the hat excessively heavy. Approximately 150–220 yards of orange yarn should be sufficient for many adult sizes, while smaller children’s versions generally require less. You will also need a small amount of green yarn for the stem and optional leaf.
A crochet hook around 5 mm is a useful starting point when working with worsted-weight yarn, although your ideal hook size depends on your personal tension and the yarn manufacturer’s recommendations. You will also need scissors, a yarn needle, stitch markers, and a flexible measuring tape. If your stitches are extremely tight, moving up one hook size can help create a softer fabric. If they are too loose, try a slightly smaller hook.
The crochet stitch key used throughout the main hat is intentionally simple. CH = chain, SC = single crochet, HDC = half double crochet, BLO = back loop only, SL ST = slip stitch, ST/STS = stitch/stitches, and FO = fasten off. For the optional stem, SC2TOG = single crochet two stitches together. Understanding these abbreviations before starting will make the written instructions much easier to follow.
The pumpkin body is constructed as a ribbed rectangle rather than crocheted continuously in rounds. This technique makes sizing especially convenient. The starting chain determines the approximate height of the hat, while the number of completed rows determines its circumference. For an average adult hat, you might begin with approximately 31–35 chains, depending on your gauge and desired depth. Always measure rather than relying only on a fixed stitch number.
To begin your pumpkin crochet hat, CH 33 as a practical adult-size starting point. Row 1: HDC in the second CH from the hook and HDC across. You should have 32 HDC stitches. CH 1 and turn. Row 2: working in BLO, HDC across all 32 STS. CH 1 and turn. Continue repeating Row 2 until the rectangle comfortably wraps around the intended wearer’s head.
Do not stretch the rectangle excessively while measuring. Crochet ribbing naturally expands, so a little negative ease helps the finished hat stay securely in place. A rectangle that measures approximately 1–2 inches smaller than the actual head circumference often produces a comfortable fit, depending on the yarn’s elasticity. Before joining anything permanently, wrap the rectangle around the head or compare it with an existing well-fitting hat.
Step-by-Step Pumpkin Hat Body and Ribbed Texture
The most recognizable feature of this crocheted pumpkin hat pattern is the vertical ribbing. Working every HDC through the back loop only leaves the front loop visible, creating a raised line between rows. Once the rectangle is turned so that the rows run vertically around the head, those raised lines resemble the natural grooves found on a pumpkin.
Continue with the repeating sequence: CH 1, turn, HDC BLO across, maintaining the same number of stitches in every row. Count periodically because accidentally skipping the final stitch can gradually make one edge narrower. If you started with 32 stitches, each completed row should still contain 32 stitches. Using a stitch marker in the first or last stitch can be particularly helpful for beginners.
Consistent tension matters more than crocheting quickly. If some rows are considerably tighter than others, the ribbing can become uneven and the rectangle may curve. Allow the yarn to move naturally through your fingers and avoid pulling each stitch excessively tight. A relaxed, consistent crochet tension creates a softer hat and makes the ribbing more flexible.
Continue adding rows until the piece reaches the required circumference. Depending on your yarn, hook, tension, and size, you may need somewhere around 45–60 rows for an adult version. Treat that number as a general reference rather than an absolute rule. Measurement is more reliable because two crocheters using identical materials can still produce slightly different gauges.
When the rectangle reaches the correct width, place the foundation-chain edge against the final row with the right sides together if your fabric has a preferred side. Join the edges using SL ST through corresponding stitches. Another option is to FO and sew the edges together with a yarn needle using a mattress-style seam. Whichever technique you choose, keep the seam flexible rather than pulling it tightly.
Turn the joined tube right side out and inspect your work. At this stage, the crochet pumpkin hat should resemble a simple ribbed cylinder. The ridges should travel vertically from the lower edge toward the crown. Try the cylinder on before closing the top. This is the easiest moment to identify whether the circumference or height needs adjustment before the final shaping begins.
Shaping the Crown and Creating the Crochet Pumpkin Stem
To transform the ribbed cylinder into a pumpkin-shaped hat, the next step is gathering the upper edge. Cut a long strand of matching orange yarn and thread it through a yarn needle. Pass the needle through the ends of the rows around the entire upper circumference. Aim for evenly spaced points so that the gathering remains balanced instead of pulling heavily toward one side.
Once you have worked completely around the opening, gently pull both ends of the yarn until the crown closes. Tighten gradually while arranging the folds with your fingers. When the opening is nearly closed, secure the yarn firmly with several stitches across the center. Weave the remaining tail through nearby stitches. This creates the softly gathered top that gives the pumpkin hat pattern its rounded appearance.
The lower edge can remain naturally stretchy, or you can add a finishing round if you prefer a more defined border. Attach orange yarn near the seam and work one round of SC evenly around the bottom. SL ST to the first SC and FO. Avoid working too many stitches because an overcrowded border may flare outward. The goal is to stabilize the edge while maintaining enough stretch for comfortable wear.
For the crochet pumpkin stem, switch to green or brown yarn and a slightly smaller hook if you want a firmer shape. Begin with a magic ring and work 6 SC into the ring. Round 2: SC in each ST around for 6 STS. Repeat this round several times until the stem measures approximately 1–2 inches. For a tapered stem, work SC2TOG once or twice near the final round.
FO while leaving a long sewing tail. Position the stem directly over the gathered center of the crown and sew around its base using small, secure stitches. Pass the needle through the hat fabric rather than only through surface loops. A securely attached stem will maintain its position even when the hat stretches during use.
You can also crochet a small leaf for extra character. CH 7, then beginning in the second CH from the hook work SC, HDC, HDC, HDC, SC, and SL ST. Work along the opposite side of the foundation chain using a similar sequence to create a leaf shape. FO, leaving a sewing tail, and attach the leaf beside the stem. This optional detail adds another layer of autumn personality without making the project significantly more difficult.
Customizing, Finishing, and Improving Your Crocheted Pumpkin Hat Pattern
Color is one of the easiest ways to personalize a crocheted pumpkin hat pattern. Classic bright orange creates a cheerful Halloween look, while burnt orange or rust gives the project a sophisticated autumn style. Cream yarn can create a white-pumpkin-inspired hat, and muted sage or olive green works beautifully for an unconventional design. The stem can be green, brown, beige, or even made from leftover yarn.
You can also modify the height of the hat by changing the foundation chain. Add chains for a deeper hat or reduce them for a shorter design. Remember that changing the starting chain affects the number of stitches in every row but does not determine the circumference. The circumference is controlled primarily by how many ribbed rows you crochet before joining the rectangle.
For a baby or child version, take an accurate head measurement rather than simply reducing an adult pattern by an arbitrary number of stitches. Children vary considerably in size. Crochet the rectangle to the desired height and continue rows until it wraps comfortably around the head with gentle negative ease. This measurement-based method makes the crochet pumpkin hat pattern adaptable to many age groups.
Finishing can dramatically improve the appearance of handmade crochet. Weave yarn ends through several directions on the wrong side rather than cutting them immediately after a single pass. Check the joining seam, crown, stem, and optional leaf carefully. Loose tails can gradually work free with repeated wear, so secure finishing is worth the extra few minutes.
When caring for the finished hat, follow the washing recommendations provided for the yarn you selected. Some fibers tolerate machine washing, while others benefit from gentle hand washing and flat drying. Avoid exposing delicate yarn to excessive heat. After washing, gently reshape the ridges with your hands and allow the hat to dry in its natural form.
Most importantly, treat this crocheted pumpkin hat pattern as a flexible foundation rather than a rigid formula. Once you understand how the ribbed rectangle becomes a fitted hat, you can experiment with wider ribs, different yarn weights, striped pumpkins, curly vines, leaves, or decorative edging. Small modifications allow the same basic construction technique to produce many unique seasonal accessories.
FAQ About the Crocheted Pumpkin Hat Pattern
Is the crocheted pumpkin hat pattern suitable for beginners?
Yes. This project can be beginner-friendly because the main body relies heavily on repeated half double crochet stitches worked in the back loop. The construction does not require complicated shaping throughout the body. The most important skills are maintaining an even stitch count, joining the rectangle, gathering the crown, and sewing on the stem.
Why do I need to crochet in the back loop only?
Working in the BLO creates the raised ribbing that gives the hat its pumpkin-like texture. Standard HDC worked through both loops produces a flatter fabric. Back-loop crochet leaves a visible ridge and also adds flexibility, making it particularly useful for hats and cuffs.
How much yarn is needed for a pumpkin hat?
The amount varies according to size, yarn thickness, gauge, and the desired hat height. For many adult hats made from worsted-weight yarn, approximately 150–220 yards of the main color provides a useful estimate. Only a small quantity of contrasting yarn is generally needed for the stem and leaf.
How do I make the pumpkin hat larger or smaller?
Adjust the starting chain to change the height and the number of completed rows to change the circumference. Instead of depending entirely on standardized stitch counts, measure the intended wearer’s head and compare that measurement with the crochet rectangle.
Can I use single crochet instead of half double crochet?
Yes, although the texture and gauge will change. BLO single crochet produces dense, stretchy ribbing and may require more rows and stitches to reach the same dimensions. If substituting stitches, make a small gauge sample before beginning the complete hat.
What yarn is best for a crocheted pumpkin hat?
Soft worsted-weight acrylic, wool blends, or other comfortable hat-friendly fibers can work well. Choose yarn that provides clear stitch definition so the pumpkin ridges remain visible. For items intended for children, softness and easy-care washing instructions are especially practical considerations.
Why is my pumpkin hat becoming wider or narrower while I crochet?
The most common cause is accidentally adding or skipping stitches at the edges. Count your stitches regularly. If your row should contain 32 HDC, confirm that all subsequent rows maintain 32 stitches. Stitch markers placed at the edges can make the first and final stitches easier to identify.
How can I make the pumpkin ridges more noticeable?
Use yarn with good stitch definition and maintain consistent tension. BLO stitches naturally create prominent vertical lines. A slightly firmer gauge may also increase definition, but avoid making the fabric so tight that the finished hat becomes uncomfortable.
Can I add a curly pumpkin vine?
Yes. Create a chain in green yarn and work multiple stitches into each chain to encourage the piece to curl naturally. The finished vine can be sewn beside the stem and leaf. Keep embellishments securely attached, particularly when making accessories for young children.
Can this pattern be made without a magic ring?
Yes. For the stem, CH 2 and work the required SC stitches into the second chain from the hook instead. You can then continue crocheting in rounds. The magic ring is convenient because it creates a tightly closed center, but it is not essential.
How do I prevent a visible seam in the hat?
Use a careful slip-stitch join or sew the two edges together with a mattress-style seam. Match each row evenly and avoid pulling the joining yarn too tightly. Because the ribbing naturally creates vertical texture, a neatly worked seam can blend surprisingly well with the surrounding ridges.
Can I sell hats made from this type of project?
Handmade finished items based on general crochet construction techniques can often be offered as craft products, but makers should always ensure that any specific pattern, branding, characters, or decorative elements they use do not infringe another creator’s intellectual property. Creating your own color combinations and original embellishments can also help give finished pieces a distinctive handmade identity.
Conclusion
The crocheted pumpkin hat pattern demonstrates how a relatively simple crochet structure can become a creative autumn accessory. Starting with a basic ribbed rectangle, you learned how HDC BLO stitches create pumpkin-inspired grooves, how the number of rows controls circumference, and how careful measurements help produce a comfortable fit. Joining the rectangle creates the hat body, while gathering the upper edge transforms the simple cylinder into the rounded pumpkin shape.
You also learned how to make and attach a crochet pumpkin stem, add an optional leaf, finish the lower edge, secure yarn tails, and customize the design through different colors and sizes. These techniques are useful beyond this single project because ribbing, seaming, gathering, and measurement-based sizing appear in many types of crochet accessories.
If you make this crocheted pumpkin hat pattern, leave your sincere opinion about the project and share your suggestions. Which part of the tutorial was most useful? What colors or embellishments would you choose for your next pumpkin hat? Your ideas and experiences can inspire new variations and help other crochet enthusiasts enjoy this cozy seasonal project too.