
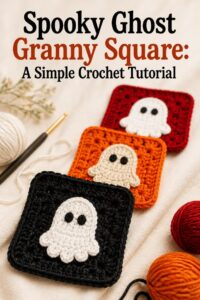
Crochet ghost square granny pattern is a playful Halloween crochet project that combines the familiar structure of a granny square with an adorable ghost motif, creating a versatile block that can become part of blankets, pillows, bags, wall decorations, table accessories, and seasonal garlands.
A successful Crochet ghost square granny pattern starts with selecting yarn colors that clearly separate the ghost from its surroundings.
The construction of this Halloween granny square can be divided into manageable stages. First, the ghost is crocheted as a flat appliqué, beginning with the rounded head and continuing downward to form a slightly wider body with a softly waved lower edge. Next, the ghost is positioned against a crocheted square background and attached securely. Finally, additional granny-style rounds are worked around the block to create a balanced square with four clear corners. This method is useful because it separates the character-making stage from the square construction, allowing you to reposition the ghost before permanently attaching it. Stitch counts can be adjusted slightly depending on yarn weight and tension, but keeping the final squares consistent is important when you plan to join several blocks together.
Materials, Crochet Keys, and Making the Ghost Motif
For the Crochet ghost square granny pattern, prepare white yarn for the ghost, a contrasting background color, another color for the border if desired, and a small amount of black yarn for facial embroidery. A medium-weight cotton or acrylic yarn provides good stitch definition and is easy to handle. Choose a crochet hook that creates fabric firm enough to maintain the square’s shape without becoming excessively stiff. A yarn needle is essential for attaching the ghost and weaving in ends, while blocking pins and a suitable blocking surface can be helpful during finishing.
Before crocheting, become familiar with the abbreviations used in the pattern. MR means magic ring, ch means chain, sc means single crochet, hdc means half double crochet, dc means double crochet, inc means two stitches worked into the same stitch, sl st means slip stitch, st/sts means stitch or stitches, sp means space, FO means fasten off, and rep means repeat. When instructions appear inside brackets, repeat everything inside those brackets for the stated number of times.
Begin the rounded ghost head with white yarn. Work {R1: MR, ch 1, 6 sc into MR (6)} and pull the ring closed. Continue with {R2: inc x6 (12)}, followed by {R3: [sc 1, inc] x6 (18)}. For a slightly larger head, add {R4: [sc 2, inc] x6 (24)}. Rather than continuing as a complete circle, the following section begins shaping the flat ghost body beneath the rounded upper portion.
To create the body, work back and forth across approximately 14 central stitches. Use {Row 1: ch 1, sc across 14 sts, turn (14)}, {Row 2: ch 1, inc, sc 12, inc, turn (16)}, and {Rows 3–6: ch 1, sc across, turn (16)}. This creates a gently widening ghost shape rather than a perfectly rectangular body. If you want a taller ghost, add one or two additional rows of 16 single crochet stitches.
Create the characteristic wavy lower edge with a combination of stitch heights. Work {Final Row: ch 1, sc 2, hdc, dc, hdc, sc 2, hdc, dc, hdc, sc 2, hdc, dc, hdc, sl st}, adjusting the final stitches slightly if your stitch count differs. The goal is to create several soft curves rather than a perfectly straight bottom. Fasten off and leave a long yarn tail if you plan to use it for attaching the ghost to the square.
Thread black yarn onto a yarn needle and embroider two small oval or vertical eyes near the upper center of the ghost. Add a tiny round or oval mouth beneath them for a classic surprised expression. Keep the embroidery simple so the face remains clearly visible at a small scale. Avoid pulling the embroidery yarn too tightly because this can distort the flat crochet fabric. Once the face is finished, gently shape the crochet ghost motif with your fingers before moving to the background square.
Crocheting the Granny Square Background and Building the Corners
Choose a background color that contrasts strongly with your white ghost. Black produces a dramatic Halloween look, purple creates a colorful seasonal style, and orange provides a traditional autumn palette. Begin with {R1: MR, ch 3, 2 dc, ch 2, [3 dc, ch 2] x3, sl st into top of beginning ch 3}. You should now have four clusters of three double crochets separated by four corner spaces.
For the second round, slip stitch to the nearest corner space. Work {R2: ch 3, 2 dc, ch 2, 3 dc in same corner sp, ch 1, [(3 dc, ch 2, 3 dc) in next corner sp, ch 1] x3, sl st to beginning}. Each corner contains two three-double-crochet clusters separated by two chains. These corner increases are what transform the expanding crochet fabric into a square.
Continue with {R3: sl st to corner, (ch 3, 2 dc, ch 2, 3 dc) in corner, ch 1, 3 dc in next side sp, ch 1, [(3 dc, ch 2, 3 dc) in corner, ch 1, 3 dc in next side sp, ch 1] x3, sl st}. The square should now be large enough to compare against the ghost appliqué. Lay the ghost on top without sewing it down yet and check the proportions.
If the background needs more room, add another traditional granny round. Work one 3-dc cluster in every side chain space and {3 dc, ch 2, 3 dc} in each corner. Remember that every new round adds additional side spaces, so the number of ordinary three-double-crochet clusters increases naturally. Keep the corner construction consistent because symmetrical corners are essential for a neat ghost granny square.
After completing the background, place it on a flat surface and check the dimensions. If the square pulls inward at the corners, your chain spaces may be too tight. If the edges become noticeably wavy, your tension may be loose or you may have accidentally added extra clusters. Small irregularities can often be corrected during blocking, but major stitch-count errors are easier to correct before attaching the ghost.
Fasten off the background yarn and weave in the ends that will become difficult to access after the appliqué is attached. Lightly press the square into shape with your hands, but avoid using excessive direct heat on synthetic yarn. At this point, the background should provide enough visible space around the ghost for the motif to remain recognizable while preserving the classic appearance of the Crochet ghost square granny pattern.
Attaching the Ghost and Adding Decorative Granny Square Rounds
Center the crocheted ghost on the right side of the background square. Leave approximately equal visual space on the left and right sides while allowing the wavy bottom to sit slightly lower than the vertical center. Pin the motif temporarily with locking stitch markers or sewing pins. Look at the block from a short distance before attaching it permanently, as this makes it easier to notice if the ghost is tilted.
Thread the long white yarn tail through a yarn needle and begin sewing around the outside edge of the ghost. Use small whip stitches or discreet running stitches that catch the background without passing through excessive layers. Try to keep the sewing yarn hidden beneath the edge of the white motif. Continue around the head, sides, and each curve of the wavy bottom until the entire ghost lies securely against the square.
Do not pull the sewing stitches too tightly. Excessive tension can cause the background to gather behind the appliqué and prevent the completed Halloween crochet square from lying flat. After every few stitches, place the work on a table and smooth it gently. If the ghost begins to wrinkle, loosen the most recent attachment stitches before continuing. A flat appliqué makes the final block easier to join into larger projects.
Once the ghost is attached, you can add another border round to frame the entire design. Join your chosen border yarn in any corner and work {Border R1: ch 3, 2 dc, ch 2, 3 dc in corner, then 3 dc in each side sp with ch 1 between clusters; in every corner work 3 dc, ch 2, 3 dc; sl st to close}. This round can match the background or introduce a contrasting Halloween color.
For a wider border, repeat the same granny-square logic for one or two additional rounds. Try alternating purple and black, orange and charcoal, or green and purple for a colorful seasonal effect. If you want a simpler appearance, use a single border color throughout. Keeping the final round identical across multiple squares makes them considerably easier to join into a blanket or pillow.
Finish the final border with an optional single crochet round for additional definition. Join yarn in a corner and work {ch 1, sc in each st and ch-1 sp; in each corner ch-2 sp work sc, ch 2, sc; continue around; sl st to first sc; FO}. This creates a tidy outer edge and gives the Crochet ghost square granny pattern a clear finished shape without overwhelming the central character.
Blocking, Joining Squares, Customization, and Project Ideas
Blocking is an important finishing step, particularly when several granny squares will be joined together. Gently shape the finished block into a square and measure each side. If using washable yarn, you can use a blocking method appropriate for that fiber. Pin the corners and edges so they remain straight while the block settles into shape. Avoid overstretching, as the goal is to correct small irregularities rather than permanently distort the stitches.
When making multiple crochet ghost granny squares, keep notes about your hook size, yarn, number of background rounds, border rounds, and final dimensions. Even a small change in tension can affect block size. Measuring every few squares helps you identify differences early. Squares intended for the same blanket or cushion should ideally be close to the same dimensions before joining.
You can join completed blocks with a yarn needle and mattress-style seam, a whip stitch, or a crochet joining method such as single crochet or slip stitch. A contrasting join can become part of the Halloween design, while matching yarn produces a more subtle appearance. Arrange all squares on a flat surface before joining so you can experiment with color placement and motif direction.
The Crochet ghost square granny pattern can also be personalized by changing the ghost’s expression. Give one ghost a surprised mouth, another a tiny smile, and another slightly angled eyes. Small embroidered details create character without changing the basic crochet construction. You can also vary the lower waves, make some ghosts taller, or use pale lavender and light gray instead of traditional white.
Color combinations offer even more possibilities. A black background with a white ghost creates bold contrast, while dark purple with pale gray produces a softer Halloween aesthetic. Orange borders can add warmth, and bright green details can introduce a playful monster-inspired palette. For a coordinated blanket, choose three or four colors and repeat them in different arrangements rather than using a completely different palette for every block.
A single square can become a mug mat, wall ornament, bag pocket, or decorative patch, while several squares can create a Halloween granny square blanket, cushion cover, table runner, or seasonal tote bag. You can also alternate ghost squares with plain granny squares or blocks featuring pumpkins, stars, moons, or other autumn-inspired motifs. The modular construction makes this pattern especially useful for building larger projects gradually.
Frequently Asked Questions About the Crochet Ghost Square Granny Pattern
Is the Crochet ghost square granny pattern suitable for beginners?
Yes, especially for crocheters who already understand single crochet, double crochet, increases, chain spaces, and slip stitches. The ghost appliqué and background are made separately, which makes the construction easier to understand than more complex colorwork designs.
What yarn should I use for a ghost granny square?
Cotton and acrylic yarn are both good choices. Cotton provides crisp stitch definition, while acrylic is available in many colors and can be economical for larger projects. Use yarns of similar thickness when combining colors in the same square.
What colors work best for a Halloween ghost square?
White or cream is traditionally used for the ghost. Black, purple, charcoal, orange, and deep green make effective background or border colors. Strong contrast helps the ghost remain clearly visible.
How do I make the ghost larger?
Add another increase round to the head and increase the number of body stitches accordingly. You can also add extra body rows. Remember to make the background square larger so there is still enough space around the appliqué.
How can I make a smaller ghost?
Stop the head increases earlier and work fewer body stitches and rows. Using thinner yarn with a smaller hook is another simple way to create a miniature version without dramatically changing the pattern structure.
Why is my granny square curling?
Curling can result from tight tension, insufficient corner chains, or an incorrect number of stitches. Check each corner and confirm that you have worked the required clusters and chain spaces. Blocking can correct minor curling.
Why does my square look wavy?
Waviness often occurs when there are too many stitches or when the tension is too loose. Review the side spaces and corners to ensure no extra clusters were accidentally added.
Should I attach the ghost before or after blocking?
You can lightly shape the background before attachment, but final blocking is usually most useful after the entire block is finished. This allows you to straighten both the appliqué and border simultaneously.
Can I use safety eyes for the ghost?
For a flat granny-square design, embroidered facial features are generally simpler because they keep the surface flatter and eliminate protruding components. This is particularly convenient when the square will become part of a blanket or cushion.
How many ghost squares do I need for a blanket?
The number depends on the final block dimensions and desired blanket size. Make and block one sample square first, measure it, and then calculate how many blocks will be required across the width and length.
Can I combine ghost squares with other granny square designs?
Yes. Ghost blocks can be alternated with solid granny squares, traditional multicolor blocks, pumpkins, moons, stars, or other seasonal motifs. Keeping all finished squares approximately the same size simplifies assembly.
How do I keep every square the same size?
Use the same yarn weight, hook size, stitch counts, and number of rounds for every block. Consistent tension and blocking are also important. Measure finished squares before joining them into a larger project.
Conclusion
The Crochet ghost square granny pattern combines a charming Halloween character with the versatility of a classic crochet block. In this tutorial, you learned how to select suitable yarn and colors, understand the essential crochet abbreviations, build a rounded ghost head, shape the body with simple rows, and create a softly waved lower edge. You also learned how embroidery can be used to give each ghost its own expressive personality.The tutorial also explained how to construct the granny square background using double crochet clusters and consistent corner spaces. Building the square separately gives you greater control over the proportions and allows the ghost to be positioned carefully before permanent attachment. Correct tension, balanced corners, and accurate stitch placement all contribute to a flatter and more polished finished block.
After attaching the ghost, you learned how to add decorative border rounds, finish the outer edge, block the square, and prepare multiple blocks for joining. The same basic pattern can be adapted with different yarn colors, facial expressions, border combinations, and dimensions, making it possible to create anything from a single Halloween decoration to a complete ghost granny square blanket.
Now that you know the complete process for making a Crochet ghost square granny pattern, experiment with your favorite Halloween colors and create your own interpretation of the design. If you make this project, leave your sincere opinion about the pattern and share your suggestions too. Tell us which color combinations, ghost expressions, borders, or creative variations you would like to see in another handmade Halloween crochet project.