
Simple fabric bag pattern is an easy and practical sewing project that turns basic fabric pieces into a useful handmade bag for everyday life.
This Simple fabric bag pattern focuses on creating a durable bag with a neat handmade appearance rather than using complicated tailoring techniques.
The construction method begins with accurate measuring and cutting, followed by preparing the handles, sewing the main body, finishing the raw edges, creating the upper hem, and attaching the straps securely. For the sample fabric bag, a practical starting size is approximately 16 inches wide by 18 inches high before seam allowances and finishing adjustments. Two straps approximately 24 inches long provide comfortable shoulder-length handles for many users, although these measurements can be customized. Throughout the project, take time to press the fabric between important sewing stages. Pressing may seem like an optional detail, but it helps control seam allowances and keeps the bag symmetrical. Careful preparation usually makes the final sewing much easier.
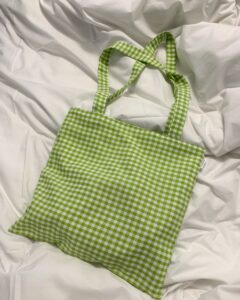
Materials, Measurements, and Fabric Preparation
To make this Simple fabric bag pattern, gather approximately 1 yard of medium-weight fabric, coordinating all-purpose thread, fabric scissors or a rotary cutter, measuring tape or quilting ruler, straight pins or sewing clips, an iron, an ironing surface, and a sewing machine. You will also need a marking pencil or removable fabric marker. If your fabric is lightweight, optional fusible interfacing can add structure. For a heavier canvas or denim bag, interfacing may not be necessary because the material already provides enough body to maintain the shape.
Begin with two main fabric rectangles measuring approximately 17 inches wide by 19 inches high. These measurements include room for the seams and upper finishing. The finished dimensions will be slightly smaller after sewing. If you want a smaller lunch or project bag, reduce both measurements proportionally. For a larger market tote, increase the dimensions while remembering that larger bags may require stronger fabric, wider straps, and additional reinforcement around the handle attachment points.
Cut two handle pieces approximately 4 inches wide by 25 inches long. This measurement creates comfortable straps after the raw edges are folded inward. If you prefer short hand-held handles, reduce the length to approximately 16–18 inches. For longer shoulder straps, 25–28 inches may be more comfortable. Because body proportions and personal preferences differ, you can temporarily pin the handle into a loop and place it over your shoulder before sewing to check the length.
Before cutting, consider prewashing and drying washable fabric using the same method you expect to use for the finished bag. Natural fibers can shrink, and prewashing reduces the chance that the finished project will change significantly after its first cleaning. After washing, press the fabric until it lies flat. Straighten the grain if necessary and remove major wrinkles before measuring. Accurate cutting becomes much easier when the material is smooth and stable.
Place the fabric on a flat surface and measure every piece carefully. If the material has a directional print, make sure both main panels face in the correct direction before cutting. This is particularly important with fabric featuring flowers, animals, words, geometric motifs, or seasonal illustrations. Cutting one panel upside down is a common mistake that is much easier to prevent than correct after sewing.
After cutting, label the wrong side of each piece lightly if the fabric looks similar on both sides. Prepare your sewing machine with coordinating thread and a suitable universal needle. A standard 80/12 needle works with many medium-weight cotton fabrics, while heavier canvas or denim may require a stronger needle. Test the stitch on a fabric scrap before starting. A stitch length of approximately 2.5 mm is a useful starting point for ordinary seams.
Step-by-Step Sewing Instructions for the Bag Body
Place the two main panels with their right sides together, carefully matching the side and bottom edges. Secure the layers using sewing clips or pins. Starting at the upper edge of one side, sew down the first side using approximately a 1/2-inch seam allowance. Continue by sewing across the bottom and then up the opposite side. Leave the entire top open. Backstitch at the beginning and end of each seam to prevent the stitching from loosening during later construction.
Once the three main seams are complete, finish the raw edges to reduce fraying. If you have a serger, finish the seam allowances with an overlock stitch. A regular sewing machine can achieve a similar practical result using a zigzag or overcasting stitch. Another beginner-friendly method is trimming the raw edges neatly with pinking shears. The appropriate method depends on your fabric because some tightly woven materials fray much less than loosely woven cotton or linen.
For a flat simple fabric bag, you can now proceed directly to the upper hem. However, adding boxed corners creates more depth at the bottom. To make boxed corners, keep the bag wrong side out and pinch one bottom corner so the side seam aligns with the bottom seam. Flatten the resulting triangle carefully. Measure approximately 1.5 inches from the point, draw a straight line across the triangle, and stitch directly along the marked line.
Repeat exactly the same procedure on the opposite corner. Measure both corners carefully because unequal measurements can make the bag lean or sit unevenly. After stitching, trim the excess triangle while leaving approximately a 1/2-inch seam allowance. Finish the trimmed edge using a zigzag or overcasting stitch if the fabric frays easily. Turn the bag temporarily right side out and check whether both corners appear symmetrical before proceeding.
Turn the bag wrong side out again and prepare the upper opening. Fold the raw top edge approximately 1/2 inch toward the wrong side and press thoroughly. Fold it down again by approximately 1 inch, enclosing the raw edge completely. Press around the entire opening and secure the fold with pins or clips. This double-fold hem gives the opening a clean appearance while also strengthening the area where the handles will eventually be attached.
Topstitch close to the lower folded edge around the entire opening. Keep the distance between your stitching and the fold consistent for a professional result. You can add a second row of topstitching approximately 1/8 inch from the upper edge if you want additional reinforcement and visual detail. When you reach your starting point, overlap the stitches slightly and backstitch. Press the upper edge once more before preparing the handles.
Making and Attaching Strong Fabric Handles
Take one of the 4-by-25-inch handle pieces and place it wrong side facing upward. Fold it in half lengthwise and press firmly to create a center crease. Open it again, then fold both long raw edges inward until they meet at the center crease. Press each fold carefully. Finally, fold the entire strip in half again along the original crease. The raw edges should now be enclosed inside the strap.
Secure the folded strap with clips and topstitch close to both long edges. The result should be a strong handle approximately 1 inch wide. Repeat the same process with the second handle. Compare the two finished straps before attaching them to the bag. They should have equal lengths and widths. If one is slightly longer, correct the difference before sewing because mismatched straps can cause the bag to hang unevenly.
Lay the fabric bag flat with the front panel facing upward. Measure approximately 4 inches inward from each side edge and mark these positions near the upper hem. Position one end of the first strap at each mark, making sure the handle is not twisted. Approximately 1–1.5 inches of each strap end can overlap the upper portion of the bag. Pin or clip the handle securely in place.
Turn the bag over and repeat the process with the second handle. Before sewing anything permanently, lift the bag by all four handle attachment points and visually compare their placement. The front and back handles should align. Check again that neither strap has become twisted. This small inspection can prevent one of the most frustrating mistakes in an otherwise simple sewing project.
Sew each handle securely using a rectangle with an X inside it. Start by stitching around the perimeter of the overlapping strap section, then sew diagonally from corner to corner in both directions. This reinforcement distributes tension across a wider area of fabric. If you expect the bag to carry heavier objects, stitch the reinforcement pattern twice or add a small square of interfacing behind each attachment area before sewing.
After attaching all four strap ends, turn the bag right side out and press it carefully. Shape the bottom corners with your fingers without aggressively pushing sharp objects into them. Inspect the seams, upper hem, and handles. Trim any loose threads and correct any areas where stitching may have skipped. Your Simple fabric bag pattern should now resemble a finished reusable tote with clean sides, a stable opening, and securely attached handles.
Finishing Ideas, Customization, FAQ, and Conclusion
One of the best features of a Simple fabric bag pattern is its flexibility. Once you understand the basic construction, the same design can become a grocery bag, library tote, sewing project bag, casual shoulder bag, or reusable gift bag. Changing the fabric alone can completely transform the appearance. Floral cotton creates a soft handmade style, canvas gives the bag a practical everyday look, and repurposed denim can produce a more structured casual design.
Adding a lining is another useful customization. Cut two lining pieces using approximately the same dimensions as the outer panels and sew their sides and bottom together. Leave a small opening along the bottom seam for turning. Place the outer bag inside the lining with right sides together, match the upper edges, and sew around the opening. Turn everything right side out through the opening, close the gap, press the top edge, and add topstitching.
A simple pocket can also make the project more functional. Cut a rectangle approximately 8 inches wide by 7 inches high, fold and stitch the upper edge, then turn the remaining raw edges inward by approximately 1/2 inch. Position the pocket on one main panel before assembling the bag body. Topstitch around the sides and bottom while leaving the top open. For additional organization, sew one vertical line through the pocket to divide it into two compartments.
Decorative details allow you to personalize the simple fabric bag without changing its basic structure. Consider adding contrasting handles, decorative topstitching, fabric appliqué, patchwork panels, embroidery, or a small fabric label. If you use a patterned fabric, you may prefer minimal decoration so the print remains the main visual feature. Solid fabric, on the other hand, provides an excellent background for creative embellishment.
Durability depends heavily on the materials and construction. Reinforce stress points, particularly around the handles and upper corners. When using lightweight fabric, interfacing can help prevent stretching. For heavier fabrics, use an appropriate sewing-machine needle and avoid creating excessively thick folded areas. A well-made bag does not require complicated techniques; accurate seams and thoughtful reinforcement are often more important.
Before using the finished bag, perform a final inspection. Check that every seam is secure, pull gently on each handle, examine the boxed corners, and make sure no raw edges remain exposed unnecessarily. Give the entire project one final press according to the fabric manufacturer’s appropriate heat setting. This last step helps flatten seams and gives your handmade Simple fabric bag pattern a neat, polished appearance.
Frequently Asked Questions About the Simple Fabric Bag Pattern
Is this Simple fabric bag pattern suitable for beginners?
Yes. This project is suitable for beginners because most of the construction uses straight seams, basic folding, pressing, and topstitching. The boxed corners are slightly more advanced but still easy to understand once the side and bottom seams are aligned correctly.
What is the best fabric for making a simple bag?
Medium-weight cotton, canvas, denim, linen blends, and sturdy quilting cotton are useful options. Medium-weight cotton is often easier for beginners, while canvas and denim provide more structure and durability. The best choice ultimately depends on what you plan to carry.
How much fabric do I need?
Approximately one yard is enough for many medium-sized versions of this Simple fabric bag pattern, including the handles. The exact amount depends on fabric width, bag dimensions, print direction, pockets, lining, and other optional features.
Should I prewash the fabric before sewing?
Prewashing is recommended for washable fabrics that may shrink. Wash and dry the material using the method you expect to use for the finished bag. Press the fabric after washing so it is flat before measuring and cutting.
Can I make the bag without boxed corners?
Yes. Simply sew the side and bottom seams and skip the corner-boxing stage. The result will be a flatter tote-style bag. Boxed corners add depth and create a more defined bottom, but they are optional.
How do I make the bag larger?
Increase the width and height of both main panels by equal amounts. Remember to maintain appropriate seam allowances. For significantly larger bags, consider increasing the strap width and reinforcing the handle attachment points.
Can I make this bag with denim?
Yes. Denim works especially well when you want a sturdy, structured bag. Use a needle designed for denim and test your machine on scraps first. At bulky intersections, sew slowly rather than forcing the fabric beneath the presser foot.
Do I need interfacing?
Not always. Canvas and heavier denim generally provide sufficient structure on their own. Lightweight cotton can benefit from fusible interfacing, especially if you want the finished bag to hold its shape more effectively.
How can I stop the handles from coming loose?
Use a generous overlap between the handles and bag body, then reinforce each attachment point with a rectangle-and-X stitching pattern. Backstitch carefully and use strong, good-quality thread. The upper bag edge can also be interfaced for additional support.
Can I add a zipper to this pattern?
A zipper can be added, although it changes the upper construction and makes the project more advanced. Beginners may prefer a magnetic snap, button loop, or simple open top for their first version before experimenting with zipper installations.
How can I make an inside pocket?
Prepare the pocket before assembling the lining. Hem the pocket’s upper edge, press the other edges toward the wrong side, position it on the lining, and stitch around the sides and bottom. Make sure the pocket is positioned low enough that it will not interfere with the upper seam.
Why does my finished bag look uneven?
Uneven cutting, inconsistent seam allowances, incorrectly matched corners, or handles positioned at different distances can all affect symmetry. Measure carefully at each stage rather than relying only on visual estimation. Pressing the pieces throughout construction also makes alignment easier.
What seam allowance should I use?
A 1/2-inch seam allowance is beginner-friendly for this project because it provides enough room to control and finish the raw edges. You can use a different seam allowance if preferred, but use the same measurement consistently throughout corresponding seams.
How can I give the bag a more professional finish?
Accurate cutting, consistent seam allowances, pressing after important steps, enclosed raw edges, straight topstitching, symmetrical handles, and reinforced attachment points all contribute to a polished appearance. Take your time rather than sewing every construction stage continuously without pressing or checking alignment.
Can leftover fabric be used for the handles?
Yes. The handles are an excellent place to use coordinating fabric remnants. Contrasting straps can actually become an intentional design feature. Just make sure the fabric is strong enough to support the intended contents of the bag.
Can the measurements be customized?
Absolutely. The measurements in this Simple fabric bag pattern provide a practical starting point rather than a mandatory finished size. Adjust the width, height, handle length, and boxed-corner depth according to how you want to use your bag.
Conclusion
This Simple fabric bag pattern demonstrates how basic sewing techniques can be combined to create a practical handmade accessory. Starting with accurately measured rectangular panels makes construction approachable, while straight side and bottom seams establish the basic bag shape. Finishing the raw edges and carefully pressing each stage improves both durability and appearanceThe optional boxed corners provide additional depth, making the bag more useful for carrying everyday items. A double-fold upper hem creates a neat opening and strengthens the area that supports the handles. Meanwhile, carefully folded fabric straps provide a simple alternative to purchased webbing and allow the entire bag to coordinate beautifully.
Handle attachment deserves particular attention because this is one of the main stress points in any reusable fabric bag. Positioning the straps symmetrically and reinforcing each end with rectangular and diagonal stitching can substantially improve stability. These techniques are simple, but they contribute greatly to the quality of the finished project.Once you have completed the basic version, customization becomes one of the most enjoyable parts of the project. Pockets, linings, contrasting handles, patchwork, embroidery, appliqué, and different fabrics can transform the same basic construction into many unique designs. You can also change the measurements to create everything from a compact project bag to a roomy everyday tote.
The most important lessons from this Simple fabric bag pattern are accurate measuring, careful cutting, consistent seam allowances, regular pressing, secure handle reinforcement, and neat finishing. None of these techniques are particularly complicated, which makes this project a useful way to build confidence while producing something functional.If you make your own version of this Simple fabric bag pattern, leave your sincere opinion about the project and share your suggestions. Tell us what fabric you would choose, which details you would add, and what you might change in your next bag. Creative variations and practical ideas are always welcome and can inspire even more handmade sewing projects.