
Pattern for making a fabric witch hat is a creative sewing project that transforms simple pieces of fabric into a charming handmade decoration for Halloween, autumn displays, costume accessories, or seasonal craft collections.
One of the most useful things about this fabric witch hat pattern is that it can be adapted to different purposes. A small version can become a tabletop Halloween decoration, while a larger version can be used as part of a costume or seasonal wall display.
Before starting this Pattern for making a fabric witch hat, it helps to understand that the project is constructed from two main shapes: a cone for the crown and a circular or slightly oval brim. Interfacing or batting can be added when additional structure is needed, especially if lightweight cotton is being used. Accurate measuring and consistent seam allowances are more important than complicated sewing techniques, which makes this project approachable for beginners who already know how to use a sewing machine. In the following instructions, you will learn how to choose suitable materials, draft the basic pieces, sew the crown, construct the brim, join everything neatly, and add decorative details that give the finished witch hat its personality.
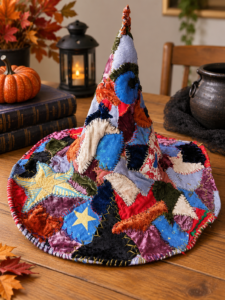
Materials, Measurements, and Preparing the Fabric Witch Hat Pattern
For a medium decorative hat, gather approximately 1/2 to 3/4 yard of fabric, coordinating lining fabric if desired, medium-weight fusible interfacing, matching thread, fabric scissors, pins or clips, measuring tape, a fabric marking tool, iron, and sewing machine. You can also prepare ribbon, felt scraps, decorative buttons, artificial leaves, small fabric flowers, or other lightweight embellishments. Cotton is particularly convenient for beginners because it cuts cleanly and is relatively easy to control while sewing curved seams.
The crown can be drafted as a large curved triangular shape that forms a cone after its two straight edges are joined. For a medium tabletop hat, aim for a finished crown approximately 12 to 14 inches tall with a circumference of approximately 20 to 22 inches around the base. Add about 1/2 inch seam allowance around the sewing edges. These measurements are flexible because a decorative witch hat does not need to fit a person’s head unless you specifically intend to create a wearable version.
To create the witch hat brim, draw a large circle approximately 15 to 17 inches in diameter. Mark a smaller centered circle that corresponds to the base circumference of the crown. The inner opening needs to be large enough to accommodate the bottom edge of the cone after seam allowances are considered. Cut two brim pieces from the main fabric if you want a fully finished fabric brim. For additional firmness, cut matching interfacing pieces and fuse them according to the manufacturer’s handling instructions for the material.
When working with a printed fabric, consider the direction of the design before cutting. Pumpkins, stars, bats, moons, or other directional Halloween motifs can look noticeably different when positioned upside down on the crown. Fold the fabric carefully, smooth out wrinkles, and place the pattern pieces strategically before cutting. Accurate preparation at this stage helps the finished handmade fabric witch hat look cleaner and more intentional.
Apply the interfacing before assembling the pieces when extra stability is desired. Place the adhesive side against the wrong side of the fabric and fuse it using appropriate heat and pressure for your specific interfacing and textile. Avoid stretching the fabric while pressing because distortion can make the brim uneven. A structured brim generally photographs beautifully and also helps a decorative hat maintain its shape when displayed on a table, shelf, mantel, or seasonal centerpiece.
After cutting, organize the pieces before sewing. You should have the crown section, two brim pieces if making a lined brim, and any optional decorative strips or patches. Mark the center points of the crown base and brim opening with small removable marks or clips. These reference points become extremely useful later when joining the curved pieces. Careful preparation is one of the simplest ways to make this Pattern for making a fabric witch hat easier to assemble.
Step-by-Step Instructions for Sewing the Witch Hat Crown and Brim
Begin with the crown piece. Fold it with right sides together, matching the two straight edges that will form the back seam. Pin or clip these edges securely, particularly near the bottom where accurate alignment will matter when attaching the brim. Sew the seam using approximately a 1/2-inch seam allowance, backstitching gently at the beginning and end. Press the seam open when the fabric allows it, or press both seam allowances toward one side.
Turn the crown right side out and carefully shape the point. A blunt turning tool can help push the fabric into the tip without damaging it. Avoid using scissors or another sharp object because it can puncture the fabric. If you want the traditional crooked witch-hat silhouette, gently bend the upper section rather than forcing the cone to remain perfectly straight. A small amount of polyester fiberfill can be added if you want a softer sculpted crown that maintains a particular curve.
Next, prepare the two fabric brim pieces. Place them with right sides facing each other and carefully align the outer circumference. Sew around the outside edge using the same consistent seam allowance. Make small clips into the seam allowance around the curve, taking care not to cut through the stitches. These clips allow the fabric to spread naturally when the brim is turned and reduce puckering along the outer edge.
Turn the brim right side out through the center opening and press it carefully. Roll the outer seam gently between your fingers before pressing so the seam sits directly along the edge rather than favoring one side. For a more polished appearance, add a row of topstitching approximately 1/8 to 1/4 inch from the outer edge. Besides being decorative, topstitching can help stabilize the brim and keep the layers from shifting.
Place the crown through the center opening of the brim with the appropriate right sides together. Match the back seam first and then match the opposite points. Continue distributing the crown evenly around the opening, using several pins or clips. Sew slowly around the circular opening, stopping periodically to reposition the fabric. Curved seams become considerably easier when you avoid pulling or stretching either layer as it passes beneath the presser foot.
After sewing, inspect the entire joining seam before completing the finishing work. If you notice a small tuck, remove only that section of stitching and resew it rather than taking apart the entire hat. Press the seam allowance toward the crown whenever possible. At this point, the main construction of the Pattern for making a fabric witch hat is complete, and the recognizable witch-hat silhouette should already be clearly visible.
Adding Structure, Halloween Details, and a Professional Finish
A decorative band is one of the easiest ways to give the fabric witch hat a finished appearance. Cut a strip of contrasting fabric or use ribbon approximately 1 to 2 inches wide. Wrap it around the base of the crown directly above the brim, overlap the ends at the back, and secure it with stitching or another appropriate craft attachment method. Orange against black creates a traditional Halloween combination, while purple, green, gold, or patterned fabric offers a different seasonal style.
A small buckle can be created from felt or contrasting fabric. Cut a rectangular frame and position it at the front of the hat band. Because this detail is decorative rather than structural, it does not need complicated construction. A neatly cut felt buckle can instantly make a simple Halloween sewing project look more detailed while remaining lightweight enough that it does not pull the crown out of shape.
Decorative patches are another option, particularly when you want the hat to have a rustic handmade personality. Cut small irregular squares or rectangles from contrasting fabric and stitch them onto the crown before final assembly whenever possible. Straight stitching around the edges creates a clean result, while intentionally visible stitching can produce a playful handmade effect. Keep the patches relatively small so they complement the hat rather than overwhelming its silhouette.
If the crown appears too soft, a small amount of lightweight stuffing can be inserted near the upper section. Do not pack it tightly because an overstuffed crown can become round instead of pointed. Another technique is inserting a soft piece of interfacing or flexible stabilizer. The goal is simply to help the fabric witch hat pattern maintain its shape while preserving the slightly bent, whimsical point associated with traditional witch hats.
The brim can also be shaped after construction. A perfectly flat brim creates a neat appearance, while gently lifting one side gives the hat more personality. If you want stronger shaping, use heavier interfacing between the brim layers during construction. Whatever method you choose, keep the edges smooth and symmetrical enough that the piece looks intentionally designed. Pressing throughout construction makes a significant difference in the final presentation.
Finally, remove visible loose threads and inspect all seams. Steam or press the hat according to the fabric’s care requirements, avoiding excessive heat on synthetic materials. Arrange the crown and brim into the desired position before displaying the finished project. These small finishing steps turn a straightforward Pattern for making a fabric witch hat into a polished seasonal decoration that looks carefully handmade rather than hurriedly assembled.
Customization Ideas, Common Questions, FAQ, and Final Sewing Tips
The easiest way to customize this project is through fabric selection. Classic black cotton creates an unmistakable witch hat, but Halloween prints featuring stars, moons, pumpkins, ghosts, or spiderwebs can produce a playful result. For an autumn-inspired interpretation, consider warm orange, brown, burgundy, or muted green fabrics. Velvet can provide a richer appearance, although beginners may find stable woven cotton easier to cut and sew accurately.
You can also change the proportions of the pattern. A taller crown produces a dramatic pointed silhouette, while a shorter crown creates a cute miniature appearance. Similarly, increasing the brim diameter creates a theatrical hat, whereas reducing it results in a compact decoration. When resizing the Pattern for making a fabric witch hat, adjust the crown base and inner brim opening together so their circumferences continue to match.
FAQ – What is the best fabric for making a witch hat? Medium-weight cotton is one of the most beginner-friendly options because it is stable, easy to press, and available in many prints. Felt is another convenient choice and may require less edge finishing. Velvet can create a luxurious effect but is more likely to shift during sewing. When using lightweight fabric, interfacing is recommended to provide enough structure for the crown and brim.
FAQ – How do I make the witch hat stand up? Add fusible interfacing to the crown and brim before sewing. For decorative hats that need additional support, a small amount of polyester fiberfill can be placed inside the crown. Avoid overfilling it. The hat should maintain a recognizable cone shape while still allowing you to bend the point slightly for a classic crooked-witch appearance.
FAQ – Can this fabric witch hat pattern be resized? Yes. The basic construction method works for miniature decorations, larger display pieces, and wearable hats. For a wearable version, measure the intended head circumference first and create the crown base accordingly. The inner brim opening must correspond closely to that measurement, with additional allowance for the seam. Making a quick paper prototype can help confirm proportions before cutting valuable fabric.
FAQ – Can beginners make this project, and how long does it take? Yes. A Pattern for making a fabric witch hat mainly requires basic cutting, straight sewing, curved sewing, clipping seam allowances, turning, and pressing. A beginner may need a few hours, particularly when drafting the pattern for the first time. Experienced sewists may complete a simple version much faster. Accuracy is more valuable than speed, especially around the circular seam connecting the crown and brim.
Conclusion
The Pattern for making a fabric witch hat is a versatile sewing project that combines straightforward construction with plenty of opportunities for creativity. By preparing a cone-shaped crown, drafting a matching brim, adding interfacing, sewing the pieces carefully, and pressing each stage, you can create a structured handmade hat suitable for Halloween decorating, seasonal displays, or costume-inspired crafts.Throughout this project, the most important techniques are accurate measuring, consistent seam allowances, careful curved stitching, and thoughtful fabric preparation. The crown determines the personality of the hat, while the brim provides balance and structure. Details such as a contrasting band, fabric buckle, decorative patches, or a gently bent point can make even a simple design look distinctive.
Beginners can keep their first version simple by using medium-weight cotton and fusible interfacing. Once you understand the basic construction, experiment with different dimensions, fabrics, textures, and Halloween embellishments. The same fundamental fabric witch hat pattern can produce many different results simply by changing these design choices.This project is also an enjoyable way to use fabric remnants from previous sewing projects. Small pieces can become patches, bands, buckles, or other decorations, while larger remnants may be enough for miniature hats. Planning these details before cutting helps maintain a coordinated appearance and reduces unnecessary material waste.
Most importantly, take your time during the joining and pressing stages. A carefully sewn curved seam and properly shaped brim can dramatically improve the finished result. Handmade projects do not have to be perfectly identical to commercial products; small variations are often part of their character and can make each witch hat unique.Now that you know the complete process for this Pattern for making a fabric witch hat, try adapting the measurements and decorations to create your own version. Leave your sincere opinion about the project and share any suggestions or creative ideas you would add. Your ideas may inspire new fabric combinations, decorative details, and imaginative variations of this fun Halloween sewing project.