
Crocheted witch pattern projects are a charming way to combine traditional crochet techniques with playful Halloween-inspired handmade decoration.
One of the advantages of making a crochet witch is the freedom to personalize almost every detail. Traditional Halloween colors such as black, purple, orange, and green work beautifully, but there is no requirement to follow a specific palette.
For this Crocheted witch pattern, medium-weight cotton or acrylic yarn is a practical choice because both materials provide good stitch definition and are widely available. You will also need a crochet hook appropriate for your yarn, fiberfill stuffing, a yarn needle, scissors, stitch markers, and embroidery thread for facial details. Safety eyes can be used when the finished item is intended strictly as decoration for adults, while embroidered eyes are generally a better choice for projects intended for young children because detachable components can present a choking hazard. The instructions below use standard US crochet terminology and provide a flexible framework that can be adjusted according to your preferred finished size. Read through the complete pattern before beginning so you understand how the body, head, hat, hair, and finishing details come together.
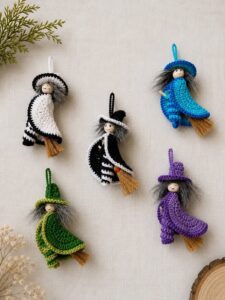
Materials, Crochet Abbreviations, and Preparation
Before starting the crocheted witch pattern, gather approximately 30–50 grams of yarn for the main dress and hat color, 20–30 grams for the skin tone, and smaller amounts for the hair and decorative details. A 2.5 mm to 3.5 mm crochet hook usually works well with DK or light worsted yarn. For amigurumi, choosing a hook slightly smaller than the yarn manufacturer’s general recommendation can help produce dense stitches that prevent stuffing from showing through the fabric.
The main crochet abbreviations used throughout this pattern are: MR = magic ring, ch = chain, sc = single crochet, sl st = slip stitch, inc = increase, dec = decrease, BLO = back loop only, FLO = front loop only, and st/sts = stitch/stitches. An increase means working two single crochet stitches into the same stitch. A decrease means combining two stitches into one, preferably with an invisible decrease when making amigurumi.
Most parts of the witch are worked in continuous spiral rounds rather than joined rounds. Place a stitch marker in the first stitch of every round and move it upward as you work. This simple habit makes counting much easier and prevents accidental increases or decreases. Accurate stitch counts are especially important when shaping the head and body because even one misplaced stitch can gradually change the proportions of the finished character.
Start with the head using your chosen skin-tone yarn. The basic sequence is: {R1: 6 sc in MR = 6}, {R2: inc around = 12}, {R3: (1 sc, inc) × 6 = 18}, {R4: (2 sc, inc) × 6 = 24}, {R5: (3 sc, inc) × 6 = 30}, and {R6: (4 sc, inc) × 6 = 36}. These evenly distributed increases create a smooth rounded foundation.
Continue with {R7–R12: 36 sc around} to build the central portion of the head. If you are embroidering the face, you can wait until the head is stuffed before deciding exactly where the eyes should sit. If using safety eyes for a decorative piece, position them before closing the head because the washers cannot easily be attached afterward.
Begin shaping the bottom of the head with {R13: (4 sc, dec) × 6 = 30}, {R14: (3 sc, dec) × 6 = 24}, {R15: (2 sc, dec) × 6 = 18}, and {R16: (1 sc, dec) × 6 = 12}. Add fiberfill gradually before the opening becomes too small. The stuffing should be firm enough to maintain the rounded shape but not so tight that the stitches become stretched or visibly separated.
Crocheting the Witch Body, Arms, and Main Shape
The body of the crocheted witch pattern can begin directly from the neck or be made separately and sewn to the head. For easier assembly, create it separately using your main dress color. Begin with {R1: 6 sc in MR = 6}, followed by {R2: inc around = 12} and {R3: (1 sc, inc) × 6 = 18}. These first rounds form the narrow upper section of the torso.
Continue expanding the dress with {R4: (2 sc, inc) × 6 = 24}, {R5: 24 sc}, {R6: (3 sc, inc) × 6 = 30}, and {R7–R10: 30 sc around}. This gradual expansion creates the recognizable slightly flared silhouette of a witch’s dress. For a wider skirt, another increase round can be added using {(4 sc, inc) × 6 = 36} before working several rounds evenly.
To form a decorative lower edge, work one round in the front loops only. A simple ruffle can be made with {FLO: 3 dc in each st around}. If you prefer a subtler finish, alternate {sc, hdc, dc, hdc} repeatedly around the skirt. Small finishing details like these can make a simple crochet witch pattern look considerably more elaborate while still relying on beginner-friendly techniques.
For each arm, use the skin-tone yarn and begin with {R1: 6 sc in MR = 6}. Work {R2–R4: 6 sc} for the hand and lower arm. Change to the dress color and continue {R5–R10: 6 sc}. Lightly stuff only the lower portion if necessary. Leaving the upper section relatively flat makes the arms easier to position naturally against the body.
Make two small legs beginning with your chosen shoe color: {R1: 6 sc in MR}, {R2: (1 sc, inc) × 3 = 9}, and {R3–R5: 9 sc}. Change to a stocking color and continue for approximately four to six rounds. Striped stockings can be created by changing yarn colors every one or two rounds. Sew the legs underneath the skirt, checking the placement from the front before securing them permanently.
Assembly should be done slowly because it determines much of the finished character’s appearance. Pin the head, arms, and legs temporarily before sewing them into place. Check the witch from the front, back, and sides to make sure everything appears balanced. Use the yarn needle and matching yarn to sew each piece securely, making several small stitches rather than a few large visible ones. Weave the yarn tails into the stuffed body after fastening them securely.
Creating the Crocheted Witch Hat, Hair, and Facial Details
The pointed hat is one of the most recognizable features in any Crocheted witch pattern. Start at the tip with {R1: 4 sc in MR = 4} and {R2: 4 sc}. Continue with {R3: (1 sc, inc) × 2 = 6}, {R4: 6 sc}, {R5: (2 sc, inc) × 2 = 8}, and {R6: 8 sc}. Alternating plain rounds with gradual increases creates a long tapered point rather than a short cone.
Continue increasing gradually until the circumference fits comfortably around the witch’s head. For example, progress from 8 to 12, 16, 20, 24, 28, and eventually around 32–36 stitches depending on the size of your head. The exact stitch count is less important than checking the fit regularly. The hat should sit securely without stretching excessively or covering too much of the face.
Once the crown reaches the desired length, create the brim. One effective sequence is {Brim R1: FLO, inc around}, followed by {Brim R2: 1 sc in each st around}. For a wider dramatic brim, work another increase round such as {(2 sc, inc) repeat around}. Finish with a round of slip stitches if you want a firmer, more defined edge.
Hair can be made without complicated crochet construction. Cut multiple strands of yarn approximately twice the desired finished hair length. Fold each strand in half, insert your hook underneath a stitch on the head, pull the folded loop through, and draw the loose ends through the loop. Repeat around the sides and back of the head. Orange, gray, black, purple, brown, or even multicolored yarn can give the crocheted witch a completely different appearance.
For the face, embroidered details offer maximum control. Use small horizontal stitches for the eyes, a tiny curved stitch for the mouth, and optional short stitches for eyebrows. A small protruding nose can also be crocheted with {4 sc in MR}, worked for one additional round, and sewn carefully to the center of the face. Keep the features simple because overly large embroidery can overwhelm a small amigurumi head.
Finally, personalize the hat with a contrasting band, tiny buckle, flower, pumpkin, star, or simple bow. A basic hat band can be created by chaining enough stitches to wrap around the crown, working one row of single crochet, and sewing the strip into position. Decorative elements should remain proportional to the witch. One or two carefully chosen accents usually create a cleaner handmade appearance than covering every available area with embellishments.
Finishing, Customizing, and Caring for Your Crochet Witch
Once all the main pieces are assembled, inspect your crocheted witch pattern carefully for visible yarn tails, loose stitches, uneven seams, or areas where stuffing can be seen. Use a yarn needle to weave remaining ends deeply through the body. Trim the yarn only after pulling it through several different directions inside the stuffed piece. This finishing technique helps prevent yarn ends from gradually working their way back to the surface.
If you want to add a miniature broom, create the handle with a tightly crocheted chain or a narrow crochet cord. A simple crochet version can begin with a long chain followed by slip stitches back along the chain. For the broom fibers, attach short strands of brown or tan yarn to one end and trim them evenly. Sew the broom to the hand if the witch will be used as a fixed decorative figure.
Color choices can transform the same crocheted witch pattern into many different styles. Black and orange produce a classic Halloween appearance, while purple and green create a whimsical fantasy look. Cream, rust, mustard, and brown can create a softer autumn-inspired witch. Pastel pink, lavender, and mint can turn the project into a playful decorative character suitable for displaying beyond the Halloween season.
The size can also be changed without rewriting every round. Using thinner yarn with a smaller hook produces a miniature witch, while thicker yarn and a larger hook create a larger decoration. Keep in mind that changing yarn weight also changes the amount of stuffing required and may affect the stability of accessories. Maintain a hook size that produces tight stitches so the fiberfill remains hidden.
For routine care, gently remove dust with a soft cloth or low-powered handheld vacuum attachment held slightly above the surface. If washing becomes necessary, always consider the care instructions for the specific yarn used. Handmade stuffed crochet projects are generally better suited to gentle spot cleaning because vigorous washing can distort the stuffing, embroidery, hat brim, and other small details.
Before displaying or gifting the finished crocheted witch, make a final safety inspection. Secure every sewn component and avoid loose beads, buttons, or detachable decorations if the item could be handled by small children. A decorative amigurumi witch can last for many seasons when properly assembled and stored in a clean, dry location. Keeping it away from prolonged direct sunlight can also help preserve the yarn colors.
FAQ – Frequently Asked Questions About the Crocheted Witch Pattern
Is this Crocheted witch pattern suitable for beginners?
Yes. A beginner who already understands the magic ring, single crochet, increases, and decreases should be able to follow the project. The construction introduces useful amigurumi techniques without requiring highly advanced stitches.
What yarn works best for a crochet witch?
Cotton, acrylic, or a cotton-acrylic blend can all work well. Cotton provides clear stitch definition, while acrylic is often soft, economical, and available in a large variety of colors. The best choice depends on the appearance and texture you want.
What crochet hook should I use?
For DK or light worsted yarn, approximately 2.5–3.5 mm is a useful starting range. Amigurumi generally benefits from a slightly smaller hook than ordinary crochet because the fabric needs to be dense enough to conceal the stuffing.
How can I make the witch larger?
The simplest method is to use thicker yarn and a larger hook while following the same general pattern. More experienced crocheters can also add increase rounds to the head and body, but the decrease sequence must then be adjusted accordingly.
How can I make the pointed hat stand better?
Use tight tension and a hook that creates firm stitches. You can also add a very small amount of fiberfill to the lower part of the crown, but avoid overstuffing because a witch hat often looks more natural when the pointed section bends slightly.
Can I change the colors in this Crocheted witch pattern?
Absolutely. The design is intentionally flexible. Traditional combinations include black, purple, green, and orange, but neutral, autumn, pastel, or bright palettes can work equally well.
Why can I see stuffing between my stitches?
This usually means your crochet tension is too loose, your hook is too large for the yarn, or the piece has been overstuffed. Try reducing the hook size slightly and adding fiberfill gradually rather than forcing a large amount inside at once.
Should I use safety eyes or embroidered eyes?
For an adult decorative piece, safety eyes can provide a polished appearance. For an item that may be handled by babies or very young children, embroidered facial features avoid detachable plastic components and are generally the more appropriate option.
How do I prevent gaps when decreasing?
Try the invisible decrease technique. Insert the hook through the front loop of the next two stitches, yarn over, pull through, then complete the single crochet. This method produces a cleaner surface than a standard decrease in many amigurumi projects.
Can I sell finished witches made from this general project?
Handmade sellers can create their own finished pieces, but they should always ensure that their products, branding, photos, and decorative character designs do not copy protected characters or trademarks. Creating an original color scheme and personal finishing details is also an excellent way to develop a recognizable handmade style.
Can the witch be turned into a keychain or ornament?
Yes. Use thinner yarn to create a smaller version and attach an appropriate hanging loop securely at the top. For lightweight ornaments, a crocheted chain loop can be sewn directly into the top of the hat.
How long does a crocheted witch take to make?
The time varies according to experience, size, and the amount of decoration. A simple version may be completed over a few crafting sessions, while detailed hair, embroidery, accessories, and clothing can naturally extend the project.
Conclusion
The Crocheted witch pattern combines classic amigurumi construction with plenty of opportunities for creative customization. Throughout this project, you learned how to build a rounded crochet head using controlled increases and decreases, shape a flared body, crochet simple arms and legs, and assemble the individual components into a balanced handmade character.
You also learned how to construct the witch’s distinctive pointed hat using gradual increases, create yarn hair, embroider facial features, and add optional details such as a hat band or miniature broom. These techniques are useful far beyond this particular project because the same basic methods can be adapted for many other crochet amigurumi patterns and handmade seasonal decorations.
Most importantly, do not feel that every finished witch needs to look exactly the same. Experiment with yarn colors, hairstyles, hat shapes, dress details, striped stockings, embroidery, and small accessories. Personal choices are what transform a basic crocheted witch pattern into an original handmade creation.If you make your own crochet witch, leave your sincere opinion about the pattern and share any suggestions you have. It is always interesting to hear which colors, details, accessories, and crochet techniques other makers would add or change in their own version.