
Crochet pumpkin coaster pattern is a charming autumn crochet project that combines seasonal style with practical handmade décor.
One of the advantages of making a pumpkin crochet coaster is the opportunity to turn simple crochet techniques into a decorative shape.
This guide explains the complete Crochet pumpkin coaster pattern in clear crochet terms, including the materials, stitch abbreviations, construction sequence, pumpkin shaping, stem, finishing, and customization possibilities. The goal is to create a coaster approximately 4.5 to 5.5 inches (11.5 to 14 cm) wide, although the final measurement will depend on yarn thickness, hook size, and individual tension. Throughout the project, count stitches carefully and check that the work remains reasonably flat. Minor differences in tension are completely normal in handmade crochet, so consider the stitch counts a reliable framework while allowing small adjustments when necessary. The project can be completed relatively quickly once the construction becomes familiar. After making the first coaster, repeating the pattern in several autumn colors can create an attractive matching set.
Materials, Yarn Choices, and Crochet Stitch Key
For this Crochet pumpkin coaster pattern, gather approximately 25 to 35 yards of worsted-weight cotton yarn for the pumpkin body and a small amount of green or brown yarn for the stem. A 4 mm or 4.5 mm crochet hook works well with many medium-weight cotton yarns, but always consider the recommendations for your particular yarn. You will also need scissors, a yarn needle, and optional stitch markers. A ruler or measuring tape is useful for checking the finished dimensions. If your crochet fabric feels very loose, moving down one hook size can help produce a firmer coaster.
The primary yarn deserves special attention because coasters are designed to sit underneath drinking vessels. Cotton yarn is often preferred for crochet coasters because it provides excellent stitch definition and produces a relatively sturdy fabric. For a classic pumpkin, choose burnt orange or warm orange for the body and dark green or brown for the stem. Cream, beige, terracotta, golden yellow, and muted green are attractive alternatives for modern fall décor. Avoid making the fabric excessively thick because an uneven surface may make a cup less stable.
Before beginning, become familiar with the crochet key used throughout the pattern. The abbreviations are: ch = chain, sl st = slip stitch, sc = single crochet, hdc = half double crochet, dc = double crochet, st = stitch, sts = stitches, inc = increase, and dec = decrease. When the instructions say inc, work two stitches into the same stitch unless otherwise specified. A decrease means combining two stitches into one. The pattern uses US crochet terminology.
Begin with a small foundation for the pumpkin body. Foundation: ch 11. Row 1: sc in the second ch from hook and sc across [10 sts]. Ch 1 and turn. Row 2: inc in first st, sc in next 8 sts, inc in final st [12 sts]. Ch 1 and turn. Row 3: inc, sc in next 10 sts, inc [14 sts]. These increases begin producing the broad center required for the pumpkin silhouette. Keep your foundation chain relaxed so the lower edge does not pull inward.
Continue widening the body gradually. Row 4: sc across [14 sts]. Row 5: inc, sc in next 12 sts, inc [16 sts]. Row 6: sc across [16 sts]. Row 7: inc, sc in next 14 sts, inc [18 sts]. At this point, the piece should resemble the lower half of a softly rounded oval. If the edges look slightly angular, do not worry. The border and final shaping will soften them later.
The tension used throughout the pumpkin coaster crochet pattern should be consistent rather than extremely tight. Lay the work on a flat surface every few rows to check the shape. If it curls significantly, your stitches may be too tight; if it becomes loose and floppy, a smaller hook may help. Remember that gauge is not as critical for a coaster as it would be for fitted clothing, but consistency still affects the final appearance. Aim for an even, dense fabric with clearly defined stitches and a comfortable thickness.
Step-by-Step Pumpkin Body and Rounded Shaping
After completing the widening section, create the fullest area of the crochet pumpkin coaster. Rows 8–11: sc across all 18 sts, ch 1, turn. Working several rows without increases gives the pumpkin a broad central area rather than making it pointed. Count the stitches at the end of each row because accidentally skipping the first or last stitch can distort the shape. Place a stitch marker in the first stitch if identifying the row edges becomes difficult.
Now begin narrowing the upper portion to mirror the shaping created earlier. Row 12: dec, sc in next 14 sts, dec [16 sts]. Row 13: sc across [16 sts]. Row 14: dec, sc in next 12 sts, dec [14 sts]. Row 15: sc across [14 sts]. Row 16: dec, sc in next 10 sts, dec [12 sts]. Row 17: dec, sc in next 8 sts, dec [10 sts]. Do not fasten off yet because the next stage creates a clean border around the pumpkin.
To create the rounded outline, ch 1 and work sc evenly around the entire outer edge. Place approximately one sc at the end of each single-crochet row while working down the sides. Work 2 sc or 3 sc around each lower corner if necessary to prevent the fabric from pulling. Continue across the foundation edge and up the opposite side. Along the top edge, distribute the stitches evenly and join to the first border stitch with a sl st. The exact border count is less important than achieving a smooth, flat result.
A recognizable pumpkin benefits from subtle vertical sections. Thread a yarn needle with a long strand of matching orange yarn. Beginning near the bottom center, bring the yarn upward toward the top center and gently tighten it to create a shallow indentation. Repeat this process slightly to the left and right, creating approximately three to five visual pumpkin sections. The strands should shape the piece rather than squeeze it tightly. Secure the yarn discreetly on the wrong side when you are satisfied with the appearance.
Another method is to crochet surface slip stitches instead of using sewn shaping lines. Attach matching or slightly darker yarn near the lower center and work a relaxed line of surface sl sts toward the top. Repeat on either side of the center. This technique adds texture while keeping the coaster relatively flat. Avoid bulky raised stitches in the center because cups need a stable surface. Decorative details should therefore remain shallow and functional.
Measure your coaster after completing the pumpkin body. With medium-weight yarn, it should generally measure around 4.5 to 5.5 inches wide, which is suitable for many mugs and glasses. If yours is smaller, you can add another round of single crochet around the perimeter. For a larger coaster, use a slightly larger hook or add extra stitches and rows proportionally. The important feature of this Crochet pumpkin coaster pattern is maintaining the rounded pumpkin proportions while keeping the finished piece flat enough for everyday use.
How to Crochet the Stem and Finish the Pumpkin Coaster
The stem is a small detail, but it completes the seasonal appearance of the Crochet pumpkin coaster pattern. Attach green or brown yarn to one of the center stitches along the upper edge. Stem Row 1: ch 1, sc in the same st, sc in next 3 sts [4 sts]. Ch 1, turn. Stem Row 2: sc across [4 sts]. Ch 1, turn. Stem Row 3: dec twice [2 sts]. Fasten off and leave a tail long enough for weaving. This creates a short, slightly tapered stem.
If you prefer a narrower stem, attach the contrasting yarn at the top center and ch 5. Beginning in the second chain from the hook, work sl st in next 4 ch, then slip stitch into the pumpkin edge. Fasten off and weave in the ends. This variation creates a slim curved stem and requires very little yarn. A green stem gives the coaster a fresh pumpkin appearance, while brown creates a rustic autumn effect. Both versions coordinate nicely with orange, cream, and mustard pumpkin bodies.
You can also add a tiny crocheted leaf without making the coaster unnecessarily bulky. With green yarn, ch 5. Sl st in second ch from hook, sc in next ch, hdc in next ch, and 3 dc in final ch. Working along the opposite side of the foundation chain, hdc in next ch, sc in next ch, sl st in final ch. Fasten off and sew the leaf beside the stem. Keep the leaf relatively flat so it remains decorative without interfering with a mug.
Once all crochet work is finished, weave every loose yarn end securely into the wrong side. Pass each tail through several stitches in one direction, reverse direction, and weave through another short section before trimming. This method helps keep the ends secure during regular handling. Examine the outer border and gently adjust any stitches that look uneven. Because a coaster is viewed closely on a tabletop, careful finishing can make even a simple pattern appear polished and professionally handmade.
Blocking is particularly useful if your pumpkin crochet coaster curls around the edges. Shape the coaster gently to the desired dimensions and follow an appropriate blocking method for the yarn fiber you used. Cotton pieces can often be lightly dampened and shaped flat, then left undisturbed until completely dry. Avoid stretching aggressively because that can distort the pumpkin outline. Pay particular attention to the rounded sides, top indentation, and stem.
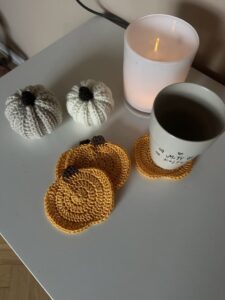
After blocking, place a mug on the center of the finished coaster to check stability. The base should sit evenly without rocking noticeably. If decorative surface stitches are too raised, gently flatten and reshape them. This final test is important because the project should remain functional as well as attractive. Your completed Crochet pumpkin coaster pattern should now show a rounded pumpkin body, subtle segmented details, a small stem, and a neat border suitable for seasonal table décor.
Customization Ideas, Common Mistakes, and Helpful Crochet Tips
Color is one of the easiest ways to personalize a Crochet pumpkin coaster pattern. Traditional orange creates an unmistakable autumn look, but pumpkins do not need to be orange. Try cream with a brown stem for farmhouse-inspired décor, mustard with dark green for a warm vintage appearance, or muted sage for a contemporary palette. You can also make several coasters in coordinated colors and use the same stem shade to visually connect the set. Small projects like this are excellent for using leftover cotton yarn.
For a more dimensional appearance, alternate sections of sc and hdc carefully within the pumpkin body. Slight stitch-height differences can create gentle texture, but avoid dramatic raised patterns in the central cup area. Another possibility is to work the border in a slightly darker shade of the body color. A rust-colored pumpkin with a deep brown-orange border, for example, can emphasize the silhouette without introducing excessive detail.
One common problem is curling. If the coaster curves upward like a shallow bowl, tension may be too tight or the border may contain too few stitches. Try relaxing your tension or distributing a few additional stitches around curved areas. If the coaster develops ripples instead, there may be too many border stitches. Remove a few evenly distributed stitches and check the piece again. A successful crochet coaster pattern should rest comfortably on a flat surface.
Uneven sides are another common beginner challenge. Count your stitches after every row, especially during the increase and decrease sections. The first and last stitches can sometimes be difficult to identify, and accidentally skipping one gradually changes the outline. Stitch markers can make this much easier. Marking the first stitch of each row allows you to see exactly where the working row begins and helps preserve symmetry throughout the pumpkin.
If you want to change the size, remember that proportion matters more than an exact number of stitches. For a larger pumpkin coaster, increase the starting chain by two or four stitches and add corresponding increases to each side. Extend the straight central rows before beginning the decreases. For a smaller version, reduce the foundation and shorten the central section. Keep the left and right sides symmetrical so the final pumpkin remains balanced.
Making several coasters is also an effective way to improve crochet consistency. The first coaster helps you understand the shaping, while the next pieces usually become faster and more uniform. A handmade set of four or six pumpkins can be useful for autumn meals, coffee tables, seasonal decorations, or thoughtful handmade gifts. Since the Crochet pumpkin coaster pattern requires only a modest amount of yarn, it is a practical project for experimenting with colors while practicing fundamental crochet skills.
Frequently Asked Questions About the Crochet Pumpkin Coaster Pattern
What is the best yarn for a crochet pumpkin coaster?
Cotton yarn is a practical choice because it creates defined stitches and a sturdy crochet fabric. Medium-weight cotton works especially well for this pattern. The exact fiber and thickness will influence the finished dimensions, so adjust your hook when necessary.
What hook size should I use?
A 4 mm to 4.5 mm crochet hook is a useful starting point for worsted-weight cotton yarn. However, crocheters naturally have different tension. If your fabric is too loose, try a smaller hook. If it feels excessively stiff or curls significantly, consider going slightly larger.
Can a beginner make this pumpkin coaster?
Yes. The pattern mainly uses chains, single crochet stitches, increases, decreases, and slip stitches. Beginners who are comfortable counting stitches and turning rows should be able to complete the project. Stitch markers can make the shaping stages easier to follow.
How large should a crochet pumpkin coaster be?
A finished width of approximately 4.5 to 5.5 inches (11.5 to 14 cm) works well for many standard mugs and drinking glasses. There is no mandatory size, however. You can adjust the pattern according to the cups you normally use.
Why does my crochet coaster curl?
Curling is commonly related to tension, hook size, or border stitch distribution. Tight stitches may pull the fabric inward, while too few border stitches can tighten the perimeter. Gently blocking the finished coaster can also help correct minor curling.
How can I keep the pumpkin shape symmetrical?
Count every row carefully and make increases or decreases at corresponding positions on both sides. If one side contains a different number of stitches, the pumpkin can lean or become uneven. Marking the first and last stitches is particularly helpful.
Can I make the pumpkin in colors other than orange?
Absolutely. Cream, yellow, rust, beige, sage green, brown, and terracotta can all create attractive autumn pumpkins. Using different colors is also an easy way to create a coordinated set while keeping every coaster slightly unique.
Can I add a leaf to the pumpkin?
Yes. A small flat leaf beside the stem adds extra detail. Keep it compact and avoid placing bulky embellishments in the center of the coaster, since the main surface needs to remain stable underneath a cup.
How long does a crochet pumpkin coaster take to make?
The time varies according to crochet experience and the amount of decoration added. Once you understand the shaping sequence, the project is relatively quick because it contains only a small number of rows and uses straightforward stitches.
How do I make a set look consistent?
Use the same yarn weight, hook size, stitch counts, and tension for every coaster. Measure the first finished pumpkin and use it as a reference for the others. You can vary the colors while maintaining identical construction for a coordinated handmade collection.
Conclusion
The Crochet pumpkin coaster pattern is a practical way to combine basic crochet techniques with warm seasonal décor. Starting with a simple foundation chain, the pumpkin gradually develops through carefully positioned increases, straight rows, and decreases. A neat single-crochet border refines the silhouette, while subtle shaping lines help create the recognizable sections of a pumpkin. Finally, a small crocheted stem and optional leaf complete the design without making the surface unnecessarily bulky.
Throughout this tutorial, you learned the essential crochet abbreviations, how to select suitable yarn, how to build the pumpkin body row by row, how to create balanced shaping, and how to finish the coaster neatly. You also learned ways to adjust the size, correct curling, improve symmetry, customize colors, and add simple decorative details. These techniques can be useful far beyond this individual project because increases, decreases, borders, surface details, and careful finishing appear in many other crochet patterns.
Once you have completed one crochet pumpkin coaster, consider making several in different autumn shades. Orange, cream, mustard, sage, rust, and brown can create a beautiful coordinated collection while allowing each handmade piece to have its own personality. Most importantly, enjoy the process and make the pattern your own. If you try this project, leave your honest opinion about the pattern and share your suggestions, favorite color combinations, or ideas for improving the design. Your creative suggestions can inspire even more ways to enjoy this simple and charming seasonal crochet project.