
Crochet bow keychain pattern is a charming and beginner-friendly project that transforms a small amount of yarn into a beautiful handmade accessory.
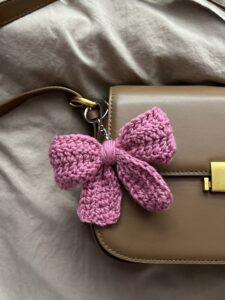
This crochet bow keychain pattern uses basic crochet techniques to form a rectangular bow body that is gathered at the center and connected to a keychain ring.
For this tutorial, the bow is designed to be approximately 3 to 3.5 inches wide, although the dimensions can easily be changed. A medium-weight cotton or acrylic yarn works particularly well because it provides enough structure without making the finished keychain bulky. You will need yarn, an appropriately sized crochet hook, scissors, a yarn needle, a stitch marker if desired, and a metal keychain ring or lobster clasp. A 3.5 mm to 4.5 mm hook is suitable for many medium-weight yarns, but your tension may require a slightly different size. The following instructions explain the stitches, construction, assembly, and customization of the crochet bow keychain pattern so you can confidently create your own version.
Materials, Crochet Stitch Key, and Preparing the Bow
Start by selecting yarn that provides good stitch definition. Cotton yarn creates a crisp bow with clearly visible stitches, while acrylic yarn usually creates a slightly softer accessory. Both materials can work beautifully, so your choice can depend on the yarn already available in your craft supplies. Approximately 15 to 25 yards of yarn should be enough for a standard-sized bow, although larger versions will naturally require more. You can use one color for the complete project or reserve a contrasting shade for the center wrap.
The crochet stitch key for this pattern uses standard US crochet terminology. CH = chain, SC = single crochet, HDC = half double crochet, DC = double crochet, SL ST = slip stitch, ST = stitch, STS = stitches, and FO = fasten off. When instructions appear inside brackets, complete the indicated sequence as directed. This pattern is primarily constructed with single crochet because SC stitches create a dense fabric that helps the finished bow maintain its shape during regular use.
To begin the main bow section, make CH 17. This foundation chain should create a bow approximately 3 inches wide with medium-weight yarn, but the exact measurement depends on your tension. For a wider bow, simply add chains. For a miniature bow, reduce the number. The important point is that your chain determines the approximate width of the finished accessory, so this is the best stage to make adjustments before continuing.
For Row 1, insert the hook into the second chain from the hook and work SC in each CH across [16]. Make CH 1 and turn. For Row 2, work SC in each ST across [16], CH 1, and turn. Continue repeating this sequence until you have approximately 8 to 10 rows. The piece should look like a small crochet rectangle. Try to maintain consistent tension so the edges remain straight rather than becoming narrower or wider.
Once the rectangle reaches the desired height, FO and leave a yarn tail approximately 8 inches long. Lay the piece flat and inspect its shape. Small variations along the edges are normal with handmade crochet, but significant differences in width usually indicate that stitches were accidentally added or skipped. Counting the 16 stitches after every row can prevent this problem. If your rectangle curls slightly, gently stretch it into shape with your fingers rather than pulling aggressively.
Before moving to assembly, weave in the starting yarn tail while leaving the longer finishing tail available if you want to use it during construction. At this point, you have completed the main structural element of the crochet bow keychain pattern. Although the rectangle may not yet resemble a bow, gathering the middle and adding the center wrap will quickly create the familiar shape.
Step-by-Step Crochet Bow Shaping and Center Wrap
Place the crochet rectangle horizontally in front of you with the side you prefer facing outward. Find the approximate center and pinch the upper and lower edges toward each other. You can create a simple accordion fold by pushing the center backward while bringing the upper and lower portions slightly forward. This produces two rounded sides and a narrow middle. Spend a moment adjusting the folds until both halves of the crochet bow appear approximately equal.
Thread the long yarn tail through a yarn needle and pass it through the pinched center several times. Pull carefully to secure the folds without stretching the stitches. Wrap the yarn around the center approximately 4 to 6 times, keeping each wrap close to the previous one. The goal is to create enough tension to hold the bow shape permanently while maintaining a neat appearance.
Next, make the decorative center band. With the same yarn or a contrasting color, CH 5. Starting in the second chain from the hook, work SC 4. Then make CH 1 and turn. Continue with SC 4 for approximately 5 to 7 rows, depending on the thickness of the gathered bow center. The resulting small rectangle should be long enough to wrap around the center without creating excessive bulk.
Wrap this small crochet strip around the gathered center of the bow. The two short edges should meet at the back. Using a yarn needle, sew those edges together with several small stitches. Position the seam on the back so it remains hidden when the keychain is viewed from the front. Before fastening the yarn, adjust the band until it sits directly in the middle of the bow.
If you prefer an even simpler construction, the separate center strip can be replaced by yarn wrapping. After gathering the rectangle, wrap yarn around the middle 10 to 15 times until you have created a defined center. Tie or sew the yarn securely at the back. This method produces a narrower center and can be useful when making miniature bows. The crocheted strip, however, usually gives the crochet bow keychain pattern a more finished appearance.
Shape the completed bow by gently pulling both sides outward and adjusting the corners. Avoid stretching the fabric excessively because the center should remain firmly gathered. Compare the left and right sides and reposition the folds if one appears noticeably larger. This simple shaping stage makes a significant difference in the final result, particularly when you want your handmade crochet keychain to have a clean and balanced appearance.
Attaching the Keychain and Customizing Your Crochet Bow
A sturdy connection between the crochet bow and metal hardware is important because keychains receive frequent handling. Cut a piece of yarn approximately 12 inches long and thread it through your yarn needle. Position the keychain ring directly behind the center of the bow. Pass the yarn through the crocheted center band and around the ring several times, making sure you catch actual crochet stitches rather than only the wrapped yarn.
Repeat these attachment stitches approximately 5 to 8 times or until the ring feels secure. Pull firmly enough to eliminate unnecessary movement, but do not pull so tightly that the center band becomes distorted. Knot the yarn discreetly on the back and weave the ends through several stitches before trimming. The ring should remain centered above the bow when the finished accessory hangs naturally.
Another option is to crochet a small attachment loop. Join yarn at the upper back of the center band, CH 8, pass the chain through the keychain ring, and SL ST back into the starting area. Work SC around the chain loop if you want a thicker connection. Fasten off and weave the yarn ends securely. This technique creates a small amount of separation between the metal ring and the bow.
You can customize the crochet bow keychain pattern by changing the foundation chain and number of rows. For a small bow, try CH 13 and approximately 6 to 7 rows of single crochet. For a larger decorative bow, try CH 21 to 25 and approximately 10 to 14 rows. Rather than focusing exclusively on exact stitch counts, maintain proportions so that the rectangle remains wider than it is tall.
Color combinations offer another simple way to personalize the project. Try a solid bow with a contrasting center, alternating stripes, or a neutral center around a brightly colored main piece. You can also add small embroidered details after crocheting the rectangle. Tiny dots, stars, lines, or initials can give the accessory additional personality without changing its basic construction. Keep decorative additions lightweight so the bow remains comfortable to carry.
Yarn texture can completely change the appearance as well. Smooth cotton produces a structured and minimalist bow, while soft acrylic gives a cozy handmade effect. A slightly thinner yarn can create delicate miniature keychains, while thicker yarn produces bold statement bows. When changing yarn weight, select a hook that keeps the fabric reasonably dense. The finished crochet bow keychain should feel flexible but substantial enough to maintain its recognizable shape.
Finishing Tips, Size Adjustments, Care, and Creative Uses
Good finishing begins with securely weaving in every yarn end. Instead of simply trimming the tails close to the knots, weave each end through several stitches in one direction, turn, and weave it back through another section. This reduces the possibility of the yarn becoming loose during regular use. Since a keychain accessory may rub against keys, bags, and other objects, secure finishing is particularly valuable.
If the bow appears uneven, gently reshape it by hand. Pull the two sides outward and reposition the center wrap until the loops look balanced. Cotton pieces can sometimes benefit from very light blocking. Slightly dampen the bow, arrange it in the desired shape, and allow it to dry naturally. Do not aggressively stretch the piece, as this can loosen the dense crochet structure that helps the bow remain attractive.
The size can be modified without changing the fundamental construction. Increasing the number of foundation chains makes the bow wider, while adding rows increases its height. A wider rectangle with fewer rows creates a long, slim bow, while a shorter rectangle with more rows creates a fuller shape. Experimenting with these proportions allows one basic crochet bow pattern to produce many different styles.
Although this tutorial focuses on a keychain, the bow itself has many other possible uses. The finished piece can decorate a tote bag, zipper pouch, backpack, handmade basket, gift package, or hair accessory. Smaller versions can be attached to crochet animals or used as decorative elements on other handmade projects. This versatility makes the pattern useful for practicing basic crochet while producing something practical.
For cleaning, gently hand wash the crochet portion using cool or lukewarm water and a small amount of mild soap if necessary. Avoid leaving metal hardware submerged for long periods because some finishes may react poorly to prolonged moisture. Press excess water from the crochet without twisting, reshape the bow, and allow it to air dry completely before using it again.
Finally, keep notes whenever you customize your project. Record the yarn type, hook size, foundation chain, number of rows, and dimensions of the finished bow. These simple notes make it much easier to reproduce a favorite version later. If you plan to make several matching accessories, consistent measurements will help each crochet bow keychain pattern look similar while still retaining the handmade character that makes crochet special.
FAQ – Frequently Asked Questions About the Crochet Bow Keychain Pattern
Is the crochet bow keychain pattern suitable for beginners?
Yes. This project is especially beginner-friendly because the main bow is essentially a rectangle made with basic stitches. If you can make chains and single crochet stitches, you can complete the primary construction. The assembly also provides useful practice with sewing crochet pieces and weaving in yarn ends.
What is the best yarn for a crochet bow keychain?
Cotton and acrylic are both practical options. Cotton generally creates sharper stitch definition and a firmer structure, while acrylic can provide a softer texture. Medium-weight yarn is easy to work with, but thinner yarn can be used when making miniature bows.
What size crochet hook should I use?
A 3.5 mm to 4.5 mm crochet hook works well with many medium-weight yarns. However, always consider your individual tension. If your stitches are very loose, using a slightly smaller hook can create the dense fabric needed for a structured keychain.
How do I make the bow larger?
Increase the number of chains in the foundation row and add more rows to the rectangle. For example, instead of CH 17, you might use CH 21 or CH 25. Add enough rows to maintain attractive proportions before gathering the center.
How can I make a miniature crochet bow?
Use thinner yarn and a smaller crochet hook, or reduce the foundation chain. A simple miniature version can begin with approximately CH 11 to CH 13 and use 5 or 6 rows of single crochet. Adjust the center band accordingly.
How do I keep the bow from losing its shape?
Use dense stitches and gather the center firmly. Cotton yarn can provide additional structure. Make sure the center band fits snugly around the gathered rectangle. Light blocking can also help restore the shape after washing.
Can I use half double crochet instead of single crochet?
Yes. HDC stitches create a slightly taller and softer texture, meaning you may need fewer rows. Single crochet is recommended for a dense, structured bow, but experimenting with other stitches is an easy way to create variations.
How should the keychain ring be attached?
Sew the metal ring securely to the back of the center band or create a crocheted chain loop that passes through the ring. Whichever method you choose, reinforce the attachment several times because this section will experience the most movement during everyday use.
Can I use leftover yarn for this project?
Yes. A bow keychain uses a small quantity of yarn, making it an excellent scrap yarn crochet project. Even very small quantities can be useful for creating contrasting center bands, stripes, or embroidered details.
Why are the sides of my crochet rectangle uneven?
Uneven edges are commonly caused by accidentally adding or skipping stitches. Count the stitches at the end of every row and remember that the turning chain in this pattern does not replace a single crochet stitch. Consistent tension also helps maintain straight edges.
Can I make several bows in different colors?
Absolutely. Once you become comfortable with the basic pattern, making multiple bows is straightforward. You can create coordinated sets using complementary colors or experiment with different yarn textures and center bands while keeping the same stitch counts.
What else can I use the crochet bow for besides a keychain?
The same bow can decorate bags, pouches, hair accessories, gift wrapping, baskets, crochet toys, and many other handmade items. Simply leave off the keychain hardware and sew the finished bow directly onto the intended project.
Conclusion
The crochet bow keychain pattern is a simple but versatile project that demonstrates how basic crochet techniques can become a polished handmade accessory. Throughout this tutorial, you learned how to select suitable yarn and hook sizes, understand the essential crochet stitch abbreviations, create the rectangular bow foundation, gather the center, crochet a finishing band, and securely attach the keychain hardware.The pattern is also highly customizable. By changing the number of foundation chains, adding or removing rows, experimenting with yarn weights, or combining different colors, you can create bows ranging from tiny and delicate to bold and decorative. The same construction can also be adapted for bags, backpacks, pouches, hair accessories, gift decorations, and many other craft projects.
Remember that careful finishing makes a significant difference. Consistent stitch counts help create straight edges, a firmly gathered center gives the bow its recognizable silhouette, and securely woven yarn tails improve durability. These simple techniques are useful skills that can be applied to many future crochet projects.
If you make this crochet bow keychain pattern, please leave your sincere opinion about the project and share your suggestions. Tell us which colors, yarn types, sizes, or creative variations you would like to try. Your ideas can inspire new versions of this charming handmade accessory and help other crochet enthusiasts discover their own favorite way to personalize the pattern.