
Crochet heart coaster pattern is a charming project for anyone who enjoys turning a small amount of yarn into something practical, decorative, and handmade.
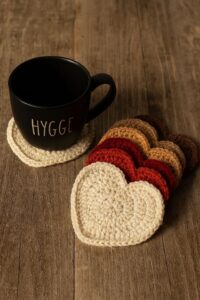
One of the best things about this crochet heart coaster pattern is how easily it can be customized. Traditional red and pink yarns create a romantic appearance, while cream, beige, terracotta, sage green, blue, or pastel shades can transform the same pattern into everyday home décor.
This tutorial explains the crochet heart coaster pattern in approachable steps while also introducing the crochet abbreviations needed to follow the instructions. The pattern is designed to be adaptable rather than overly complicated, so crocheters can adjust the final dimensions by changing yarn weight, hook size, or the number of rounds. Before beginning, read through the complete instructions so you understand where the heart curves, center indentation, and bottom point are created. Taking a few minutes to understand the construction makes it much easier to maintain even tension and achieve a balanced finished shape.
Materials, Crochet Keys, and Preparation
For this crochet heart coaster pattern, choose approximately 20 to 35 yards of medium-weight cotton yarn for one coaster. Cotton is a practical option because it produces defined stitches and generally keeps its shape well. You will also need a crochet hook that works comfortably with your chosen yarn. A 4 mm or 4.5 mm hook is a useful starting point for many medium cotton yarns, although the label recommendations and your personal tension should always be considered.
The main crochet keys used throughout the pattern are: MR = magic ring, ch = chain, sl st = slip stitch, sc = single crochet, hdc = half double crochet, dc = double crochet, tr = treble crochet, st = stitch, sts = stitches, inc = increase, and sk = skip. When an instruction appears inside brackets or parentheses, work those directions according to the stated repetition. For example, [2 dc in next st] means that two double crochet stitches are worked into the same stitch.
Begin by making a magic ring (MR). If you do not enjoy using a magic ring, make ch 4 and join the first and last chains with a sl st to form a small ring. The center needs to remain reasonably tight because a large opening may make the coaster look unfinished. Do not pull the yarn excessively tight while crocheting the first round, however, because you still need enough space to accommodate all of the required stitches.
For the foundation round, use the following sequence as a practical heart-shaped starting point: {MR, ch 3, 3 tr, 3 dc, ch 1, 1 tr, ch 1, 3 dc, 3 tr, ch 3, sl st into MR}. Pull the magic ring closed carefully. You should already see the beginnings of a heart, with two rounded upper sections and a lower point created through the placement of taller stitches.
Lay the small heart on a flat surface before continuing. Check that the right and left curves look approximately equal. The heart does not need to be perfectly symmetrical at this stage because the following rounds will refine its shape. If one side appears significantly larger, check your stitch count and confirm that you have not accidentally added or missed a stitch.
A stitch marker can be helpful even though this is a relatively small easy crochet coaster. Marking important locations, especially the center top indentation and bottom point, makes later rounds easier to understand. Maintaining these reference points is one of the secrets to producing a heart shape rather than a simple oval or circle.
Step-by-Step Crochet Heart Coaster Pattern
Once the foundation heart is complete, the second round expands the shape. Join your working yarn where necessary and ch 1. Work approximately {2 sc in the first upper stitches, hdc increases around the first curve, sc toward the center, sl st at the center indentation, sc into the next stitch, then repeat the shaping in reverse along the second curve}. At the bottom point, work {sc, ch 1, sc} into the point stitch to preserve the characteristic heart tip.
The most important principle in this stage is placing increases around the rounded sections. When crocheting a flat shape, additional stitches provide the space required for the fabric to expand. Therefore, work 2 sts into selected stitches around each upper curve. If the coaster begins curling upward, you may need another increase. If it starts rippling excessively, you probably have too many increases.
Continue around the heart using sc or hdc, depending on the texture you prefer. Single crochet produces a firm and compact coaster, while half double crochet creates slightly more height and softness. For a practical drinking coaster, a dense fabric is usually preferable because it helps the finished piece remain stable beneath a mug.
When you reach the center indentation between the two heart lobes, use shorter stitches. A helpful sequence is {sc, sl st, sc} around the center. The sl st pulls the middle area slightly downward and emphasizes the heart shape. Avoid using multiple tall stitches in this location because they can fill the indentation and make the upper edge appear almost circular.
At the bottom point, emphasize the tip with {sc, ch 1, sc} or {hdc, ch 1, hdc}, depending on the height of the surrounding stitches. Both stitches on either side of the chain space help the fabric turn naturally. Keep the chain relatively tight so the point remains defined instead of forming a visible hole.
For another expansion round, use a sequence such as {ch 1, sc around, placing 2 sc in selected increase points around each upper curve, sl st or sc at the center indentation, continue around, [sc, ch 1, sc] at the bottom point, join with sl st}. Stop periodically and place your crochet heart coaster on a table. Flatness is more important than following an increase formula that does not suit your individual yarn tension.
Shaping, Border, and Professional Finishing
A clean border can dramatically improve the appearance of a handmade crochet heart coaster pattern. Once the heart has reached the desired size, work one final round of sc around the entire piece. Use one stitch in each stitch along relatively straight areas and add increases only where the upper curves require additional room. At the center indentation, work a sl st if you want a deeper, sharper dip.
For a contrasting border, fasten off the main yarn and join a second color at a discreet location along one side. Work {ch 1, sc evenly around, [sc, ch 1, sc] into the bottom point, continue sc around, sl st to first sc}. A cream heart with a red border, red heart with a white border, or pink heart with a burgundy edge can create an attractive decorative finish.
Another border option is the reverse single crochet, sometimes called a crab stitch. It creates a slightly twisted decorative edge that can make the coaster look more finished. Beginners may prefer ordinary single crochet edging, however, because it is easier to control around the curves and center indentation.
After completing the final round, cut the yarn while leaving a tail approximately 6 inches long. Pull the tail through the final loop and tighten gently. Use a yarn needle to weave the tail through several stitches on the wrong side, change direction, and weave through several more stitches. Trim the remaining yarn only after you are confident that the end is secure.
Blocking is particularly helpful for a heart-shaped crochet coaster. Lightly dampen the finished piece and place it on a clean blocking surface. Gently arrange both upper lobes so they appear balanced, deepen the center indentation with your fingers, and straighten the bottom point. Allow the coaster to dry completely before removing it.
The final dimensions depend on yarn, hook size, tension, and the number of rounds. A finished width of approximately 4 to 5 inches is practical for many mugs and drinking glasses. If your heart is too small, add another carefully increased round. If it is larger than needed, use fewer rounds or choose a slightly thinner yarn for your next coaster.
Customization, Uses, and Helpful Crochet Tips
Color is one of the easiest ways to personalize this crochet heart coaster pattern. Red is ideal for a classic heart, while blush pink creates a softer appearance. Neutral shades such as ivory, oatmeal, gray, or warm brown can coordinate beautifully with modern interiors. You can also make a complete set using several related colors rather than making every coaster identical.
A set of four or six crochet heart coasters can become a thoughtful handmade gift. Stack the finished hearts together and tie them with a simple piece of yarn or ribbon. Handmade coaster sets can work well for birthdays, housewarming occasions, anniversaries, Valentine’s Day, Mother’s Day, or small appreciation gifts.
Scrap yarn can also be useful for this project. Because each heart requires relatively little material, the pattern provides a practical way to use leftover cotton from larger crochet projects. Before combining different leftovers in one set, check that their yarn weights are similar so the finished coasters remain approximately the same size and thickness.
Beginners should pay special attention to crochet tension. Extremely tight stitches can make the coaster stiff and cause the edges to pull inward. Very loose stitches can make the fabric floppy and create gaps between stitches. Aim for consistent tension that allows the hook to enter each stitch comfortably while still producing a dense finished fabric.
If your heart develops wavy edges, examine your increases before unraveling the entire project. Rippling usually indicates that the outer round contains more stitches than necessary. Conversely, a coaster that curls upward like a shallow bowl often needs additional increases around the curves. Small adjustments can often correct these issues without changing the entire crochet coaster pattern.
Once you understand the basic construction, experiment with variations. Add surface embroidery, crochet a tiny flower for one corner, use two colors in alternating rounds, or make coordinating hearts in several sizes. The same basic Crochet heart coaster pattern can therefore become the foundation for many creative handmade projects while helping you practice essential shaping techniques.
FAQ – Frequently Asked Questions About the Crochet Heart Coaster Pattern
What is the best yarn for a crochet heart coaster?
Cotton yarn is an excellent choice because it creates clear stitch definition and a relatively firm fabric. It is also commonly used for household crochet projects. Medium-weight cotton works especially well for beginners because the individual stitches are easy to see and count.
What crochet hook size should I use?
A hook around 4 mm to 4.5 mm is a useful starting point for many medium-weight cotton yarns. However, always consider your yarn thickness and personal tension. If the stitches feel extremely tight, try a slightly larger hook. If the fabric feels too loose, try a smaller hook.
Why is my crochet heart curling?
Curling frequently occurs when there are not enough increases around the curved portions of the heart or when your tension is very tight. Add increases gradually around both upper lobes and check the project on a flat surface after each section.
Why does my coaster look wavy?
Excessive increases can create ruffles or waves. If the outer edge refuses to lie flat, remove some increases from the next attempt. Blocking may correct minor irregularities, but significant rippling usually requires adjusting the stitch count.
How can I make the heart shape more defined?
Use shorter stitches around the upper center indentation and maintain a clear increase or chain space at the bottom point. The combination of rounded upper lobes, a lower center indentation, and a sharp bottom tip creates the recognizable heart silhouette.
Can beginners make this crochet heart coaster?
Yes. The project uses common stitches such as chain, slip stitch, single crochet, half double crochet, double crochet, and treble crochet. Beginners may need a little practice with shaping, but the small size makes it easy to restart a round if necessary.
How large should a crochet heart coaster be?
Approximately 4 to 5 inches across is a convenient size for many cups and mugs. There is no mandatory measurement, however. You can add rounds for a larger coaster or stop earlier for a smaller decorative heart.
Can I use acrylic yarn instead of cotton?
You can use acrylic for decorative versions, but cotton is generally more suitable for functional coasters. Also remember that handmade yarn items should be kept away from very hot cookware or open flames. For everyday cups and mugs, choose materials appropriate for their intended use and follow the yarn manufacturer’s care guidance.
How do I make several coasters the same size?
Use the same yarn, hook, stitch counts, and number of rounds for every heart. Consistent tension is also important. Measuring the first finished coaster can give you a useful reference for the rest of the set.
Can this heart pattern be made larger?
Yes. Continue adding rounds while distributing increases evenly around the curved sections. As the heart becomes larger, check it frequently on a flat surface because the number and placement of increases may need to change.
How should crochet coasters be washed?
Follow the washing instructions provided for the specific yarn you used. Cotton yarns may have different care requirements depending on their construction and dye. Reshape the heart after washing and allow it to dry according to the yarn manufacturer’s recommendations.
What else can I make with this heart shape?
The basic heart can become an appliqué, ornament, gift tag decoration, garland component, bag embellishment, or decorative motif. By changing the yarn thickness and hook size, you can adapt the same shaping technique to projects of many different sizes.
Conclusion
The Crochet heart coaster pattern is a small project that combines useful crochet skills with an attractive finished result. Throughout this tutorial, you learned how to create the foundation heart, understand essential crochet keys, distribute increases around the upper curves, shape the center indentation, define the bottom point, and finish the project with a neat border.You also learned why stitch placement is important when creating a flat heart-shaped crochet coaster. Increases give the rounded areas enough room to expand, shorter stitches help define the center indentation, and careful shaping at the bottom maintains the recognizable heart point. These principles can be applied to many other shaped crochet motifs.
Finishing details can make a significant difference. Secure yarn ends carefully, block the coaster when necessary, and experiment with colors and borders that complement your style. Once you are comfortable with the basic construction, making a coordinated set becomes a relaxing way to practice consistent tension and shaping.
Most importantly, use this crochet heart coaster pattern as a foundation for your own creativity. Try different yarn colors, experiment with contrasting edges, adjust the dimensions, and develop variations that make each handmade heart unique. If you make this project, leave your sincere opinion about the pattern and share your suggestions for future crochet tutorials. Your ideas can inspire new variations and help other crochet enthusiasts discover creative ways to personalize this simple heart coaster.