
Crochet Layered Witch Hat Pattern is a charming way to bring texture, dimension, and a playful handmade touch to your seasonal crochet collection.
One of the most enjoyable features of this crochet witch hat pattern is the freedom to experiment with colors and textures.
The following Crochet Layered Witch Hat Pattern explains the process from the pointed crown to the decorative layered brim and finishing details. Rather than relying only on abbreviated instructions, the pattern explains what each stage accomplishes so you can understand how the shape develops. Stitch counts can be adjusted depending on yarn thickness and the desired finished size. Before beginning, read through the complete instructions, prepare your colors, and make a small gauge sample if an exact measurement matters. Consistent tension is particularly important because the different sections need to sit neatly together without excessive curling or stretching.
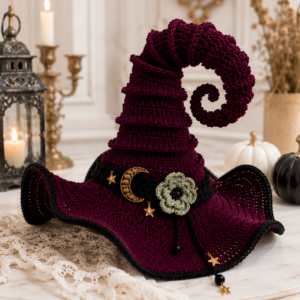
Materials, Crochet Stitch Key, and Preparation
For this Crochet Layered Witch Hat Pattern, gather medium-weight or light worsted yarn in your chosen main color, plus contrasting yarn for the layered sections and decorative band. You will also need a crochet hook appropriate for your yarn, scissors, a yarn needle, and stitch markers. If you want a firmer decorative hat, choose a hook slightly smaller than the size normally recommended for your yarn. This creates tighter stitches and helps the pointed crown retain its shape.
The basic crochet stitch key used throughout the pattern is: CH = chain, SL ST = slip stitch, SC = single crochet, HDC = half double crochet, DC = double crochet, INC = increase, and ST/STS = stitch/stitches. An increase means working two stitches into the same stitch unless another instruction is specifically given. Understanding these abbreviations before starting will make the written rounds much easier to follow.
Begin with the pointed section of the hat. Using the main color, make a magic ring. Round 1: CH 1 and work 4 SC into the ring; join with a SL ST if you are working joined rounds. Round 2: work 1 SC in each ST for a total of 4 SC. Round 3: SC in the next ST, INC in the next ST; repeat around for 6 SC. This narrow beginning establishes the characteristic pointed witch-hat shape.
Continue widening the crown gradually. Round 4: SC around with no increases. Round 5: SC in the next 2 STS, INC; repeat around for 8 SC. Round 6: SC around. Round 7: SC in the next 3 STS, INC; repeat around for 10 SC. By alternating plain rounds and increase rounds, the hat expands slowly instead of developing the rounded shape associated with a ball or traditional amigurumi piece.
For the next section, continue the same principle: increase approximately every second round while spacing the increases evenly. For example, work SC in the next 4 STS, INC around, followed by one plain SC round. On the following increase round, work SC in the next 5 STS, INC. Continue until the crown reaches your preferred width. A small decorative hat may need only 18 to 24 stitches around its lower edge, while a larger version can continue increasing.
Check the shape regularly rather than depending exclusively on stitch numbers. The crown should resemble a slightly curved cone, not a perfectly straight triangle. You can encourage the classic crooked-witch-hat appearance by gently bending the upper section after finishing. Maintaining a consistent crochet tension throughout the crown is important because loose stitches can make the tip floppy, while stitches that are too tight may make the piece difficult to shape.
Building the Layered Witch Hat Shape
The defining feature of the Crochet Layered Witch Hat Pattern is the overlapping construction near the lower portion of the crown. Once the basic cone has reached the desired width, change to a contrasting yarn color. Work one round of SC through the back loops only (BLO). Working into the back loops leaves the unused front loops visible, creating a convenient line where an additional decorative layer can later be attached.
For the next round, CH 2 and work 1 HDC in each ST around. On the following round, create a gentle flare by working HDC in the next 2 STS, 2 HDC in the next ST. Repeat around as evenly as possible. The exact final count is less important than keeping the increases balanced. This expanding section becomes the first visible layer of the hat.
Fasten off the contrasting yarn and return to the unused front loops from the earlier BLO round. Join another color, CH 1, and work SC around through those loops. On the next round, work SC, HDC, DC, HDC, SC repeatedly around the edge. This combination creates small waves that overlap the lower section, giving the layered crochet hat its distinctive textured appearance.
A second decorative layer can be added slightly lower on the hat. Choose another round where the stitches are clearly accessible and surface crochet a line of SL ST around the crown. Into these slip stitches, work a sequence such as SC, HDC, 2 DC in one ST, HDC, SC. Repeating this sequence produces another soft scalloped layer. Keep these sections relatively shallow so they enhance the design without overwhelming the overall hat shape.
To create more dramatic layering, alternate colors between each section. Purple, black, orange, and dark green create a classic Halloween-inspired palette, but the Crochet Layered Witch Hat Pattern does not require traditional colors. Deep burgundy with charcoal can create a vintage appearance, while lavender and cream can produce a softer fantasy-inspired hat. Color placement is one of the easiest ways to personalize the project.
After completing the layers, lay the hat flat and examine its silhouette. If one section is curling excessively, gently reshape it with your fingers. Natural-fiber yarn may respond well to careful blocking, while acrylic should be treated according to its care instructions. The objective is to preserve visible separation between the layers while keeping the overall shape balanced and recognizable.
Crocheting the Brim, Hat Band, and Decorative Details
To begin the brim, join the main color to the bottom edge of the crown. Round 1: CH 1 and SC evenly around. Round 2: work SC in the next 2 STS, INC in the next ST around. Round 3: SC around without increasing. This combination begins pushing the fabric outward, transforming the vertical crown into a recognizable crochet witch hat brim.
For a wider brim, continue with another increase round. Work SC in the next 3 STS, INC around, followed by one plain round. If you prefer a dramatic brim, repeat the process using progressively larger spaces between increases. Avoid placing too many increases in a single round because this can cause pronounced ruffling. A slight wave is attractive for this design, but the brim should still remain controlled.
You can deliberately create an asymmetrical edge to emphasize the whimsical witch-hat style. On the final brim round, alternate sections of SC, HDC, and DC. For example, work several SC, followed by several HDC, then a few DC before returning gradually to HDC and SC. This creates gentle variations in depth around the brim and makes the handmade hat look more organic.
Next, make the decorative crochet hat band. Using a contrasting color, CH enough stitches to wrap comfortably around the base of the crown. Starting in the second CH from the hook, SC across. Turn, CH 1, and SC across again if you want a thicker band. Fasten off, leaving a long tail for sewing. Wrap the band around the crown immediately above the brim and secure it neatly with small stitches.
A miniature buckle can add another decorative element. CH 10 to 14, depending on the size of your hat, and join with a SL ST to form a ring. Work SC around the chain and fasten off. Shape the ring gently into a square or rectangle and sew it over the center of the hat band. Gold, yellow, gray, or metallic-look yarn can make this detail stand out against a darker background.
Additional decorations can be kept simple so the layered construction remains the main visual feature. A tiny crocheted flower, star, moon, leaf, or bow can be attached to one side. You can also embroider small accents with leftover yarn. When adding embellishments, weave every yarn tail securely into the back or interior of the project so the front remains clean and polished.
Finishing, Shaping, Customizing, and Using the Pattern
Finishing makes a significant difference in the appearance of a Crochet Layered Witch Hat Pattern. Use a yarn needle to weave each loose end through several nearby stitches before trimming it. Avoid cutting tails directly beside knots because they can eventually loosen. If the hat has multiple color changes, take additional time to hide the tails behind matching sections so they do not show through lighter yarn.
To shape the pointed crown, gently bend the top toward one side. If your stitches are firm enough, the cone may naturally hold the curve. A decorative version can also be lightly stuffed with fiberfill to give the crown additional volume. Add only a small amount at a time because excessive stuffing can stretch the stitches and make the cone look rounded instead of pointed.
For a flatter appliqué version, do not stuff the crown. Instead, flatten the completed hat and lightly shape each layer. This variation works particularly well for handmade cards, fabric decorations, garlands, bags, or seasonal wall hangings. You can also crochet the project with thinner yarn and a smaller hook to create a miniature witch hat ornament without changing the basic construction.
The pattern is easy to resize because its shape is based on progressive increases. To make a larger hat, simply continue the crown increase sequence for additional rounds before beginning the layered sections. Expand the brim proportionally by adding more rounds with evenly spaced increases. For a smaller version, stop the crown earlier and use fewer brim rounds. This flexibility makes the pattern useful for experimenting with different yarn weights.
Color changes offer another opportunity for customization. A black crown with purple layers creates a traditional look, while orange and green accents can make the design more playful. Scrap yarn can be particularly effective because each layer requires only a relatively small quantity. Using different textures can also add dimension, although similar yarn weights generally produce the most predictable shape.
Once completed, the Crochet Layered Witch Hat Pattern can become part of many creative handmade projects. Add a loop to turn it into a hanging decoration, attach a keyring for a seasonal accessory, sew it onto a larger crochet project, or make several hats in coordinating colors for a decorative garland. Because the pattern combines basic stitches with shaping, layering, color changes, and finishing techniques, it is also a useful practice project for improving several crochet skills at once.
FAQ – Frequently Asked Questions About the Crochet Layered Witch Hat Pattern
Is the Crochet Layered Witch Hat Pattern suitable for beginners?
Yes. A confident beginner who understands chains, single crochet, half double crochet, double crochet, slip stitches, and basic increases should be able to complete the project. The most important skill is counting stitches carefully so that the cone and brim expand evenly.
What yarn works best for a layered crochet witch hat?
Cotton and acrylic yarn are both practical choices. Cotton tends to provide crisp stitch definition and a structured shape, while acrylic can create a softer result. For a decorative miniature hat, light worsted or DK yarn can provide excellent definition without making the finished project bulky.
How do I keep the pointed crown from becoming too wide?
Increase gradually rather than adding stitches on every round. Alternating an increase round with a plain round helps maintain a long cone. If the crown begins looking rounded, crochet one or two additional rounds without increases before continuing the expansion.
Why is my crochet witch hat brim ruffling?
Excessive ruffling usually indicates that too many increases were added. Try increasing less frequently on the following round. A small amount of waviness can complement a whimsical witch-hat design, but pronounced ruffles may prevent the brim from holding its intended shape.
How can I make the layers more visible?
Use contrasting colors and vary stitch height. Combining SC, HDC, and DC creates dimensional edges, while working through front or back loops creates natural attachment points for overlapping sections. A slightly smaller hook can also improve stitch definition.
Can I make this pattern using leftover yarn?
Absolutely. The individual layers, band, buckle, and embellishments require relatively small amounts of yarn. This makes the project an effective scrap yarn crochet pattern, especially when several coordinated colors are available.
Can the finished hat be made into a keychain?
Yes. Crochet the pattern with thinner yarn and a smaller hook, then attach a strong yarn loop at the top or back before adding a suitable keyring. Make sure all components are securely sewn if the item will be handled frequently.
How can I make the hat larger?
Continue increasing the crown while maintaining the established increase pattern. Once the desired circumference is reached, work the layers and then extend the brim with additional increase rounds. Keep checking proportions so the brim does not become too small compared with the enlarged crown.
Does the hat need stuffing?
No. Stuffing is optional. A three-dimensional ornament can benefit from a small amount of fiberfill, while appliqués and flat decorations generally look better without stuffing. If you do use fiberfill, add it sparingly to preserve the pointed shape.
How can I create a curved witch-hat tip?
Crochet one or two extra plain rounds near the narrow beginning of the crown and gently bend that section during finishing. Firm tension helps the curve remain visible. You can also secure the bend discreetly with a few matching yarn stitches on the back.
Conclusion
The Crochet Layered Witch Hat Pattern combines simple crochet techniques with creative shaping to produce a project that looks detailed without requiring overly complicated construction. Starting with a narrow magic ring, the crown develops through controlled increases, while alternating plain rounds helps preserve the elongated pointed shape. The additional crochet sections create the characteristic layered effect and allow multiple colors to become part of the design.
Throughout this tutorial, you learned how to use SC, HDC, DC, SL ST, CH, INC, BLO, controlled increases, surface crochet, color changes, and decorative edging. You also learned how to build a flared brim, add a contrasting hat band and buckle, shape the pointed crown, and adjust the pattern for different sizes. These techniques can be reused in many other decorative crochet projects.
The most enjoyable part of this Crochet Layered Witch Hat Pattern is making it your own. Experiment with yarn colors, layer combinations, brim shapes, and small embellishments until the finished piece reflects your preferred style. Whether you turn it into an ornament, appliqué, keychain, garland decoration, or simply use it as a fun crochet practice project, the layered construction offers plenty of room for creativity.
If you make your own version, leave your honest opinion about the pattern and share your suggestions. Which color combination would you choose for your layered witch hat? Your ideas and creative variations can inspire new ways to adapt this playful crochet design.