
Pattern for making a crochet Christmas tree is a charming holiday project that transforms simple yarn into a handmade decoration filled with warmth and personality.
One of the biggest advantages of this crochet Christmas tree pattern is its flexibility. A classic version can be made with forest green yarn and a brown trunk, while modern interpretations can use sage green, cream, white, red, or even leftover yarn in several coordinated colors.
The Pattern for making a crochet Christmas tree can also be adapted for many different purposes. Make a small flat version and add a hanging loop for an ornament, create several trees for a festive garland, or make a larger stuffed version that can stand on a shelf or mantel. Small trees can become gift toppers, while larger pieces can serve as handmade seasonal decorations year after year. The key to a polished result is not rushing the shaping process. Consistent tension, carefully counted stitches, neat finishing, and thoughtful decoration make a noticeable difference. Once the basic construction is understood, the same method can be modified to create an entire collection of handmade Christmas crochet decorations.
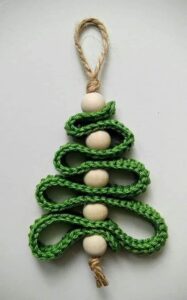
Materials, Crochet Key, and Preparation for the Christmas Tree
For a basic crochet Christmas tree, gather green yarn, a suitable crochet hook, scissors, a yarn needle, and a small amount of brown yarn for the trunk. If you are making a three-dimensional version, you will also need polyester fiberfill or another suitable craft stuffing. Optional decorative materials include small beads, miniature bows, buttons, ribbon, embroidery thread, and a small crocheted or felt star for the top. Choose lightweight decorations so they do not distort the finished crochet fabric.
The yarn weight determines much of the tree’s final appearance. DK or worsted-weight yarn works especially well for a medium-sized decorative tree because the stitches remain visible without becoming overly bulky. For miniature ornaments, lightweight cotton yarn is a practical choice. A hook around 3.0–4.5 mm may work depending on the yarn selected. Always check the yarn label and adjust the hook according to your tension. Dense stitches are generally preferable when the tree will be stuffed.
Before beginning the Pattern for making a crochet Christmas tree, become familiar with the crochet key: CH = chain, SC = single crochet, HDC = half double crochet, DC = double crochet, SL ST = slip stitch, INC = increase, DEC = decrease, ST = stitch, and STS = stitches. An increase normally means working two stitches into the same stitch, while a decrease combines two stitches into one. These simple techniques create the widening and narrowing sections responsible for the tree’s triangular shape.
For a flat tree, begin with CH 2 and work into the second chain from the hook. Row 1: 1 SC. Row 2: CH 1, turn, INC to create 2 stitches. Row 3: CH 1, turn, SC across. Row 4: CH 1, turn, INC in first ST, SC across until one ST remains, INC in last ST. Continue repeating a plain row followed by an increase row. This gradually creates a clean triangle rather than an abrupt or uneven shape.
Keep counting the stitches after every increase row. For example, the sequence may progress from 1 ST to 2 STS, 4 STS, 6 STS, 8 STS, 10 STS, and so on depending on the desired width. The exact dimensions are flexible, which is one reason this easy crochet Christmas tree project can be adapted so easily. For a small ornament, a base width of approximately 10–14 stitches may be sufficient. A larger decorative tree can continue until the base reaches the width you prefer.
Gauge is not as critical for decorative crochet as it is for garments, but consistency still matters. If the edges begin curling excessively, your tension may be too tight. If the fabric feels loose and unstable, try a slightly smaller hook. The objective is a fabric that holds its shape while remaining comfortable to crochet. Once your triangle looks balanced, fasten off neatly and weave the yarn tail into several nearby stitches using a yarn needle.
Step-by-Step Crochet Christmas Tree Construction
To create a more textured handmade crochet Christmas tree, you can divide the triangle visually into branches. Instead of maintaining perfectly straight edges, add small extensions at regular intervals. For example, after several rows, work CH 2, SL ST into the second CH, then continue across the row. Repeating these tiny points along selected rows produces subtle branch tips. Keep them evenly spaced so the finished tree remains symmetrical.
Another method uses shell-like branches. Work a foundation triangle first and then crochet decorative rows across its surface. Attach green yarn near one edge and work [SC, HDC, 2 DC, HDC, SC] across groups of stitches. These small shells overlap slightly and imitate layers of evergreen branches. Begin near the bottom and work upward. This technique adds dimension without requiring a complicated three-dimensional construction.
For a stuffed version, crochet two matching triangles using the same stitch counts. Place the pieces together with the right sides facing outward. Join the edges using SC or SL ST, beginning near one lower corner. Continue around the sides while leaving the bottom partially open. Add small portions of stuffing gradually, concentrating first on the upper point and then moving downward. Avoid overstuffing because too much filling can stretch the stitches and distort the triangular shape.
The trunk can be created separately. With brown yarn, CH 5. Row 1: starting in the second chain from the hook, SC 4. Rows 2–5: CH 1, turn, SC 4. Fasten off, leaving a long tail for sewing. Adjust the number of rows according to the size of your tree. The trunk should be wide enough to look balanced but narrow enough that the green tree remains the visual focus.
Position the trunk at the center of the lower edge. If the tree is flat, sew the trunk behind the green triangle so only the desired length remains visible. For a stuffed tree, insert the upper portion of the trunk into the opening before closing the final stitches. Sew securely through several layers of crochet fabric. A properly centered trunk helps the crochet Christmas decoration look symmetrical and professionally finished.
Finish the main construction by examining the tree from a short distance. Check whether the top point is centered, whether the two sides have similar slopes, and whether the trunk aligns with the middle. Minor irregularities can often be corrected by gently shaping the fabric with your fingers. Cotton pieces may also benefit from light blocking. Avoid excessive heat, particularly with synthetic yarn, because some fibers can be damaged by high temperatures.
Decorating and Customizing Your Crochet Christmas Tree
Decoration is where the Pattern for making a crochet Christmas tree becomes especially creative. A traditional tree might feature tiny red and gold ornaments, while a rustic version could use wooden beads, natural-colored thread, and a simple star. A modern Scandinavian-inspired tree may look beautiful with cream, sage, beige, and muted red details. There is no requirement to cover every part of the tree; a few carefully positioned decorations often create a cleaner result than an overloaded surface.
A simple crocheted garland can be created with a long chain. Make approximately CH 30–50, depending on the tree size, and fasten off. Arrange the chain diagonally across the tree and secure it at several points with matching sewing thread or yarn. For a more colorful garland, change yarn colors every few chains. Keep the strand slightly loose so it appears naturally draped instead of stretched tightly across the fabric.
Tiny crochet ornaments can be made using simple circles. Create a magic ring, work 6 SC into the ring, and join with SL ST. Fasten off and leave a tail for attaching the circle to the tree. Make several circles in red, white, yellow, or other festive colors. Because these ornaments require very little yarn, they are excellent for using small leftovers from previous projects.
To crochet a small star topper, begin with a magic ring and work 5 SC into it. For each point, use a simple sequence such as [CH 3, SL ST into second CH from hook, SC into next CH, SL ST into next base ST]. Repeat around until five points are formed. Fasten off and gently shape the points with your fingers. Attach the star securely to the top without pulling so tightly that the tree’s tip bends.
You can also turn the finished project into a crochet Christmas tree ornament by adding a hanging loop. Attach yarn to the top point, CH 15–25, and join back into the same area with SL ST. Fasten off securely and weave in the ends. Test the loop before hanging the ornament. If the tree is relatively heavy, make the loop shorter or reinforce the attachment point with a few extra stitches.
Customization can extend beyond decoration. Try creating a collection in different sizes, such as miniature, medium, and large trees. Alternate shades of green or use white yarn to represent a snowy tree. Another idea is to embroider small French knots across the surface as ornaments. These variations allow the same Christmas tree crochet pattern to produce many distinctive pieces without changing the fundamental construction.
Finishing Techniques, Common Mistakes, FAQ, and Final Tips
One of the most important finishing steps is weaving in every yarn end securely. Thread each tail onto a yarn needle and pass it through several stitches on the wrong side of the project. Change direction at least once before trimming the excess. This helps prevent the tail from working loose over time. On a stuffed tree, yarn ends can often be pulled toward the inside before the final opening is closed.
Uneven edges are a common issue for beginners. They usually occur because the first or last stitch of a row has accidentally been skipped or because an extra stitch has been added. Count the stitches regularly and use stitch markers if necessary. Remember that the turning chain in this pattern does not necessarily count as a stitch. Following the same rule consistently helps maintain straight, balanced sides.
Another common problem is excessive curling. This can result from tight tension, a hook that is too small, or inconsistent increases. Gentle blocking can correct minor curling, but severe distortion is easier to prevent than repair. Relax your hands while crocheting and allow the yarn to move naturally through your fingers. The stitches should be firm but should not require force to insert the hook.
When stuffing a three-dimensional tree, use small amounts of fiberfill instead of inserting one large piece. Push the stuffing carefully into the top point first and then fill the middle and lower sections. Keep checking the silhouette as you work. The finished tree should feel softly structured rather than hard. Overstuffing can make the seams visible and cause the branches or edges to lose their intended shape.
For a more polished handmade appearance, coordinate the yarn textures throughout the project. If the main tree uses matte cotton, consider using similar fibers for the star and garland. If you choose fuzzy or sparkling yarn, use it strategically because highly textured fibers can hide stitch definition. Good stitch visibility is especially helpful when following an easy crochet pattern or making several identical trees.
Finally, photograph or write down your stitch counts after completing the first successful tree. These notes make it much easier to reproduce the same size later. Once you understand how the increases determine width and how the number of rows determines height, you can resize the Pattern for making a crochet Christmas tree almost intuitively. That flexibility makes this project useful for ornaments, garlands, table decorations, gifts, and seasonal handmade collections.
FAQ – Frequently Asked Questions About the Pattern for Making a Crochet Christmas Tree
What is the best yarn for a crochet Christmas tree?
Cotton and acrylic are both practical options. Cotton offers excellent stitch definition and structure, while acrylic is lightweight, economical, and available in many festive colors. For small ornaments, DK or worsted-weight yarn provides a good balance between detail and durability.
Can a beginner make this crochet Christmas tree?
Yes. The basic version primarily uses chains, single crochet stitches, increases, slip stitches, and simple sewing techniques. Beginners should count stitches carefully after each row because accurate increases are essential for producing an even triangular shape.
How can I make the crochet Christmas tree larger?
Continue repeating the increase sequence until the tree reaches the desired width. You can also add more plain rows between increases to create a taller, narrower tree. Using thicker yarn and a larger hook will naturally increase the overall dimensions as well.
How do I make a smaller Christmas tree ornament?
Use thinner yarn, a smaller crochet hook, and fewer increase rows. Stop increasing once the triangle reaches approximately the desired ornament width. Add a small trunk and hanging loop, then decorate with lightweight details so the piece hangs evenly.
Do I need to stuff the tree?
No. A flat crochet Christmas tree works beautifully for garlands, ornaments, gift decorations, and appliqués. Stuffing is only necessary when you want a thicker, three-dimensional piece suitable for tabletop or shelf decoration.
How can I make the tree stand upright?
For a freestanding version, create a broader base and use firm stuffing. A small crocheted base can also be attached underneath. The center of gravity should remain low, so avoid placing heavy decorations near the top of the tree.
Why does my crochet tree look uneven?
The most common reason is an incorrect stitch count. Missing the final stitch of a row or accidentally adding an extra stitch can quickly change the shape. Count every row and mark the first and last stitches when necessary.
Can I use leftover yarn for this project?
Absolutely. This is an excellent scrap yarn crochet project, especially when making miniature trees. Small quantities of red, gold, white, brown, and green yarn can be used for ornaments, trunks, garlands, stars, and embroidered details.
How can I create a more realistic branch texture?
Add shell stitches, small chain points, picots, or layered rows over the basic triangle. Working from the bottom toward the top creates an overlapping effect that resembles evergreen branches while maintaining the recognizable Christmas tree silhouette.
What decorations work best on a crocheted Christmas tree?
Small crochet circles, embroidered dots, miniature bows, lightweight beads, chains, stars, and tiny pom-poms are popular choices. Decorations should remain proportionate to the tree and lightweight enough that they do not stretch or distort the crochet fabric.
How long does it take to crochet a Christmas tree?
A simple flat ornament can often be completed relatively quickly once you are comfortable with the stitch sequence. A stuffed or heavily decorated tree takes longer because it involves making multiple pieces, joining, stuffing, sewing, and adding decorative details.
Can I make several trees into a Christmas garland?
Yes. Crochet multiple flat trees and connect them using a long crochet chain or decorative cord. Leave consistent spacing between the trees and alternate colors or sizes if you want a more varied handmade holiday display.
Conclusion
The Pattern for making a crochet Christmas tree demonstrates how basic crochet techniques can become a beautiful and customizable holiday decoration. By starting with simple chains and single crochet stitches, adding controlled increases, creating a centered trunk, and finishing the edges carefully, you can produce a recognizable Christmas tree with a neat handmade appearance. The project can remain flat for ornaments and garlands or be transformed into a stuffed three-dimensional decoration.Throughout this tutorial, we explored the essential crochet stitch key, including CH, SC, HDC, DC, SL ST, INC, and DEC, as well as techniques for shaping the tree, creating branch texture, attaching the trunk, adding stuffing, and finishing yarn ends. We also covered decorative possibilities such as crocheted garlands, miniature ornaments, stars, embroidered details, and hanging loops.
The most enjoyable part of this crochet Christmas tree pattern is making it your own. Experiment with traditional greens, soft neutral shades, snowy white yarn, colorful scraps, or coordinated festive palettes. Once you have completed the basic version, changing the number of rows, yarn weight, hook size, and decorative details makes it possible to create an entire collection of unique Christmas trees.
If you make this project, leave your sincere opinion about the pattern and share your suggestions. Tell us which colors, decorations, or variations you would use for your own handmade crochet Christmas tree. Your creative ideas may inspire new versions of this festive project and help other crochet enthusiasts discover even more ways to personalize their Christmas decorations.