
Christmas tree-shaped crochet mug cozy pattern brings a cheerful holiday detail to an ordinary mug with a textured wrap and a small crocheted tree.
A crochet Christmas mug cozy is a satisfying small project because each part has a clear purpose.
The rectangular body provides the foundation, while the triangular tree introduces the festive shape without making the wrap bulky.
Rather than depending on one standard mug size, this tutorial shows you how to measure your own mug and adapt the cozy.This Christmas tree-shaped crochet mug cozy pattern uses US crochet terminology and works primarily with single crochet stitches.
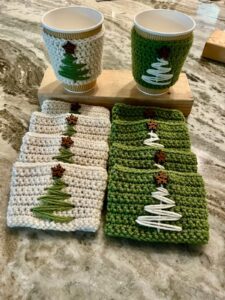
1. Materials, Measurements, and Crochet Stitch Key
Choose your yarn and tools. Gather worsted-weight cotton yarn in a background color, green for the tree, and brown for the trunk. Small amounts of contrasting yarn can provide embroidered ornaments. You will also need a 4 mm crochet hook as a starting point, a yarn needle, scissors, a measuring tape, and one smooth button approximately ¾ inch across. Around 35–50 grams of yarn in total should be ample for a typical small cozy, although the amount varies with size and decoration.
Read the crochet stitch key before beginning. In this pattern, ch means chain, sc means single crochet, sl st means slip stitch, st means stitch, and sts means stitches. Sc2tog means single crochet two stitches together, reducing two stitches to one. RS means right side, or the surface intended to face outward. Numbers in parentheses show the completed stitch count. The turning ch 1 does not count as a stitch, so always work the first single crochet into the first actual stitch.
Practice the two main techniques. For sc, insert the hook into the indicated stitch, yarn over, pull up a loop, yarn over again, and pull through both loops. For sc2tog, insert the hook into the first stitch and pull up a loop, then insert it into the next stitch and pull up another loop. Yarn over and draw through all three loops. Work these decreases through both loops of each stitch for the tree instructions below.
Measure the mug where the cozy will sit. Wrap a measuring tape around the mug body, excluding the handle itself. Then measure the usable height between the lower handle attachment and the upper area where you want the wrap to finish. Leave approximately ½ inch below the drinking rim and enough clearance above the base for the mug to sit flat. This design suits a fairly straight-sided mug; a strongly tapered mug may need more shaping than a rectangular wrap provides.
Make a small gauge sample. A useful target for the sample instructions is approximately 16 sc and 18 rows per 4 inches, measured in relaxed, unblocked fabric. Crochet a swatch large enough to measure the central stitches accurately. If your fabric has fewer stitches per inch, try a smaller hook; if it has more, try a larger hook. Exact gauge is less important than fit, but it helps you understand whether the sample counts will produce the intended dimensions.
Calculate the wrap length and check the closure gap. Aim for a rectangular body approximately ½–¾ inch shorter than the mug circumference, leaving a gap near the handle for the button loop. At four stitches per inch, 36 sc produce a body about 9 inches long. This is a starting point for a mug measuring roughly 9½–9¾ inches around. For another size, multiply your desired wrap length by your stitches per inch, then add one chain to create the foundation.
2. Crochet the Rectangular Mug Cozy Body
Begin with the foundation chain. Using the background yarn, ch 37 for the sample size. Keep the chains even and relaxed so the lower edge will not pull inward. Row 1: sc in the second chain from the hook and in every remaining chain; turn (36 sc). Count the stitches before continuing. If you adjusted the foundation length, your first row should contain one fewer single crochet than the number of chains you made.
Work the second row carefully. Row 2: ch 1, sc in each st across; turn (36 sc). Work through both loops for a firm, uncomplicated fabric. The first stitch belongs in the stitch directly beneath the turning chain, not in the next one. Place a removable marker in the first and last stitches if you tend to miss the row ends. Straight edges will make the closure easier to position and give the finished crochet mug cozy a tidy appearance.
Repeat the rows to build the height. Rows 3–14: ch 1, sc in each st across; turn (36 sc in every row). At the suggested gauge, 14 rows measure approximately 3 inches high. Stop earlier if your mug has less usable space, or work additional rows if it comfortably accommodates a taller wrap. Measure the actual fabric rather than relying only on the row number. A cozy that presses against the handle attachments may bunch or twist when fastened.
Check the fit around the empty, cool mug. Wrap the rectangle around the body with its short ends beside the handle. The fabric should lie smoothly without needing to stretch hard. Check that the lower edge does not extend beneath the mug and that the top edge leaves drinking clearance. If the body is too long or too short, revise the foundation stitch count. Changing the number of rows adjusts height, while changing the foundation adjusts length.
Finish the body without adding a border. After the final row, fasten off and weave the yarn tail through several stitches on the wrong side. Thread the beginning tail through the lower edge in the same way, changing direction to help secure it. This version leaves the rectangle unbordered so its measurements stay predictable. If you choose to add an edging later, account for the extra height and length before deciding whether the wrap fits your mug.
Set the body aside and plan the tree placement. Identify the outward-facing side of the rectangle and mark its center with a removable stitch marker. The tree should sit on the front of the mug, opposite the handle and closure. Keep its future position clear of the upper and lower edges. The next section creates a compact triangular appliqué; if your cozy is shorter than the sample, use finer yarn and a smaller hook for the tree to reduce its size.
3. Crochet the Christmas Tree and Trunk
Start the tree along its wide lower edge. With green yarn, ch 12. Row 1: sc in the second chain from the hook and in each remaining chain; turn (11 sc). Row 2: ch 1, sc across; turn (11 sc). Leave a beginning tail of approximately 12 inches if you would like to use it for sewing. The foundation edge forms the bottom of the tree, while the following rows gradually narrow toward its point.
Work the first two shaping stages. Row 3: ch 1, sc2tog, sc in the next 7 sts, sc2tog; turn (9 sc). Row 4: ch 1, sc across; turn (9 sc). Row 5: ch 1, sc2tog, sc in the next 5 sts, sc2tog; turn (7 sc). Row 6: ch 1, sc across; turn (7 sc). Each decrease row removes one stitch at each edge, keeping the triangular shape balanced.
Continue narrowing the tree. Row 7: ch 1, sc2tog, sc in the next 3 sts, sc2tog; turn (5 sc). Row 8: ch 1, sc across; turn (5 sc). Row 9: ch 1, sc2tog, sc in the next st, sc2tog; turn (3 sc). Row 10: ch 1, sc across; turn (3 sc). Count after every shaping row, since an extra stitch can make one side wider than the other.
Finish the pointed top. Row 11: ch 1, sc2tog, sc in the last st; turn (2 sc). Row 12: ch 1, sc2tog (1 sc). Fasten off, leaving a tail for sewing. At the suggested gauge, the tree will be approximately 2¾ inches wide and 2⅔ inches tall, though green yarn may work up differently from the background yarn. Smooth it gently with your fingers. Its stepped edges give it a simple stylized Christmas tree silhouette.
Make the small brown trunk. With brown yarn, ch 4. Row 1: sc in the second chain from the hook and in the next 2 chains; turn (3 sc). Rows 2–3: ch 1, sc across; turn (3 sc). Fasten off with a sewing tail. Place the trunk behind the center of the tree’s lower edge, overlapping roughly two trunk rows and allowing the remaining row to show. Stitch the overlapped section securely to the back of the tree.
Add lightweight embroidered decorations. Use contrasting yarn to sew a few small straight stitches or crosses onto the green surface. A gently curved line of surface stitching can suggest a garland without adding much bulk. For a tiny star, embroider intersecting gold stitches near the top rather than attaching a hard ornament. Keep the decoration sparse enough for the tree shape to remain clear. Secure the embroidery tails on the back, where they will be concealed when the appliqué is attached.
4. Assemble the Cozy and Adjust the Closure
Position the completed tree on the wrap. Lay the rectangle flat with its outward-facing side upward. Center the tree horizontally and check the combined height of the tree and exposed trunk. The appliqué should fit within the body without hanging over either long edge. Pin or temporarily baste it in place, then wrap the body around the cool mug to inspect the position. The tree should face forward when the short ends meet beside the handle.
Sew the tree securely to the background. Use green yarn and small stitches around the tree’s perimeter, catching the edge of the appliqué and the corresponding background stitches. Work without pulling so tightly that the body puckers. Secure the exposed trunk with brown yarn. Add a discreet stitch through the central area of the tree if needed to keep it from lifting. Weave in the sewing tails on the inside of the wrap, ensuring they remain clear of the closure.
Create the button loop on one short edge. Rejoin the background yarn approximately at the midpoint of one short edge with a sl st. Ch 10, then sl st into the same edge approximately ½ inch away from the joining point to form a loop. Fasten off temporarily with a generous tail. Ten chains are a starting point, not a fixed requirement: the loop must cross the intended gap near the handle and fit over your chosen button.
Find the button position using the actual mug. Wrap the cozy around the empty mug and guide the loop through the clear space in the handle. Bring it toward the opposite short edge without pulling the body tight. Mark a button position near that edge where the loop can fasten comfortably. Remove the cozy, then sew the button firmly using several passes of suitable thread or yarn. Fasten it again and check that the loop holds securely but can still be removed easily.
Refine the fit and secure the loop tails. If the loop droops, shorten it by removing chains and reconnecting it. If it strains against the handle or cannot reach the button, add chains before fastening off permanently. Keep the wrap smooth, with both short edges beside the handle and the base unobstructed. Once the fit is correct, weave in the loop tails thoroughly. A firmly attached button is essential, especially if the cozy will be handled frequently or given as a gift.
Finish with practical care and a final inspection. Check every sewn attachment, remove markers, and trim loose ends after they have been woven in. Remove the cozy before washing the mug or putting it in a microwave or dishwasher. Wash the crochet separately according to the yarn instructions, reshape it, and let it dry completely. Check the mug temperature before holding it through the fabric. Your finished Christmas tree-shaped crochet mug cozy pattern should add decoration while keeping the mug comfortable to use normally.
Frequently Asked Questions
Is this Christmas tree-shaped crochet mug cozy pattern beginner-friendly?
Yes, the main body uses straightforward rows of single crochet, making it approachable for beginners who can maintain a consistent stitch count. The tree adds sc2tog decreases, and the assembly introduces basic sewing. Practice the decrease on a small scrap first if it is unfamiliar. Take particular care with the button loop, since its length needs to suit your own mug rather than a standard measurement.
Is the entire cozy shaped like a Christmas tree?
The cozy has a rectangular wrap with a separate Christmas tree-shaped appliqué on the front. This construction lets the body fit around the mug evenly while the festive motif remains clearly visible. A wrap shaped entirely like a triangle would cover the mug unevenly and would need a different fastening arrangement. Here, the tree provides the decorative shape, and the rectangle supplies the practical fit.
Can I use acrylic yarn instead of cotton?
You can use acrylic for a decorative version, but its stretch, texture, and care requirements may differ from cotton. Make a gauge sample and check the fit after the fabric relaxes. Cotton is a useful choice for this design because it usually provides clear stitches and a relatively firm fabric. Neither fiber turns a decorative mug cozy into a certified heat-protective accessory, so always check the temperature before handling a hot mug.
How do I resize the pattern for a wider mug?
Measure the mug circumference and choose a wrap length about ½–¾ inch shorter as an initial target. Multiply that length by the number of stitches per inch in your swatch. For example, a 10-inch wrap at four stitches per inch requires approximately 40 sc, so begin with ch 41. Crochet a few rows and test the fit before completing the body. Adjust the closure separately to match the handle opening.
Why are the edges of my cozy becoming uneven?
The most common cause is adding or missing stitches at the beginning or end of a row. Remember that the turning ch 1 does not count as a stitch. Work into the first actual stitch, and make sure you also crochet into the final stitch before turning. Mark both row ends and count regularly. If the count has changed, undo the affected rows rather than trying to disguise the mistake with uneven tension.
What if the tree is too tall for my mug cozy?
Make the tree with lighter-weight yarn and a smaller hook, keeping the same row instructions. This reduces its dimensions while preserving the shaping counts. You can also overlap more of the trunk behind the tree so less brown fabric shows. Avoid letting the appliqué extend beyond the top of the wrap, where it could approach the drinking rim or interfere with comfortable use.
Can I replace the button with another closure?
Yes. One option is to attach a yarn tie to the midpoint of each short edge and tie them together through the handle opening. Keep the ties short enough to stay away from the mug base and nearby objects. Any closure should allow the cozy to be removed for cleaning. Check the fit carefully, and avoid fastening arrangements that pull the fabric across the handle or make it difficult to grip.
Can I decorate the tree with beads?
Embroidery is the simpler choice for a soft, washable finish. Beads add hard components and require secure attachment, particularly on an accessory that will be handled often. For households with young children or pets, embroidered decorations avoid adding extra small detachable pieces. A few stitched ornaments and a small embroidered star can create an attractive festive effect without making the appliqué heavy.
Conclusion
This Christmas tree-shaped crochet mug cozy pattern teaches you how to measure a mug, crochet a rectangular single crochet wrap, shape a triangular Christmas tree with decreases, and add a small brown trunk.
You also learned how to embroider simple decorations, sew the appliqué in place, and adjust a button loop around the handle. Checking the fit at each stage helps you create a tidy accessory suited to the mug you actually own.
Choose colors that make you smile, keep the stitching relaxed and consistent, and enjoy turning a few small amounts of yarn into a festive handmade detail. Please leave your honest opinion about this tutorial and share your suggestions. Would you choose a cream background, a colorful embroidered tree, or a different closure for your own Christmas mug cozy?