
Crochet fruit bag pattern is a lovely project for anyone who enjoys making practical accessories with a personal touch. A handmade fruit bag can accompany you to the market, organize whole fruit in your kitchen, or become a thoughtful gift for someone who appreciates reusable items.
The beauty of a crochet fruit bag comes from its balance of texture, flexibility, and simplicity. The bottom supports the contents, while the open mesh allows you to see what is inside. Smooth cotton yarn makes the stitches easy to identify and gives the finished bag a comfortable feel.
This Crochet fruit bag pattern creates a small to medium drawstring bag with a base approximately 5–6 inches across and a finished height around 10–12 inches, depending on your yarn and tension. The mesh will stretch when filled, so these measurements are approximate rather than guaranteed. You can adjust the length by changing the number of mesh rounds without altering the base instructions. Before starting, read the complete pattern and gather your supplies in a comfortable workspace. Pay particular attention to the transition between the solid bottom and the open sides. Once you understand that section, the remaining rounds follow a relaxing rhythm that makes this an enjoyable everyday crochet project.
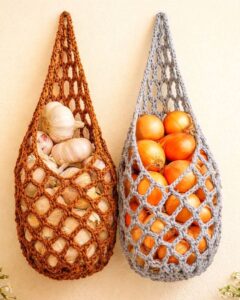
Materials and Crochet Stitch Abbreviations
For this Crochet fruit bag pattern, prepare approximately 150–200 yards of medium-weight cotton yarn. Keep a little extra available if you plan to make the bag taller or add decorative details. Smooth yarn is easier to work with than fuzzy or loosely twisted yarn because you can see each stitch clearly. Choose one color for a simple appearance or two coordinating shades for a contrasting bottom and mesh body.
Use a 4 mm crochet hook as a starting point, adjusting the size if necessary to produce a reasonably firm base. You will also need scissors, a yarn needle, a measuring tape, and a removable stitch marker. The marker is particularly helpful during the circular bottom, where the rounds are worked continuously. A comfortable hook and good lighting make counting and identifying stitches much easier.
The main crochet abbreviations are ch for chain, sc for single crochet, sl st for slip stitch, and st for stitch. MR means magic ring, which forms an adjustable starting loop. Inc means increase: work two single crochet stitches into one stitch. These instructions use US terms, so a single crochet here is the stitch called double crochet in UK terminology.
Instructions inside brackets should be repeated the stated number of times. For example, [sc in next 2 sts, inc] × 6 means working one single crochet into each of the next two stitches, followed by two single crochets into the following stitch, and repeating that sequence six times. The number given at the end of a round tells you how many stitches you should have.
A chain space is the opening beneath a group of chains. When the pattern asks you to work into a ch-5 space, insert your hook beneath the entire chain arch instead of into an individual chain stitch. This method makes the mesh section easier to work and creates the open structure. Keep the chains relaxed and similar in size so the openings look reasonably even.
Exact gauge is less critical than it would be for fitted clothing, but fabric quality still matters. Your crochet bag base should feel flexible without having large gaps between stitches. Check its diameter after completing the increase rounds. If it is much larger or smaller than expected, you can accept the different size or change hooks and restart before investing time in the mesh body.
Crochet the Solid Circular Base
Begin Round 1 with a magic ring and work 6 sc into the ring. Pull the starting tail to close the center, then place your stitch marker in the first stitch. For Round 2, work 2 sc in each stitch around, giving 12 sc. Continue in a spiral without joining or turning, moving the marker to the first stitch of every new round.
For Round 3, work [sc in next st, inc] × 6, producing 18 sc. For Round 4, work [sc in next 2 sts, inc] × 6, producing 24 sc. Count the stitches before continuing. A missed increase is simple to correct at this stage, and keeping the counts accurate will make the later transition into mesh much easier.
For Round 5, work [sc in next 3 sts, inc] × 6, giving 30 sc. For Round 6, work [sc in next 4 sts, inc] × 6, giving 36 sc. Place the growing circle on a flat surface and check its shape. If you notice strong rippling or cupping, confirm your stitch counts and consider whether your tension needs adjusting.
Continue Round 7 with [sc in next 5 sts, inc] × 6, giving 42 sc. Work Round 8 as [sc in next 6 sts, inc] × 6, giving 48 sc. Keep each increase as relaxed as the surrounding stitches. The evenly spaced increases expand the base while providing enough fabric to support a modest amount of whole fruit.
For Round 9, work [sc in next 7 sts, inc] × 6, producing 54 sc. For Round 10, work [sc in next 8 sts, inc] × 6, producing 60 sc. Measure the base, which should be approximately 5–6 inches across with the suggested materials. The next section relies on these 60 stitches to establish 20 mesh spaces.
For Round 11, work 1 sc in each stitch around, keeping 60 sc. Join with a slip stitch into the first single crochet of this round, and leave the working yarn attached. Thread the starting tail onto your yarn needle and weave it securely through the underside of the base in several directions. A firmly closed center helps the bottom remain tidy during handling.
Work the Mesh Body and Reinforced Opening
For Mesh Round 1, ch 1 and sc into the same stitch where you joined, marking this as the first anchor. Work [ch 5, skip next 2 sts, sc in next st] × 19. Then ch 5, skip the final two base stitches, and join with a sl st into the marked first sc. You should now have 20 ch-5 spaces.
For Mesh Round 2, slip stitch into the first ch-5 space, ch 1, and sc into that space. Mark this first sc. Work [ch 5, sc in next ch-5 space] × 19, then ch 5 and join with a sl st into the marked first sc. Work beneath each complete chain arch. This round maintains the same 20 mesh spaces.
For Mesh Rounds 3–18, repeat the instructions for Mesh Round 2. At the beginning of each round, slip stitch into the first chain space before making the initial single crochet. Keep the chain loops consistent, and count your spaces occasionally. If you accidentally skip an opening, correct it immediately so the sides of your crochet produce bag remain evenly shaped.
After eighteen mesh rounds, assess the length by resting the base flat and gently extending the sides upward. Add more mesh rounds for a taller bag or stop earlier for a shorter version. Maintain 20 spaces per round throughout. Remember that the mesh stretches under load, so a very long empty bag may become less convenient to carry once filled with fruit.
To make Top Edging Round 1, slip stitch into the first ch-5 space and ch 1. Work 3 sc into each of the 20 ch-5 spaces, giving 60 sc, then join to the first sc. Do not work additional stitches into the anchor stitches between the spaces. This edging draws the mesh into a firmer rim and prepares the bag for its closure.
For the eyelet round, ch 1 and sc in the same stitch, then work [ch 1, skip next st, sc in next st] × 29. Ch 1, skip the last stitch, and join to the first sc. You have 30 sc and 30 eyelets. Finish with another round, working 1 sc in every sc and every ch-1 space for 60 sc. Join and fasten off.
Make the Drawstring and Finish Your Fruit Bag
Create the crochet drawstring by making a chain approximately 28–32 inches long without stretching it. The required chain count depends on your tension, so measure the cord instead of relying on a fixed number. Starting in the second chain from the hook, work one slip stitch into every chain. Keep these stitches loose enough to create a flexible cord, then fasten off and secure the ends.
Thread the finished cord through the eyelets, moving alternately in and out around the entire opening. Bring both ends out through the same opening and adjust them until they are approximately equal in length. Pull gently to close the bag, then reopen it fully. If the cord ends nearly disappear into the eyelets when the rim is open, make a longer drawstring.
For an optional crochet leaf decoration, use green yarn and ch 8. Starting in the second chain from the hook, work sl st, sc, hdc, dc, hdc, sc into the next six chains, then 3 sc into the final chain. Here, hdc means half double crochet and dc means double crochet. Rotate the piece so you can work along the opposite side of the foundation.
Along that opposite side, work sc, hdc, dc, hdc, sc, sl st into the remaining six chain positions. Fasten off with a sewing tail and attach the leaf below the bag’s eyelet round. Keep the drawstring channel clear so the closure moves freely. Weave in every remaining end through several stitches in different directions, checking both the base and the upper rim for loose tails.
Follow the yarn label when washing your reusable fruit bag. For gentle care, wash with mild detergent, rinse thoroughly, and press out excess water without twisting the mesh. Lay the bag flat and shape the base and sides with your hands. Let it dry completely before use. Cotton may change size after washing, so check the finished dimensions and drawstring movement again once it is dry.
Test the bag with two or three pieces of whole fruit before adding more. Lift it a short distance over a table and inspect the base, mesh, and closure for excessive stretching or loose stitches. This Crochet fruit bag pattern has no tested weight rating, so use modest loads and support the bottom when necessary. Regular inspection helps you notice wear before it affects the bag’s usefulness.
Frequently Asked Questions
Is this Crochet fruit bag pattern suitable for beginners?
Yes, it is suitable for beginners who already understand chains and single crochet stitches. The base introduces evenly spaced increases, while the body uses a repeating mesh sequence. Read each round carefully, use a stitch marker, and check the stated counts before moving forward. The optional leaf introduces two additional stitches and can be omitted.
What is the best yarn for a crochet fruit bag?
Smooth cotton is a practical option because it provides clear stitch definition and is suitable for many washable accessories. Choose yarn that creates a firm base with your hook and follow its care instructions. The finished bag’s strength depends on the yarn, stitching, and finishing, so assess the fabric as you work.
Can I make the bag shorter or taller?
Yes. Adjust the number of mesh rounds while keeping 20 chain spaces in every round. Removing rounds creates a shorter bag, and adding rounds increases its height. Remember that the body stretches when filled, so check the shape with a light load before deciding whether you need additional length.
Can I make smaller mesh openings?
You can replace every ch-5 loop in the mesh body with a ch-3 loop while retaining the same anchor placement. This changes the bag’s dimensions and produces a more compact fabric. Check that the top edging lies comfortably, and adjust the number of body rounds if needed to reach your preferred height.
Why is my circular base rippling or curling?
Start by checking the stitch counts. Extra increases can create ripples, while missed increases can make the base cup. Tension and hook size also influence its shape. Slight unevenness may settle with gentle shaping, but pronounced distortion is worth correcting before you begin the mesh section.
Can I use this crochet bag for vegetables?
Yes, it can hold suitable whole vegetables that are larger than the mesh openings. Avoid overloading it and check for sharp stems that might catch the yarn. Clean the bag as needed and let it dry fully between uses. Choose storage conditions appropriate for the produce inside.
Will the mesh bag keep fruit fresh longer?
The openings allow air circulation, but the bag does not guarantee longer freshness. Different fruits have different storage needs depending on their type and ripeness. Use appropriate room-temperature or refrigerated storage, and remove damaged or overripe fruit promptly.
How should I carry the finished bag?
Use the drawstring to close the opening, and support the bottom when the contents feel heavy. Avoid swinging the bag or putting sudden strain on the closure. Begin with a modest load and assess how the yarn and mesh behave during use.
Conclusion
This Crochet fruit bag pattern shows you how to create a useful handmade accessory from a small collection of basic supplies.
You have learned to crochet a solid circular base, build evenly spaced mesh rounds, reinforce the opening, and add a drawstring closure. The optional leaf provides a simple decorative detail, while changes to the body length let you personalize the finished size.
Careful counting, consistent tension, and securely woven ends are the main ingredients for a tidy result. Choose your favorite cotton colors, work through the instructions at your own pace, and check the finished bag with a light load before regular use. Please leave your honest opinion about this tutorial and share your suggestions, preferred color combinations, or ideas for future crochet projects.