
Denim organizer basket pattern turns old jeans into a useful storage basket with character, texture, and a practical purpose.
A denim storage basket is particularly satisfying because the materials already contain interesting details. Faded knees, darker sections, sturdy pockets, and existing topstitching can become decorative features instead of being discarded.
This Denim organizer basket pattern guides you through preparing the jeans, cutting the pieces, assembling the exterior, adding support, and finishing the lining and handles. The suggested finished size is approximately 12 inches in diameter and 14 inches tall, making a generous organizer for a shelf, craft corner, or living room. A smaller version can hold sewing supplies, while a wider version can accommodate folded textiles. Before cutting, decide which original jeans details you want to feature and check that the fabric is strong enough to reuse. Work slowly around thick seams, measure carefully, and test the basket with lightweight contents after assembly. A thoughtful combination of sturdy construction and attractive denim placement produces the best result.
Materials, Basket Measurements, and Denim Preparation
Gather two or three pairs of non-stretch or low-stretch jeans, woven cotton lining, and sew-in bag stabilizer suitable for a freestanding fabric basket. You will also need polyester sewing thread, a denim needle compatible with your machine, fabric scissors, clips, a measuring tape, and a removable marking tool. For the handles, prepare two brown leather or faux-leather straps and suitable attachment hardware.
The suggested finished basket dimensions are 12 inches across the circular base and approximately 14 inches high. All construction seams use a ½-inch seam allowance unless stated otherwise. Cut the completed exterior wall to 38¾ inches wide by 15 inches tall and the exterior base as a 13-inch-diameter circle. These measurements allow for the side, base, and upper joining seams.
The wall measurement comes from the circumference of the finished base: 12 × π ≈ 37¾ inches. Adding a total of 1 inch for the two side seam allowances gives a cutting width of approximately 38¾ inches. This relationship matters because the lower wall edge must match the circular base at the stitching line. Measure accurately rather than stretching either piece to force a fit.
For the basket lining, cut one rectangle measuring 38¾ by 15 inches and one circle measuring 13 inches in diameter. Choose a tightly woven cotton that coordinates with the denim. A plain lining makes small objects easier to see, while a subtle print adds personality. The lining also covers the interior seams and handle attachments for a cleaner finish.
Wash and dry the jeans before cutting, following their care labels. Remove damaged sections and avoid fabric that has become thin or brittle. Open the leg seams where necessary to create flat pieces, then press them. Keep attractive back pockets, belt loops, and original topstitching for the exterior, but remove bulky seam allowances that would interfere with new construction seams.
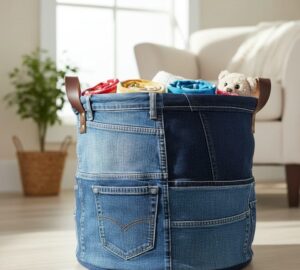
Plan the denim patchwork layout before sewing. Position a lighter pocket panel toward the front and place darker denim beside it to echo the photograph. Keep the upper edge relatively even in thickness, especially where the lining will join. Use a pieced strip to suggest a waistband if desired; an intact curved jeans waistband can be difficult to fit neatly around a cylindrical basket.
Piece the Denim Exterior and Sew the Circular Base
Create an oversized patchwork denim panel at least 40 inches wide and 16 inches tall before trimming it to size. Arrange broad sections of different denim shades, using vertical and horizontal joins to resemble the reference basket. Sew the patches with ½-inch allowances, press the seams open where practical, and trim the finished panel to exactly 38¾ by 15 inches.
Add the outside jeans pocket while the wall panel is still flat. An intact pocket section can be incorporated as one patch, preserving its original stitching. Alternatively, remove a pocket carefully and sew it onto the completed wall panel. Position its opening several inches below the upper edge and reinforce the upper corners with short backstitches. Keep it clear of the side seam and base seam allowance.
Attach decorative belt loops near the upper edge if you want the same recycled-jeans character seen in the photo. Sew their ends securely to the exterior and keep them away from the planned handle positions. Any decorative denim band should sit below the top joining seam. This placement creates the appearance of a waistband without adding unnecessary bulk where the lining attaches.
Cut and attach the basket stabilizer according to the product instructions. For sew-in support, use a wall piece approximately 37¾ by 14 inches and a base piece approximately 12 inches in diameter, centered inside the denim seam allowances. Baste them securely to the wrong side. A firm stabilizer helps the basket retain its shape, although the finished result will depend on the denim and support you choose.
Fold the exterior wall with right sides together, aligning the two 15-inch edges. Sew the vertical seam with a ½-inch allowance to form a tube. Press the seam open carefully. Mark four equal sections along the tube’s lower edge, then mark corresponding quarter points on the circular base. These marks distribute the fabric evenly during assembly.
With right sides together, clip the circular base to the tube, matching the quarter marks. Sew around the circle using a ½-inch allowance, adjusting the fabric gradually. If necessary, make shallow clips in the wall’s seam allowance without reaching the stitching line. Inspect for tucks, reinforce the seam with a second nearby line of stitching, and turn the exterior right side out.
Add the Handles, Construct the Lining, and Finish the Rim
Prepare two brown basket handles, each approximately 1 inch wide and 12 inches long. Leather gives an appearance close to the photo, while sturdy faux leather or reinforced webbing offers alternatives. Round the strap ends if desired. Test each strap against the basket before attachment, allowing approximately 2 inches at each end for secure fixing and leaving the middle free to form the handle.
Place the handles on opposite sides of the basket. Each strap should arch between two attachment points on the same side, rather than stretching across the opening. Mark the positions with the basket standing upright so both handles sit at the same height. Keep all hardware below the upper seam allowance and away from thick patchwork intersections.
Reinforce each handle attachment area on the inside with a strong fabric or suitable reinforcement patch. Install rivets or Chicago screws that are appropriate for the combined thickness, following the hardware instructions. If using sewable straps, secure them with reinforced stitching suitable for the material. Check that the connections are firm; decorative handles should not be assumed suitable for heavy loads.
To construct the lining tube, fold the lining rectangle with right sides together and align its short edges. Sew the vertical seam with a ½-inch allowance, leaving an approximately 6-inch turning opening in its middle. Backstitch at both ends of this opening. Press the seam allowances open, including along the unstitched section, to make closing it easier later.
Attach the lining circle to the lower edge of the lining tube using the same quarter-marking method as the exterior. Sew with a ½-inch allowance. Leave the lining inside out and place the right-side-out denim exterior inside it, so their right sides face each other. Tuck the handles down between the layers and align the upper raw edges.
Sew around the top with a ½-inch seam allowance, taking care not to catch the free portions of the handles. Turn the basket through the lining opening, then close that opening with a narrow machine seam or hand ladder stitch. Push the lining into place, smooth the rim, and topstitch approximately ¼ inch below the upper edge to secure the layers.
Shape the Basket, Customize the Pattern, and Maintain It
Stand the completed denim organizer basket upright and smooth the circular base from inside. Arrange the lining against the walls and check that it does not pull tightly across the bottom. Gently shape the exterior by hand. The stabilizer should support the sides, while the denim remains flexible enough to show the natural texture and seams that make the design distinctive.
For a different size, calculate the wall width using finished diameter × π + twice the seam allowance. With a ½-inch allowance, a 10-inch-diameter basket needs a wall approximately 32⅜ inches wide. Cut its base circle 11 inches in diameter. The wall height should equal your desired finished height plus 1 inch for the top and bottom allowances.
Customize the patchwork basket pattern by mixing two or three denim shades rather than using many unrelated colors. Broad panels give a clean appearance similar to the photograph. Narrow strips create a more detailed patchwork effect but introduce extra seams and thickness. Lay out the pieces before sewing so you can balance light and dark areas around the basket.
Use the external pocket for small, lightweight items such as labels, a measuring tape, or a notebook. The main compartment can hold fabric rolls, yarn, or folded textiles. Avoid placing uncovered sharp tools inside, where they could damage the lining. Distribute the contents evenly to help the circular base sit flat and prevent the basket from leaning.
Before moving a filled basket, inspect the handles and attachment points. The project is intended for lightweight organization, and its carrying capacity depends on the materials, reinforcement, and hardware. Support the base when lifting it if you are unsure. A basket that stands neatly on a shelf does not automatically have the strength needed to carry a heavy load.
For basket care, choose cleaning methods suitable for every component, including the denim, lining, stabilizer, and straps. Spot cleaning is often practical when leather handles or firm support materials are present. Test a hidden area first, avoid soaking incompatible components, and let the basket dry completely. Reshape it while drying and inspect the seams periodically.
FAQ: Denim Organizer Basket Pattern
Can beginners make this denim organizer basket pattern?
Yes, although sewing a circular base and working through thick denim require patience. Beginners may find it easier to use large patches and avoid bulky original seams. Practice stitching a curved seam on scraps before assembling the basket.
What type of jeans should I use?
Medium-weight, non-stretch denim is a useful starting point. Low-stretch jeans can work with appropriate support, but very stretchy or worn-out fabric may distort. Choose sections that remain strong, particularly around the base and handle attachments.
How do I make the basket stand upright?
Use firm bag stabilizer designed for structured fabric projects. Denim alone may soften or collapse, especially in a tall basket. The base also needs support, and the exact firmness will depend on the combination of fabric and stabilizer.
Why does the circular bottom not fit the wall?
Check the cutting dimensions and seam allowances first. The wall must match the base circumference at the stitching line. Uneven patchwork seams or inaccurate trimming can change the wall width. Match quarter marks and distribute the fabric gradually without pulling it.
Can I keep the original jeans waistband?
You can incorporate sections as decorative features, but a complete waistband may be curved, uneven, or bulky. For predictable construction, assemble and trim the wall first, then add a denim band below the upper joining seam.
Can I make fabric handles instead of leather handles?
Yes. Reinforced denim straps or sturdy webbing can replace leather. Position them on opposite sides and reinforce their attachment areas. Sew them securely to the exterior before adding the lining, keeping their free sections clear of the rim stitching.
Do I need to add a lining?
A lining creates a cleaner interior and covers the stabilizer, seam allowances, and handle hardware. It also makes the basket more pleasant to use. The lined construction described here is particularly helpful when incorporating several patchwork joins.
Can I machine-wash the finished basket?
Only if every material and component permits it. Leather, some faux leathers, certain stabilizers, and hardware may need different care. Check their instructions before assembly if machine washing is a priority, and choose compatible materials.
Conclusion
This Denim organizer basket pattern explains how to turn reusable jeans into a rounded storage basket inspired by the reference photo.
You learned how to plan contrasting panels, preserve a useful outside pocket, calculate the wall and base measurements, add support, install handles, and finish the basket with a neat lining. Careful measuring and reinforced attachment points help create an attractive organizer for lightweight everyday storage.
Please leave your honest opinion about the tutorial and share your suggestions, preferred denim combinations, or adjustments that made the basket work better for your home.