
Crochet gingerbread man pattern for Christmas is a delightful way to bring handmade warmth to your holiday decorations.
Making a crochet gingerbread man is especially enjoyable because its personality develops through simple finishing touches.
This Crochet gingerbread man pattern for Christmas uses US crochet terminology and includes stitch counts at the end of the shaping rounds. You will begin with the head and body, continue with matching arms and legs, and finish with embroidered decorations and an optional hanging loop. The finished character should measure approximately 12–15 cm tall when made with DK yarn, although your exact size will depend on your materials and tension. Read through the instructions before starting so you understand how the components fit together. Keep your stitch marker nearby, add stuffing gradually, and leave long yarn tails for sewing. By following the steps in order, you can create a charming decorative ornament with a balanced shape and a tidy finish.
1. Materials and Crochet Stitch Abbreviations
Prepare approximately 25–35 grams of brown DK yarn, small amounts of white, red, and green yarn, polyester stuffing, scissors, a tapestry needle, and a stitch marker. A 2.5–3 mm crochet hook is a useful starting point. Choose the size that produces close stitches without making the fabric uncomfortable to crochet.
Brown yarn creates the gingerbread cookie appearance, while white embroidery represents icing. Cotton yarn produces clear stitch definition and a firm finish. Acrylic offers a softer feel and is also suitable for this decoration. Use accent yarn of a similar thickness so the embroidered details remain proportional to the crocheted pieces.
The crochet stitch abbreviations are: MR for magic ring, ch for chain, sc for single crochet, sl st for slip stitch, inc for increase, and dec for decrease. An increase means working two single crochets into one stitch. A decrease combines two stitches into one, reducing the stitch count.
For an invisible decrease, insert the hook under the front loop of the next stitch and then under the front loop of the following stitch. Yarn over and pull through both front loops. Yarn over again and pull through the two loops remaining on the hook. This method helps keep the shaping neat.
Work the shaped components in continuous rounds, without joining or turning between rounds. Mark the first stitch of every round and move the marker as you progress. The instruction “[sc 2, inc] × 6” means repeat two single crochets followed by one increase six times. Numbers in parentheses indicate the completed round’s stitch count.
Before beginning your Crochet gingerbread man pattern for Christmas, make a small sample to check the fabric. If you can easily see through the stitches, try a smaller hook. Leave approximately 20 cm of yarn whenever a sewing tail is requested, and keep a checklist for the head, body, two arms, and two legs.
2. Crochet the Gingerbread Head and Body
Start the gingerbread head with brown yarn. Round 1: work 6 sc into an MR (6). Round 2: inc in every stitch (12). Round 3: [sc 1, inc] × 6 (18). Round 4: [sc 2, inc] × 6 (24). Tighten the magic ring and secure the starting tail inside.
Continue with Rounds 5–8: sc in every stitch (24 per round). Round 9: [sc 2, dec] × 6 (18). Round 10: [sc 1, dec] × 6 (12). Begin stuffing the head with small amounts of filling. Distribute it evenly so the head remains round without stretching the crochet fabric.
Complete Round 11: dec × 6 (6). Cut the yarn, leaving a long sewing tail. Thread the tail through the front loops of the remaining six stitches and pull gently to close the opening. Secure the closure and retain the tail for assembly. This closed end will face downward toward the body.
For the gingerbread body, work Round 1: 6 sc into an MR (6). Round 2: inc in every stitch (12). Round 3: [sc 1, inc] × 6 (18). Round 4: [sc 2, inc] × 6 (24). Continue with Rounds 5–9: sc in every stitch (24 per round).
Shape the upper body with Round 10: [sc 2, dec] × 6 (18). Round 11: [sc 1, dec] × 6 (12). Add stuffing gradually, supporting the lower body while keeping the upper section slightly flexible. Round 12: dec × 6 (6). Fasten off, close the opening through the remaining front loops, and secure the yarn.
Place the head above the body to check the proportions. The head should look rounded, while the body should appear slightly longer. Position their closed ends together to form the neck. Do not sew them yet; making the limbs first lets you arrange all the pieces and assess the full crochet gingerbread man silhouette.
3. Crochet the Arms and Legs, Then Assemble
Make the first gingerbread arm with brown yarn. Round 1: 6 sc into an MR (6). Round 2: [sc 1, inc] × 3 (9). Rounds 3–6: sc in every stitch (9 per round). Round 7: [sc 1, dec] × 3 (6). Lightly stuff the rounded end, leaving the upper section flexible.
Flatten the arm opening so three stitches sit opposite three stitches. Work 3 sc through both layers, inserting the hook through one stitch from each side for every single crochet. Fasten off with a long sewing tail. Make a second arm using the same instructions, and compare the pieces before continuing.
Make the first gingerbread leg. Round 1: 6 sc into an MR (6). Round 2: inc in every stitch (12). Rounds 3–6: sc in every stitch (12 per round). Round 7: [sc 2, dec] × 3 (9). Round 8: [sc 1, dec] × 3 (6). Add a small amount of stuffing.
Flatten the leg opening and close it with 3 sc through both layers, following the method used for the arms. Leave a long sewing tail and make the second leg. Arrange the head, body, arms, and legs on your work surface. Choose the front of the body and check that the matching limbs sit symmetrically.
Attach the head to the body with their closed ends touching. Sew through a small circle of stitches around the contact area, then make a second pass for support. Keep the head centered as you tighten the stitches. Attach the arms to opposite sides of the upper body, just below the neck, pointing slightly outward and downward.
Sew the legs onto the lower left and lower right sides of the body, leaving a small gap between them. Angle the rounded feet downward and slightly outward. Secure each attachment with several stitches, then weave the yarn tails through the pieces in more than one direction. Trim carefully and gently reshape the stuffing with your fingers.
4. Embroider the Icing and Finish the Christmas Decoration
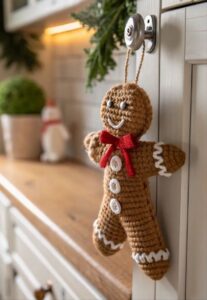
Add the facial features using white yarn and a tapestry needle. Embroider two small eyes on the front of the head, approximately three stitches apart. Create a curved smile beneath them using several short stitches. Keep the embroidery relaxed enough to sit on the surface without pulling dents into your crochet Christmas ornament.
Make gingerbread icing details across the visible fronts of the arms and legs. Use short white backstitches to form gentle waves near the rounded ends. Small, evenly spaced waves are easier to control than long loose stitches. Add an optional curved icing accent across the forehead for a more decorated cookie appearance.
Embroider two or three Christmas buttons down the center of the body. Red and green provide a traditional festive combination, while cream or burgundy can create a quieter look. Form each button with several short stitches crossing the same small area. Space the button centers approximately one crochet round apart so the details remain distinct.
For an optional bow tie, embroider two small red triangles directly below the head, with their narrow points meeting in the middle. Add a few short stitches at the center to suggest a knot. Keep the decoration proportional to the body, and avoid pulling the yarn too tightly when securing the embroidered shapes.
To turn the character into a gingerbread Christmas tree ornament, cut approximately 20 cm of matching yarn or narrow cord. Pass it beneath several sturdy stitches at the top of the head, then tie the ends securely. Adjust the hanging loop to extend approximately 5–7 cm above the head. Check that the character hangs evenly.
Inspect the completed Crochet gingerbread man pattern for Christmas project for loose seams, uneven embroidery, or stray yarn ends. Follow your yarn’s care instructions if cleaning is necessary, and allow the ornament to dry completely before storing it. Display it away from candles and heat sources, where its stitched details and handmade shape can be appreciated.
FAQ
Is this crochet gingerbread man pattern suitable for beginners?
Yes, it is suitable for beginners who know single crochet and are ready to practice increases, decreases, and assembly. The separate components make the project easier to manage. If the magic ring or invisible decrease is unfamiliar, practice those techniques with a small amount of spare yarn before starting the ornament.
What should I do if my stitch count is wrong?
Count the stitches again from your marker, then check the repeated sequence for that round. A missed increase, extra stitch, or incorrect decrease can affect later shaping. Undo the affected section and correct the count before continuing. It is easier to repair a mistake immediately than after several more rounds.
Can I make a larger crochet gingerbread man?
Yes. Thicker yarn and a suitable larger hook will produce a bigger character while keeping the same stitch counts. Finer yarn creates a smaller ornament. Always choose a hook that makes dense fabric, and remember that changing yarn thickness also changes the amount of stuffing and yarn required.
Why does stuffing show through the stitches?
The crochet fabric may be too loose, or the piece may contain too much filling. Try a smaller hook and add stuffing in small portions. Aim for a supported shape that still feels slightly flexible. Overstuffing can stretch the stitches and distort the head, body, or limbs.
How can I stop the head from leaning forward?
Position it directly above the body and sew around the entire contact area. Attaching only the front or back can allow the head to tip. Make a second sewing pass and check the angle as you work. Balanced stuffing and a firm, evenly distributed seam help support the head.
Can I use plastic eyes or real buttons?
You can add suitable embellishments to a decoration that will remain out of children’s reach, but this tutorial uses embroidery to avoid detachable decorative pieces. If making an item for a child, consider the entire construction and applicable toy requirements. Embroidered features alone do not establish that a handmade project is suitable as a toy.
How should I store the finished ornament?
Ensure the gingerbread man is clean and completely dry, then store it in a box away from moisture and direct sunlight. Keep heavier decorations from pressing against it. Plain tissue can help protect the embroidered details, and gentle reshaping with your fingers can restore its appearance before the next holiday season.
Conclusion
This Crochet gingerbread man pattern for Christmas teaches you how to crochet a rounded head and body, make matching arms and legs, and sew the components into a festive character.
You have also learned how to read the stitch abbreviations, follow round counts, add stuffing gradually, and finish the ornament with embroidered icing, buttons, and a hanging loop. Careful assembly and simple decorative details give the project a cheerful, recognizable appearance.
Choose colors that suit your holiday decorations and enjoy giving your gingerbread man its own expression. Whether you make one ornament or a small collection, the same construction provides a useful foundation for practicing crochet shaping and embroidery. Please leave your honest opinion about this tutorial and share any suggestions for improving the instructions. Your ideas for future Christmas crochet projects are welcome, too.