
Crochet Christmas tree cushion pattern is a charming way to bring handmade warmth into your holiday decorations while creating a cheerful character for your favorite chair or sofa.
A crochet Christmas tree cushion combines the shape of a festive tree with the softness of a small decorative pillow.
This Crochet Christmas tree cushion pattern takes you through choosing materials, understanding the stitch abbreviations, shaping the body, making the accessories, and completing the final assembly. At an approximate gauge of 14 single crochet stitches and 16 rows per 4 inches, the unstuffed body measures about 11 inches wide and 10 inches tall. The finished dimensions will vary with your yarn, hook, tension, and amount of filling, while the star and feet add extra height. Making a small gauge sample before beginning helps you check that the fabric is dense enough to contain the stuffing. The instructions use US crochet terminology and include stitch counts at important shaping stages. Take your time with the embroidery and sewing, as these finishing details give your handmade Christmas cushion its distinctive expression.
Materials and Crochet Stitch Abbreviations
Gather approximately 150–200 grams of green worsted-weight yarn, 20–30 grams of yellow yarn, and 20–30 grams of beige yarn. You will also need black yarn for the face, polyester fiberfill, scissors, a tapestry needle, and stitch markers. These quantities are estimates and may vary with your chosen yarn and crochet tension.
Begin with a 4 mm crochet hook and make a small single crochet sample. The fabric should feel flexible but dense enough to prevent filling from showing through. If the sample develops noticeable gaps when stretched gently, use a smaller hook. Choose the hook according to the fabric you produce rather than the yarn label alone.
The basic crochet stitch key is as follows: ch means chain, sc means single crochet, sl st means slip stitch, and st means stitch. MR means magic ring. An inc means working two single crochet stitches into one stitch, while a dec combines two neighboring stitches into one.
To work single crochet, insert your hook into the indicated stitch, yarn over, and pull up a loop. Yarn over again and pull through both loops. For a decrease, pull up a loop in each of the next two stitches, then yarn over and pull through all three loops on the hook.
The body panels use turned rows. Chain one at the end of each row and turn your work; this turning chain does not count as a stitch. Crochet into the first stitch beside the chain. The small rounded pieces use continuous rounds, so mark the first stitch and move the marker after completing each round.
Instructions such as (sc, inc) × 6 mean that you repeat the sequence inside the parentheses six times. Numbers in square brackets show the total stitch count after completing a row or round. Understanding this notation makes the Crochet Christmas tree cushion pattern easier to follow and helps you identify counting mistakes early.
Crochet the Christmas Tree Body Panels
Start the first green tree panel by chaining 3. Row 1: work sc into the second chain from the hook and the remaining chain [2]. Chain 1 and turn. Row 2: increase in both stitches [4]. Chain 1 and turn. Row 3: work sc across [4], then chain 1 and turn.
Continue shaping the triangle. Row 4: increase in the first stitch, work sc in the next 2 stitches, and increase in the last stitch [6]. Row 5: sc across [6]. Row 6: increase, sc in the next 4 stitches, increase [8]. Row 7: sc across [8]. Chain 1 and turn between rows.
Repeat this sequence through Row 39, increasing in the first and last stitches of every even-numbered row and working straight across every odd-numbered row. Check these counts: Row 10 [12], Row 14 [16], Row 18 [20], Row 22 [24], Row 26 [28], Row 30 [32], Row 34 [36], and Row 38 [40]. Row 39 also has 40 stitches.
Fasten off after Row 39 and weave in the loose ends. Lay the panel flat to inspect its shape. The gradual increases create a simple triangular outline, while stuffing will give it dimension during assembly. Keep the edges relaxed and check that you have not accidentally added stitches when working beside the turning chain.
Make the second body panel by repeating Rows 1–39 with the same yarn and hook. Place both panels together and compare their outlines. If one is noticeably larger, check the stitch counts and tension before continuing. Matching panels make the joining process easier and help prevent a twisted or uneven finished cushion.
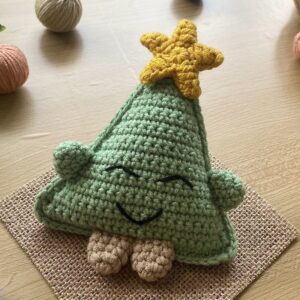
Embroider the face on one panel before assembling the body. Use black yarn to create two curved closed eyes near the middle and a smile below them. Check the placement by laying the star and feet nearby. Secure the embroidery ends on the reverse, keeping the stitches loose enough to avoid pulling or puckering the green fabric.
Make the Star, Arms, and Feet
Begin the golden crochet star by making two identical circular centers. For each center, work Round 1: 5 sc into an MR [5]. Round 2: increase around [10]. Round 3: (sc, inc) × 5 [15]. Round 4: (2 sc, inc) × 5 [20]. Slip stitch into the next stitch to finish the center.
Each star point uses four consecutive stitches from the center. Point Row 1: sc in the next 4 stitches [4], chain 1, and turn. Row 2: decrease twice [2], chain 1, and turn. Row 3: decrease [1] and fasten off. Rejoin yarn in the next unused center stitch and repeat until you have five points.
Make the second star face in the same way and weave in the loose ends. Place the faces together with their points aligned, then whipstitch around the outline using yellow yarn. Add a little fiberfill before closing the final opening. Keep the star lightly padded so its points remain recognizable, and leave a long sewing tail.
For each green arm, work Round 1: 6 sc into an MR [6]. Round 2: increase around [12]. Round 3: (sc, inc) × 6 [18]. Rounds 4–6: sc around [18]. Round 7: (sc, dec) × 6 [12]. Rounds 8–9: sc around [12]. Lightly stuff, flatten the opening, and close with 6 sc through both layers.
For each beige foot, work Round 1: 6 sc into an MR [6]. Round 2: increase around [12]. Round 3: (sc, inc) × 6 [18]. Rounds 4–7: sc around [18]. Round 8: (sc, dec) × 6 [12]. Rounds 9–10: sc around [12]. Add stuffing, flatten the opening, and close with 6 sc through both layers.
Leave long sewing tails on both arms and feet. Arrange them around the front panel to check their positions before attaching anything. Place the arms along the lower sides and the feet close together near the center of the bottom edge. Position the star over the tip, keeping it clear of the embroidered eyes.
Assemble and Finish Your Crochet Christmas Tree Cushion
Place the front and back panels together with their finished sides facing outward. Align the upper point, lower corners, and side edges using stitch markers. Join green yarn at one bottom corner and work single crochet through both layers. Keep the joining stitches relaxed so the seam follows the outline without gathering the fabric.
Along each sloping side, begin with approximately one joining single crochet per row end. Adjust the spacing where necessary to keep the border flat. Work 3 sc at the upper tip to turn the corner, and use 2–3 sc at each lower corner as needed. Across the bottom, join corresponding stitches from both panels.
Leave an opening about 3 inches wide along the bottom for stuffing. Add small handfuls of fiberfill, gently distributing it into the upper point and lower corners before filling the center. The cushion should hold its shape while remaining soft. Avoid packing it too firmly, as excessive filling can stretch the stitches and distort the triangular outline.
Complete the joining border across the opening, slip stitch into the first joining stitch, and fasten off. Weave in the ends securely. Sew each flattened arm opening to a lower side edge using green yarn. Attach the feet along the lower front edge so they project beneath the body, checking that both are positioned evenly.
Sew the yellow star topper over the upper point using several stitches across its lower center. Catch a broad area of the cushion fabric so the attachment feels stable. Gently arrange the points, smooth the body, and check the embroidery. Inspect the arm, foot, and star attachments for loose stitches before displaying the finished cushion.
Follow the care instructions supplied with your yarn and stuffing. Spot-cleaning is a practical option for small marks on a stuffed decoration. If all materials are washable, clean gently and allow the cushion to dry completely before storing it. Keep your crochet Christmas tree cushion in a dry place with the star resting naturally between holiday seasons.
Frequently Asked Questions
Is this crochet Christmas tree cushion pattern suitable for beginners?
This pattern is suitable for confident beginners who understand single crochet, increases, decreases, and basic sewing. The tree panels use a repeating shaping sequence, while the arms and feet use simple rounds. The star requires closer attention because its five points are worked separately. Practicing one star face first can make the final assembly easier.
Will the finished cushion look exactly like the photograph?
The instructions create an original interpretation of the photographed design, including its green triangular body, yellow star, smiling face, arms, and beige feet. The original stitch counts and materials are unknown. Your result will have similar features, but its precise shape and texture will depend on the yarn, gauge, stuffing, and finishing techniques you use.
How can I make the cushion larger?
Use thicker yarn and a hook that produces a dense fabric, or continue the alternating increase and straight-row sequence beyond Row 39 on both body panels. Make a sample first to estimate the resulting size. If you enlarge the body considerably, adjust the accessories as well so the star, arms, and feet remain proportionate.
Why can I see the stuffing through the crochet stitches?
Visible stuffing usually indicates loose tension, an oversized hook, or excessive filling. Before making the panels, check that your sample has a close texture. During assembly, add stuffing gradually and stop before the stitches stretch. You can also make a slightly smaller fabric insert to hold the filling inside the crocheted body.
Can I use cotton yarn for this project?
Yes, cotton yarn can produce a firm cushion with clearly defined stitches. Acrylic may create a lighter and softer finish, depending on the specific yarn. Either option can work when the fabric is dense enough. Use matching yarn weights for the panels and check the washing requirements of every material before cleaning the finished cushion.
What should I do if the body panels do not match?
First, compare the stitch counts at the shaping checkpoints. A missing increase can make one panel narrower. If the counts match, check whether your tension or hook size changed between panels. Correct substantial differences before joining, since stretching one panel to fit the other can create puckering or an uneven seam.
Can I change the face or leave off the arms and feet?
Yes. You can embroider open eyes, change the smile, add yarn cheeks, or make a simpler tree cushion without limbs. Embroider the face before joining the panels so you can secure the yarn ends inside. Preview the placement of each feature to keep the expression balanced beneath the star.
How much stuffing should I add?
Add enough fiberfill to create an evenly padded cushion that keeps its triangular shape. The exact amount depends on the finished dimensions and your preferred firmness. Use small portions and redistribute them gently as you work. The star, arms, and feet need relatively little filling so they remain neat and easy to attach.
Conclusion
This Crochet Christmas tree cushion pattern has explained how to read the stitch abbreviations, crochet two matching body panels, make the star and limbs, and assemble a cheerful holiday decoration.
Consistent tension, accurate stitch counts, and gentle stuffing help preserve the shape, while careful embroidery gives the tree its friendly personality. You can adapt the colors and expression to create a cushion that suits your Christmas décor.
Please leave your honest opinion about this project and share any suggestions for different colors, facial expressions, or finishing details. Your feedback can help improve future tutorials and inspire new handmade Christmas ideas. Enjoy the process, take your time with the sewing, and make your crochet tree a festive character of its own.