
Crochet pinecone ornament pattern brings the quiet beauty of woodland decorations into your home through a small, textured project made with yarn.
This crochet pinecone ornament is suitable for crocheters who understand basic stitches and feel comfortable following simple increases and decreases.
The Crochet pinecone ornament pattern below uses US crochet terminology and includes a complete stitch key, materials, body instructions, scale construction, and finishing guidance. Expect a small ornament approximately 3–4 inches tall, although yarn thickness, hook size, stuffing, and personal tension will affect its measurements. The design is a stylized interpretation of a pinecone rather than an exact reproduction of a particular species. Its purpose is to capture the familiar tapered shape and overlapping texture in a manageable crochet project. Read the instructions before beginning, keep your stitch marker nearby, and leave generous sewing tails. Those simple preparations will help you enjoy the process and achieve a tidy result.
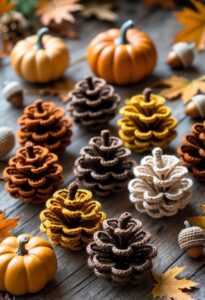
Materials and Crochet Stitch Key
For this Crochet pinecone ornament pattern, prepare approximately 35–50 grams of DK-weight yarn, a 3 mm crochet hook, polyester fiberfill, scissors, a blunt yarn needle, and a removable stitch marker. The yarn quantity is an estimate rather than a fixed requirement. Keep some extra yarn available if you decide to add more scales or make a longer hanging loop.
Choose a smooth yarn that allows you to see individual stitches easily. Cotton yarn gives the shells clear definition, while acrylic yarn creates a softer surface. A medium brown body with slightly lighter brown scales adds subtle depth. Using one shade throughout also works beautifully and helps small spaces between the scales blend into the background.
The basic crochet abbreviations are ch = chain, sl st = slip stitch, sc = single crochet, and dc = double crochet. Additional terms are MR = magic ring, inc = increase, and dec = decrease. An increase means working two single crochet stitches into the same stitch. A decrease combines the next two stitches into one single crochet.
Use an invisible decrease for a smoother stuffed body. Insert your hook through the front loop of the next stitch, then through the front loop of the following stitch. Yarn over and pull through both front loops. Yarn over again and pull through the two loops remaining on the hook. This completes one decrease and reduces the count by one stitch.
The body is worked in continuous rounds, so you will not join each round with a slip stitch. Mark the first stitch of every round and move the marker upward as you progress. Instructions such as (sc 2, inc) × 6 mean repeat that complete sequence six times. The number in parentheses at the end indicates the total stitches in the completed round.
Exact gauge is not essential, but the fabric must be firm enough to keep stuffing inside. Crochet a few rounds and inspect the spaces between stitches before continuing. If the openings are large, try a smaller hook. Keep your tension comfortable rather than forcing unusually tight stitches, which can make the project difficult to work and cause hand fatigue.
Crochet the Pinecone Body Step by Step
Start at the lower tip. Round 1: make an MR and work 6 sc into the ring (6). Tighten the ring carefully. Round 2: work 1 sc in each stitch around (6). Round 3: work 2 sc in each stitch around (12). These rounds create a narrow beginning that gradually opens into the lower portion of the ornament.
Continue shaping the lower body. Round 4: work 1 sc in each stitch around (12). Round 5: repeat (sc 1, inc) × 6 (18). Round 6: work 1 sc in each stitch around (18). Check your stitch count after the increase round. Catching an extra or missing stitch now is easier than correcting the shape after stuffing.
Expand the middle section. Round 7: repeat (sc 2, inc) × 6 (24). Round 8: work 1 sc in each stitch around (24). Round 9: repeat (sc 3, inc) × 6 (30). The evenly spaced increases create a rounded body. Let the fabric curve naturally rather than trying to flatten it like a coaster or circular motif.
Add length and begin narrowing. Rounds 10, 11, and 12: work 1 sc in each stitch around (30 stitches per round). Round 13: repeat (sc 3, dec) × 6 (24). Round 14: work 1 sc in each stitch around (24). These rounds form the fullest section and then gently reduce the upper circumference.
Stuff the ornament and shape the top. Round 15: repeat (sc 2, dec) × 6 (18). Add small pieces of fiberfill, beginning at the lower tip and moving upward. Round 16: repeat (sc 1, dec) × 6 (12). Adjust the filling until the body feels softly firm. Avoid overstuffing, which can stretch the stitches and make sewing the scales more difficult.
Close the body. Round 17: work 6 dec (6). Cut the yarn, leaving an approximately 8-inch tail, and pull it through the final loop. Thread the tail through the front loops of the remaining six stitches and draw the opening closed. Secure the yarn, bury the end inside the body, and gently roll the ornament between your palms to distribute the stuffing.
Make the Decorative Pinecone Scale Strips
The textured surface of this Crochet pinecone ornament pattern is made from two separate strips of rounded shells. Each strip contains 20 scales, giving you 40 scales to arrange around the body. Because crochet tension varies, this is a starting quantity. Test the strips against your stuffed body before sewing, and make a shorter additional strip if the coverage needs adjustment.
Begin the first strip with ch 62. Work 1 sc into the second chain from the hook. After that stitch, you will have 60 unused foundation chains remaining. Keep the foundation chain relaxed enough to work into comfortably. A chain that is excessively tight can make the strip twist sharply and make the shell stitches harder to complete.
Work the shell repeat: skip the next chain, work 5 dc into the following chain, then work 1 sl st into the next chain. Repeat this sequence 20 times. Each repeat uses three foundation chains, so the 20 repeats consume all 60 remaining chains. The five double crochet stitches spread into a small fan that forms one decorative scale.
Fasten off and make the second strip. Leave an approximately 24-inch sewing tail on the first strip, then repeat the same instructions for another strip with 20 shells. You can use matching yarn or a slightly different brown shade. If a sewing tail becomes too short during assembly, secure it neatly and continue with a fresh length of matching yarn.
For a shorter supplementary strip, use the formula three chains per shell, plus two starting chains. For example, ch 17 produces five shells: work sc into the second chain, then repeat the shell sequence five times across the remaining 15 chains. This lets you add a small amount of coverage without making an entire extra 20-shell strip.
Smooth the shells gently with your fingers before assembly. Some curling is normal because several tall stitches share the same foundation chain. Identify the narrow foundation edge and the rounded shell edge on each strip. You will sew the foundation edge to the body while leaving the shell edges loose, allowing them to overlap and create the pinecone texture.
Assemble and Finish the Crochet Pinecone Ornament
Place the stuffed body with its narrow starting tip pointing downward and its closed opening at the top. Position the first scale strip near the lower tip, with its foundation edge above its rounded shell edges. The shells should point generally toward the bottom of the ornament. Leave the narrow tip slightly visible so the overall shape remains recognizable.
Wrap the first strip around the body in an ascending spiral. Hold the foundation edge temporarily with removable stitch markers, catching the crocheted fabric rather than pushing deeply into the stuffing. Check the arrangement from several angles. The shells should overlap enough to soften the attachment lines while retaining room to lift away from the body.
Sew the foundation edge in place with small stitches using your yarn needle. Catch a stitch on the strip and a neighboring stitch on the body, then pull the yarn through gently. Continue along the foundation without stitching down the rounded shell tips. Keep the sewing tension even so the strip sits securely without squeezing or distorting the stuffed center.
Position the second strip near the end of the first, hiding the transition beneath a neighboring shell. Continue the spiral toward the top. Adjust the spacing to suit your ornament rather than forcing a particular number of turns. If the shells look crowded, spread the turns farther apart. If the body remains noticeably exposed, add a short supplementary strip.
Make the hanging loop by chaining approximately 25 stitches, adjusting the length to your preference. Fasten off with tails long enough for sewing. Attach both ends directly to the top of the stuffed body with several small stitches. Secure and weave in the ends. Give the loop a gentle pull to check the attachment before hanging your ornament.
Finish by arranging the shells and trimming any visible yarn ends. For a snowy version, embroider a few small cream stitches along selected shell tips before or after assembly. Keep the decoration light so the layered texture remains visible. Your completed crochet pinecone ornament can be displayed on a tree, added to a wreath, or used as a reusable gift decoration.
FAQ
Is this Crochet pinecone ornament pattern suitable for beginners?
It is suitable for confident beginners who can work single crochet, double crochet, increases, and decreases. The scale strips are repetitive, and the body has straightforward stitch counts. Assembly takes more attention than the individual stitches. Practicing one short shell strip first can help you understand how the rounded scales behave before making the full ornament.
Why does my pinecone look round instead of elongated?
The body can look round if it is heavily stuffed across the middle or if your stitches are particularly short. Redistribute the filling before closing the opening, keeping the lower tip defined. For a future ornament, add one or two extra 30-stitch rounds between Rounds 12 and 13, remembering that a longer body may need additional scales.
How do I stop the scales from looking flat?
Attach only the foundation edge of each strip and leave the rounded shell edges free. Sewing through the entire shell prevents it from lifting. Also check that neighboring spiral turns are not pressing the shells tightly against the body. Gently lift and arrange each scale after sewing to create a more dimensional surface.
Can I make the ornament with thicker yarn?
Yes. Thicker yarn with an appropriately sized hook generally produces a larger ornament, while finer yarn makes a smaller version. Keep the stitches dense enough to contain the filling. Test the scale coverage before sewing because the relationship between the body and shell strips may change with your yarn choice and tension.
How should I clean and store a crochet pinecone ornament?
Follow the care instructions for your yarn and filling. Gentle spot cleaning is often convenient for a small decoration. If washing is appropriate, reshape the shells afterward and let the stuffed center dry completely. Store the ornament in a dry container with enough room to prevent the scales from being crushed.
Can I use the ornament without a hanging loop?
Yes. Omit the loop if you plan to place the pinecone in a decorative bowl or incorporate it into a tabletop arrangement. For a wreath, sew it securely to the supporting structure through the body rather than relying on the loose shell edges. Position the attachment where surrounding scales can conceal the securing stitches.
Conclusion
This Crochet pinecone ornament pattern teaches you how to shape a stuffed body with increases and decreases, crochet shell strips with clear repeat counts, and sew the scales into an overlapping spiral.
You also learned how to adjust coverage, attach a hanging loop, and care for the finished decoration. Small choices in yarn color and scale placement give each pinecone its own character.
Please leave your honest opinion about the tutorial and share your suggestions for improvements, color combinations, or future crochet projects you would like to make.