
The Patchwork Christmas tree pattern is a charming way to bring the warmth, creativity, and festive spirit of the holiday season into your home.
One of the most appealing features of a Patchwork Christmas tree pattern is its versatility. You can create a simple triangular tree using green fabric squares, rectangles, and triangles, or develop a more detailed design with layered branches, decorative prints, and a contrasting tree trunk.
In this tutorial, you will learn how to plan your Patchwork Christmas tree pattern, choose suitable materials, prepare your fabric, arrange the patchwork pieces, and assemble the design step by step. The instructions focus on a versatile fabric Christmas tree block that can be adapted to different finished projects. Since individual photographs may show variations in block construction, fabric placement, or decorative details, use the method below as a practical guide and adjust the measurements to match the design you want to reproduce. Whether you are an experienced quilter or a beginner learning to sew straight seams, this festive project offers an enjoyable way to practice your skills while preparing handmade decorations for Christmas.
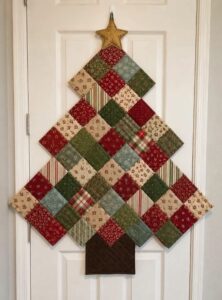
Materials, Fabric Selection, and Preparation for a Patchwork Christmas Tree Pattern
Before beginning your Patchwork Christmas tree pattern, gather the materials you need and decide how large you want your finished design to be. A small tree block can become a pillow front or a section of a table runner, while several blocks can be joined to create a larger Christmas quilt. Planning the final use helps you determine the dimensions, fabric quantities, and finishing method before cutting anything.
Choose cotton quilting fabric because it is generally easy to handle, cuts cleanly, and works well with standard sewing-machine settings. For a traditional Patchwork Christmas tree pattern, prepare green fabrics in several shades, including light green, medium green, and dark green. You may also select Christmas prints featuring stars, snowflakes, tiny ornaments, or seasonal foliage. Using different prints creates visual interest without requiring complicated sewing techniques.
You will also need a fabric for the tree trunk. Brown, tan, or dark beige cotton creates a natural appearance, while red or gold can give the design a more decorative look. Select a background fabric in cream, white, pale gray, or another color that contrasts with the tree. A clear distinction between the background and the tree helps the triangular silhouette stand out, especially when the finished block is displayed from a distance.
Prepare the basic sewing supplies before you start. Gather a rotary cutter or fabric scissors, a cutting mat, a quilting ruler, sewing pins or clips, a sewing machine, matching thread, an iron, and an ironing board. A fabric marker can help you mark cutting lines and seam allowances. If you are new to quilting, accurate measuring and careful pressing are more important than purchasing specialized equipment.
For a beginner-friendly block, you can start with a finished design approximately 12 inches square, although the exact dimensions can be adjusted. Remember that quilting measurements must account for seam allowances. If you use a standard 1/4-inch seam allowance, each seam removes approximately 1/2 inch from the combined width of two joined pieces. Measure carefully so the finished Patchwork Christmas tree pattern retains the proportions you intended.
Wash and dry your fabrics before cutting if appropriate for the fabric and the care requirements of your finished project. This can reduce later shrinkage and help remove manufacturing finishes. Press the fabric flat, align its grain, and organize your pieces by color. Keep your background fabric separate from the green pieces so you can quickly identify the components during assembly.
Step-by-Step Instructions for Sewing the Patchwork Christmas Tree Pattern
The first step in constructing your Patchwork Christmas tree pattern is to sketch the overall design. Draw a triangle representing the tree canopy, then divide it into horizontal sections or smaller geometric pieces. A layered arrangement of green fabric pieces creates the familiar appearance of Christmas tree branches. Add a small rectangle at the bottom for the trunk and leave enough background fabric around the design to make the block easy to assemble.
Next, decide whether you want to use squares, rectangles, half-square triangles, or a combination of shapes. Squares and rectangles are particularly suitable for beginners because they are easy to measure and sew. Triangles create a more traditional tree silhouette, while alternating green prints can suggest separate layers of branches. Choose a construction method that suits your experience and the appearance you want to achieve.
For a simple square-based version, cut green fabric pieces in several sizes and arrange them into progressively wider rows toward the bottom. For example, the top row might contain one small green square, the next row three squares, and the following rows five or seven squares, depending on your intended dimensions. These counts are an example rather than a fixed requirement. Adjust the arrangement so the overall shape remains balanced and the pieces fit within your planned block.
Arrange the pieces on a flat surface before sewing. Place the lightest green fabrics near the top if you want a bright, airy effect, and position darker fabrics toward the lower branches to create visual depth. Alternatively, alternate prints throughout the tree for a playful patchwork appearance. Photographing your arrangement or labeling each row can help you remember the layout once you begin joining the pieces.
Sew the pieces together using a consistent 1/4-inch seam allowance. Join neighboring squares or rectangles into horizontal rows, keeping their edges aligned. After sewing each row, press the seams carefully. Depending on the block design, you can press adjoining row seams in alternating directions to help them nest together when the rows are joined. Avoid stretching the fabric, especially when working with triangles or bias-cut edges.
Once the rows are complete, join them in the planned order to form the tree canopy. Pin the intersections where seams meet, then sew slowly to maintain alignment. If your design uses triangular pieces, take extra care to preserve the points and avoid cutting off the tips at the seam allowance. After joining the rows, press the completed canopy and check that the sides form a recognizable triangular shape.
Create the trunk by cutting a small rectangle from your selected fabric. Position it directly beneath the center of the tree canopy and sew it into place. If your chosen layout leaves open spaces around the canopy, add background fabric strips or squares to create a rectangular block. This method, often called adding background pieces or borders, helps square up the design and makes it easier to join the finished block to other quilt sections.
Trim the block only after checking its measurements. Use a quilting ruler to ensure the sides are straight and the corners form right angles. If the tree canopy appears slightly uneven, identify whether the issue comes from seam allowances, fabric stretching, or the original layout. Small adjustments at this stage can improve the final appearance, but avoid trimming away too much fabric. Your Patchwork Christmas tree pattern should now be ready for quilting or incorporation into a larger project.
Quilting, Finishing, and Creative Ways to Customize Your Patchwork Christmas Tree Pattern
After assembling the patchwork block, decide how you want to finish your Patchwork Christmas tree pattern. For a quilted wall hanging, prepare a backing fabric and a layer of batting. Place the backing with its right side facing down, position the batting on top, and arrange the patchwork block right side up. Smooth all three layers to remove wrinkles, then secure them with quilting pins, clips, or temporary basting stitches.
Choose a quilting design that complements the tree. Straight lines can emphasize the horizontal rows of branches, while gentle diagonal lines can create movement across the canopy. Simple outline quilting around the tree can help separate it visually from the background. If you are using decorative fabric prints, keep the quilting relatively understated so the patchwork itself remains the main feature. Test your stitching on a fabric sample before quilting the entire piece.
If you are making a table runner, consider combining several Christmas tree blocks with plain background squares or narrow fabric strips. Repeating the same tree design creates a coordinated appearance, while alternating different green prints gives every block a slightly different character. For a larger quilt, use the tree block as a focal point and surround it with complementary patchwork sections. Make sure the blocks share compatible finished dimensions before joining them.
A Patchwork Christmas tree pattern also works well on decorative pillows. Once the block is complete, add borders if needed to achieve the dimensions of your pillow front. Place the finished patchwork on a backing or pillow-cover construction of your choice, then assemble the cover according to the closure style you prefer. An envelope back is a convenient option because it allows the pillow insert to be removed for cleaning.
You can personalize the design with small embellishments, including fabric stars, embroidered snowflakes, decorative buttons, or stitched garlands. If the finished item will be used in a home with young children or pets, avoid loose buttons and other small pieces that could detach. Embroidered details or securely stitched fabric appliqués can provide a decorative effect without introducing as many loose components. Choose embellishments that are appropriate for the intended use of the project.
Color selection can completely change the personality of your finished tree. Traditional green and red fabrics create a classic holiday appearance, while cream and muted green can produce a farmhouse-inspired design. Blue, white, and silver-colored fabrics suggest a winter theme, and gold accents can make the block feel more festive. You can also use leftover fabric from previous quilting projects to create a coordinated decoration with personal meaning.
Finally, inspect the seams, edges, and quilting before displaying your project. Secure loose threads, reinforce any seams that need attention, and add binding if you are making a quilt or wall hanging. Follow the care instructions for your fabrics and embellishments when washing or storing the finished piece. With thoughtful preparation and careful sewing, your Patchwork Christmas tree pattern can become a seasonal decoration that you enjoy bringing out year after year.
Troubleshooting, Frequently Asked Questions, and Helpful Tips for Beginners
One common challenge when making a Patchwork Christmas tree pattern is keeping the rows aligned. Even small differences in cutting measurements can cause the finished tree to look uneven. To prevent this, measure the pieces carefully, use the same seam allowance throughout the project, and press the seams before joining the next section. If the block includes multiple rows of squares, check the combined width of each row before sewing the rows together.
Another frequent issue is choosing fabrics that blend together too much. If all the green prints have similar shades and visual patterns, the tree can appear flat. Include a mixture of light, medium, and dark greens to create contrast. You do not need many different fabrics; three coordinated shades can be enough to give the design depth. A contrasting trunk and background will further improve the visibility of the tree silhouette.
Beginners sometimes find that the finished block becomes smaller than expected. This usually happens because the original cutting measurements did not include seam allowances or because the seams were sewn wider than planned. Always distinguish between the cut size and the finished size of a patchwork piece. If a block needs to measure 12 inches finished, it must generally be larger before it is joined to other blocks or enclosed in borders.
Fabric stretching can also affect the final result, particularly when a design contains triangles or diagonal edges. Handle these pieces gently, avoid pulling them through the sewing machine, and use pins to maintain alignment. Press with an up-and-down motion rather than sliding the iron across delicate pieces. These simple habits help preserve the intended shape of the Patchwork Christmas tree pattern.
If you are reproducing a design from a photograph, examine the general structure before cutting fabric. Look at the number of tree sections, the direction of the branches, the contrast between the tree and the background, and the placement of the trunk. A photograph may not reveal exact measurements or the construction method, so use the visible proportions as a guide rather than assuming that every seam or piece size can be identified precisely. Make a paper sketch or a small test block if you need to confirm the layout.
Remember that the purpose of a handmade patchwork project is not to achieve absolute perfection on the first attempt. Small variations in fabric placement can add character, and careful finishing can make a simple design look polished. Work at a comfortable pace, check your measurements frequently, and enjoy experimenting with different fabric combinations. With practice, you will become more confident in constructing your Patchwork Christmas tree pattern and adapting it to other Christmas sewing projects.
Frequently Asked Questions
1. What is a Patchwork Christmas tree pattern?
A Patchwork Christmas tree pattern is a fabric design that uses multiple pieces of fabric to create the shape of a Christmas tree. The pieces may be arranged as squares, rectangles, triangles, or other geometric shapes. The completed block can be used for quilts, pillows, table runners, wall hangings, and other seasonal decorations.
2. Is a Patchwork Christmas tree pattern suitable for beginners?
Yes. A simple version made with squares and rectangles is a good starting point for beginners. These shapes are easy to measure, cut, and sew. As you gain experience, you can try more detailed designs that use half-square triangles, smaller patchwork pieces, or appliqué.
3. What fabric is best for a patchwork Christmas tree?
Cotton quilting fabric is a practical choice because it is generally easy to sew and comes in many colors and prints. Choose fabrics that are compatible in weight and care requirements. A combination of green cotton prints, a contrasting background, and a brown or decorative trunk fabric creates a recognizable Christmas tree design.
4. How many fabrics do I need for this pattern?
The number depends on the size and complexity of your project. A simple tree can be made with three green fabrics, one background fabric, and one trunk fabric. More elaborate designs can include additional prints. Small fabric scraps are useful for creating a varied patchwork appearance, provided the pieces are large enough for the planned construction.
5. What size should a Patchwork Christmas tree block be?
There is no single required size. A 12-inch finished block is a convenient example for a pillow front, wall hanging, or larger quilt arrangement. You can make a smaller block for a mug rug or a larger one for a table runner. Decide on the final project first, then calculate the cutting measurements and seam allowances.
6. How do I make the tree shape look even?
Plan the design before sewing and arrange the fabric pieces from the top of the tree to the bottom. Keep the center aligned, make each lower section slightly wider than the section above it, and check that the trunk is centered. Consistent seam allowances and careful pressing will help the finished tree retain its intended shape.
7. Can I make a Patchwork Christmas tree without a sewing machine?
Yes. You can sew the pieces by hand using small, consistent stitches. Hand sewing takes longer, especially for larger projects, but it can work well for small blocks and decorative items. Mark the seam allowances before sewing and secure the ends of your stitches carefully to prevent seams from opening.
8. Can I use fabric scraps for this project?
Absolutely. Using fabric scraps is one of the advantages of a Patchwork Christmas tree pattern. Scraps from previous quilting projects can create an interesting mix of colors and prints. Sort them by shade, check that they are suitable for the intended project, and cut them into consistent shapes before assembly.
9. How do I turn the block into a quilt or wall hanging?
For a quilt or wall hanging, prepare a backing fabric and batting, layer them with the completed patchwork block, and secure the layers before quilting. Add binding around the outer edges for a neat finish. If you are making a larger quilt, join several finished blocks using compatible measurements and seam allowances before assembling the quilt layers.
10. How can I decorate my finished Christmas tree block?
You can add embroidered stars, stitched garlands, small fabric ornaments, decorative quilting, or a contrasting border. Choose details that complement the fabric prints instead of overwhelming the tree. For items used by young children or displayed where pets can reach them, consider avoiding small detachable embellishments.
11. Why does my finished block measure smaller than expected?
The most common reasons are seam allowances that are too wide, inaccurate cutting, or measurements that do not account for the fabric removed during sewing. Confirm whether your measurements refer to cut dimensions or finished dimensions. Check the block after each major construction stage so that you can identify and correct discrepancies before adding borders or joining additional blocks.
12. How should I store my patchwork Christmas decoration?
Make sure the project is clean and completely dry before storing it. Fold it gently or roll it when practical, and keep it in a dry place away from direct sunlight. Avoid placing heavy objects on delicate embellishments. Following the fabric manufacturer’s care recommendations can help preserve the colors, stitching, and overall appearance.
Conclusion
Creating a Patchwork Christmas tree pattern is a rewarding way to combine practical sewing skills with the creativity of holiday crafting. In this guide, you learned how to select fabrics, prepare cutting measurements, arrange patchwork pieces, assemble the tree canopy, add a trunk, and finish the block for use in quilts, pillows, table runners, or wall hangings. You also explored ways to choose complementary colors, add decorative details, troubleshoot common sewing problems, and adapt the design to your own preferences.
The key to a successful result is careful planning, consistent seam allowances, accurate cutting, and thoughtful fabric placement. You do not need complicated techniques or expensive materials to create a beautiful Christmas decoration. Even a simple arrangement of fabric squares and rectangles can become a distinctive seasonal piece when the colors, proportions, and finishing details work together.
Now it is your turn to bring your Patchwork Christmas tree pattern to life! Choose your favorite fabrics, prepare your sewing space, and enjoy the process of creating something handmade for the holiday season. If you have already tried this project, please leave your honest opinion in the comments and share your suggestions. Which colors would you choose for your Christmas tree, and what would you make with the finished block? Your feedback and creative ideas can inspire other sewing enthusiasts to begin their own festive projects.