
Crochet cutlery holder pattern is a charming and practical project that combines creativity, functionality, and the beauty of handmade crafts.
One of the best things about this crochet cutlery holder pattern is that it can be adapted to different occasions, color combinations, and decorative styles.
Another advantage of this handmade project is its versatility. A crochet cutlery holder can be made in traditional rectangular shapes, small pockets, decorative envelopes, or even seasonal designs inspired by flowers, leaves, and holiday characters. You can choose cotton yarn for a firm and durable finish or another suitable yarn depending on the appearance you want to achieve. Throughout this tutorial, you will learn how to select materials, understand the stitches, follow the step-by-step instructions, and personalize your finished crochet accessory. The goal is to create a beautiful, practical piece that is easy to reproduce and enjoyable to use.
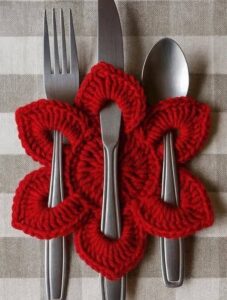
Materials, Crochet Stitches, and Preparation for Your Cutlery Holder
Before starting your crochet cutlery holder pattern, gather all the materials you need. Preparing everything in advance makes the process more organized and helps you maintain consistent stitches throughout the project. You do not need expensive supplies, and many crocheters can complete this project using materials they already have at home.
For this tutorial, choose medium-weight cotton yarn in your favorite color. Cotton is a popular option because it provides good stitch definition, is relatively durable, and creates a structured fabric. You can use cream, beige, white, red, green, or any combination that complements your dining table.
You will also need a crochet hook appropriate for your yarn, a pair of scissors, a yarn needle, and a measuring tape. A decorative button, ribbon, or small crocheted flower is optional if you want to personalize the finished holder. Always check the yarn label for its recommended hook size.
The main stitches used in this crochet cutlery holder pattern are beginner-friendly. You will work with the chain stitch (ch), single crochet (sc), and slip stitch (sl st). These basic techniques create a neat and stable fabric that is suitable for a small cutlery pocket.
Before beginning, it is helpful to understand the abbreviations used in the instructions. The term ch means chain, sc means single crochet, and sl st means slip stitch. The abbreviation st refers to stitch, while rep means repeat. These are common crochet abbreviations that make written patterns easier to follow.
For the sample project, the finished holder will measure approximately 4.5 inches wide and 9 inches tall when laid flat, although the measurements can vary depending on your yarn, hook, and tension. The design consists of a rectangular crocheted base folded upward to create a pocket. This simple construction makes the pattern easy to customize.
Take a few minutes to check your yarn tension before starting. Your stitches should be firm enough to hold their shape without becoming excessively tight. If your fabric feels stiff, consider using a slightly larger hook. If it looks too loose, try a smaller hook or adjust your tension.
Step-by-Step Crochet Cutlery Holder Pattern Instructions
Now it is time to begin the actual crochet cutlery holder pattern. The project is worked from the bottom upward, creating a rectangular piece that will later be folded and joined along the sides. Follow each step carefully, counting your stitches to keep the edges straight.
Step 1: Create the foundation chain.
Start with a slip knot and place it on your crochet hook. Make 21 chain stitches (ch 21). This foundation chain determines the width of your cutlery holder. If you prefer a wider pocket, you can add more chains in multiples of one, keeping in mind that the finished dimensions will change.
Step 2: Work the first row.
Insert your hook into the second chain from the hook and make one single crochet (sc). Continue working one single crochet into each remaining chain until you reach the end of the row. You should have 20 single crochet stitches.
Step 3: Build the rectangular base.
Chain one and turn your work. Make one single crochet in each stitch across the row. Repeat this process until you have completed 34 rows in total. Remember that the chain one used to turn your work does not count as a stitch. Counting each row will help you maintain an even rectangular shape.
Step 4: Check the dimensions.
Lay your crochet piece on a flat surface and measure it. The rectangle should be approximately 4.5 inches wide and 9 inches tall, depending on your yarn and tension. If it is significantly smaller or larger, you can adjust the number of rows or foundation chains to achieve your preferred size.
Step 5: Shape the cutlery pocket.
Place the rectangular piece horizontally in front of you. Fold the bottom section upward, covering approximately one-third of the rectangle. This folded section will become the pocket where the cutlery is placed. Adjust the fold until the pocket has enough depth to hold your utensils comfortably.
Step 6: Join the sides.
Using your crochet hook, attach the yarn to one side of the folded pocket. Work single crochet stitches through both layers along the side edge. Continue until the pocket is securely closed. Repeat the same process on the opposite side. Make sure the stitches are evenly spaced so that the pocket looks symmetrical.
Step 7: Create a decorative border.
Attach a contrasting yarn color to the top edge of the holder. Work one round of single crochet stitches around the opening and visible edges, placing three single crochet stitches in each corner when necessary to maintain a smooth shape. Finish the round with a slip stitch.
Step 8: Fasten off and weave in the ends.
Cut the yarn, leaving a small tail. Pull the yarn through the final loop and tighten gently. Use a yarn needle to weave the loose ends into the back of the stitches. This step gives your handmade project a clean and professional appearance.
Step 9: Add optional decoration.
You can finish your crochet cutlery holder with a small crocheted flower, bow, button, or decorative appliqué. Attach the embellishment securely, making sure that it does not interfere with inserting or removing the utensils. For a minimalist look, you can leave the holder plain.
Step 10: Prepare the finished piece.
Check the side seams, border, and pocket opening. Gently shape the holder with your hands and make sure the pocket is deep enough for your intended cutlery. Your handmade accessory is now ready to complement your dining table.
Creative Customization, Finishing Techniques, and Practical Uses
One of the most enjoyable aspects of this crochet cutlery holder pattern is the opportunity to experiment with colors and decorative details. The basic rectangular construction provides a wonderful foundation for many different styles. You can make several matching holders for a dinner party or create individual designs for each member of the family.
For a Christmas table, consider using red, white, and green cotton yarn. A small crocheted star, snowflake, or Christmas tree can be attached to the front of each pocket. These details create a festive appearance without making the project unnecessarily complicated. You can also use metallic-looking yarn accents for a subtle seasonal touch.
If you prefer a more neutral dining arrangement, choose natural shades such as beige, ivory, gray, or light brown. These colors work beautifully with wooden tables, ceramic plates, and simple fabric napkins. A neutral crochet cutlery holder can also be used throughout the year without looking out of place.
Another interesting idea is to experiment with different stitch textures. Although single crochet creates a firm and compact fabric, you can use half double crochet or textured stitches for future variations. Always make a small sample first to understand how the stitch changes the size and flexibility of the finished piece.
The border is another detail that can completely transform the appearance of your project. A simple single crochet border creates a clean finish, while a scalloped edge adds a delicate decorative effect. You can also use a contrasting color to frame the pocket and make the design stand out.
If you are making several holders for a special occasion, consider personalizing each one. Small embroidered initials, crocheted flowers, or different border colors can help guests identify their individual place settings. Keep decorations securely attached and avoid adding loose pieces that could easily detach.
Proper care will help your handmade accessories maintain their appearance. Follow the washing instructions provided with your yarn, and avoid harsh cleaning products that may damage the fibers. Cotton crochet pieces can often be gently hand-washed, reshaped, and left flat to dry. Make sure the holders are completely dry before storing them.
Your finished crochet cutlery holder pattern can also inspire other creative projects. You can adapt the same pocket construction to make small gift holders, decorative napkin pockets, or organizers for lightweight craft supplies. Changing the dimensions and colors allows you to explore different possibilities while practicing the same basic techniques.
Common Mistakes, Maintenance Tips, and Frequently Asked Questions
Even a simple crochet cutlery holder pattern can present a few challenges, especially when you are learning how to maintain consistent tension and create straight edges. One common mistake is accidentally adding or skipping stitches at the beginning or end of a row. This can make the rectangle wider or narrower as you progress. Counting your stitches regularly is the easiest way to prevent this problem.
Another frequent issue is creating a pocket that is too shallow. Before joining the sides, test the folded section with the utensils you intend to use. The pocket should hold them securely without covering too much of their length. Adjust the fold if necessary before completing the seams.
Uneven side seams can also affect the final appearance. To avoid this, use the same number of stitches along both sides whenever possible. Work slowly around the edges and check that the pocket remains symmetrical. Blocking the finished piece gently, when appropriate for your yarn, can help improve its shape.
Choosing the wrong yarn can make the project less practical. Very fluffy or loosely spun yarn may create a fabric that stretches or loses its structure. For a firm and attractive result, medium-weight cotton yarn is a useful starting point. The best choice will depend on the desired texture, durability, and care requirements.
Frequently Asked Questions
1. Is this crochet cutlery holder pattern suitable for beginners?
Yes. This pattern is suitable for beginners because it uses basic stitches, including chain stitches, single crochet, and slip stitches. The rectangular construction is straightforward, and the pocket is formed simply by folding and joining the sides. Beginners should take their time counting stitches and checking measurements.
2. What is the best yarn for a crochet cutlery holder?
Cotton yarn is generally a great choice because it creates a firm fabric and offers good stitch definition. It is also available in many colors and weights. Choose a yarn that is comfortable to work with and suitable for the intended use of your holder.
3. How much yarn do I need to make one holder?
The amount depends on the yarn weight, hook size, stitch tension, and final dimensions. For a small holder like the one described here, approximately 30 to 50 grams of medium-weight yarn is a reasonable planning estimate. Having a little extra yarn is always helpful.
4. Can I make the crochet cutlery holder in different sizes?
Absolutely. You can increase the foundation chain to make the holder wider or add more rows to make it taller. If you are making a larger pocket, adjust the folded section accordingly so that the utensils remain securely supported.
5. Can I use acrylic yarn instead of cotton?
Yes, acrylic yarn can be used if you prefer its texture, color selection, or availability. However, it may behave differently from cotton and can create a softer or more flexible pocket. Make a small sample before completing the project to check the structure.
6. How do I keep my crochet cutlery holder from stretching?
Use a suitable hook size and maintain consistent tension throughout the project. Avoid making stitches excessively loose, as this can cause the pocket to lose its shape. A compact stitch such as single crochet is particularly helpful for creating a stable fabric.
7. Can I add a lining to the crochet cutlery holder?
Yes. A small piece of cotton fabric can be sewn inside the pocket to create a smoother interior and provide additional structure. Measure the pocket carefully, cut the fabric to size, fold the edges inward, and sew it discreetly to the crochet fabric.
8. How can I decorate a crochet cutlery holder for Christmas?
Use seasonal colors such as red, green, white, and gold. You can add small crocheted snowflakes, stars, bows, or Christmas tree appliqués. Keeping the decorations relatively flat makes the holders easier to use and store.
9. How should I wash and store my handmade cutlery holders?
Follow the care instructions for your yarn. If hand-washing is recommended, use mild soap and cool or lukewarm water. Avoid twisting the fabric, reshape it gently, and allow it to dry completely before storing. Keep the holders in a clean, dry place.
10. Can I sell crochet cutlery holders that I make using this pattern?
You can generally sell handmade items you create, but you should respect any applicable pattern-use terms if you are following a pattern created by another designer. If you develop your own version, keep accurate records of your materials, working time, and costs when setting a selling price.
11. How many holders should I make for a complete table setting?
The number depends on the number of guests and the way you plan to arrange your table. A practical approach is to make one holder for each place setting, with one or two additional pieces available as spares. Making them in matching colors creates a coordinated appearance.
12. Can I use this crochet pocket for something other than cutlery?
Yes. The same construction can be adapted into a small organizer for lightweight items, craft accessories, or decorative gift packaging. Simply adjust the dimensions and pocket depth to suit the intended contents.
13. Why does my crochet cutlery holder curl at the edges?
Curling can happen when the stitches are too tight, the hook is too small, or the tension is inconsistent. Check your foundation chain and try a slightly larger hook if necessary. Gently shaping the finished piece can also improve its appearance.
14. How can I make my crochet cutlery holder look more professional?
Focus on consistent stitch tension, straight edges, symmetrical seams, and neatly woven yarn ends. Choose a coordinated color palette and avoid overcrowding the design with decorations. A carefully finished border can make a simple project look polished and elegant.
15. Can I make a matching set for different occasions?
Definitely. You can create a basic collection using the same pattern and change the colors or embellishments for each celebration. Neutral versions work for everyday dining, while themed variations are perfect for holidays, birthdays, and family gatherings.
Conclusion
This crochet cutlery holder pattern is a wonderful example of how a simple handmade project can combine beauty, creativity, and everyday functionality. Throughout this tutorial, you learned how to choose suitable materials, understand the basic crochet abbreviations, create the rectangular base, fold the fabric into a practical pocket, join the sides, and finish the piece with a decorative border.You also discovered different ways to customize your crochet cutlery holder, including seasonal color combinations, decorative appliqués, textured stitches, and personalized details. With a little practice, you can create an entire collection of matching holders for family dinners, holiday celebrations, and special occasions. The same basic construction can even inspire other small crochet organizers and handmade gifts.
The most important part of this project is enjoying the creative process and making something that reflects your personal style. Remember that your first piece does not need to be perfect. Each new attempt gives you an opportunity to improve your stitch consistency, finishing techniques, and confidence.
If you enjoyed this tutorial, please leave your honest opinion in the comments and share your suggestions. Which colors would you choose for your crochet cutlery holders? Would you prefer a simple, elegant design or a festive version with decorative details? Your ideas and experiences can inspire other crochet enthusiasts to try this beautiful handmade project!