
Crochet angel pattern for decoration is a beautiful and creative way to bring elegance, warmth, and a handmade touch to your home. Crochet angels are timeless decorative pieces that can be displayed during Christmas, used to decorate special celebrations, added to gift packages, or incorporated into a collection of handmade ornaments. With delicate stitches, carefully shaped details, and a little imagination, you can create an adorable angel that makes any space feel more welcoming.
One of the most charming features of this crochet angel pattern for decoration is its versatility. You can make a traditional white angel with delicate wings, choose soft pastel colors for a romantic appearance, or experiment with gold and silver details for a more festive design. Each small detail, from the dress to the wings and halo, contributes to the personality of the finished piece. This makes the project especially enjoyable for anyone who loves handmade decorations and personalized crafts.
Whether you are an experienced crocheter or someone who enjoys learning new techniques, this crochet angel decoration is a rewarding project to try. The pattern combines basic crochet stitches, simple shaping techniques, and separate decorative elements that are joined together at the end. In this tutorial, you will learn how to prepare your materials, crochet the angel’s body, create beautiful wings, assemble the different parts, and add finishing details that make your handmade angel look complete and elegant.
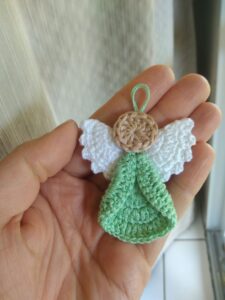
Materials, Crochet Abbreviations, and Preparation for Your Crochet Angel
Before beginning your crochet angel pattern for decoration, gather all the necessary supplies. Preparing your materials in advance makes the process more organized and allows you to concentrate on creating even stitches and carefully shaped details. You do not need complicated equipment, and this project can be completed using basic crochet tools.
Choose cotton yarn in white, cream, or another color that matches your preferred decorative style. Cotton yarn is particularly suitable because it provides good stitch definition and helps small details maintain their shape. You can also use a small amount of yellow, gold, or beige yarn for the hair, halo, or decorative accents.
For this project, use a crochet hook measuring approximately 2 mm to 3 mm, depending on your yarn thickness. A smaller hook can produce tighter stitches, which is useful when making a stuffed angel. You will also need scissors, a yarn needle, stitch markers, polyester stuffing, and a small amount of embroidery thread.
The main components of the angel will be the head, body, dress, wings, and halo. You can crochet these elements separately and assemble them afterward. This approach makes the project easier to manage, especially if you want to customize the colors or adjust the size of individual parts.
Understanding the crochet abbreviations will help you follow the instructions more easily. This tutorial uses US crochet terminology:
- MR: Magic ring.
- CH: Chain.
- SC: Single crochet.
- INC: Increase, working two single crochet stitches into one stitch.
- DEC: Decrease, combining two stitches into one.
- DC: Double crochet.
- HDC: Half double crochet.
- SL ST: Slip stitch.
- FO: Fasten off.
- BLO: Back loop only.
The finished angel will be approximately 5 to 7 inches tall, depending on your yarn, hook, and tension. You can make a smaller ornament by using finer yarn and a smaller hook or create a larger decorative figure by choosing thicker materials. Keep your tension consistent throughout the project to ensure that the different pieces fit together naturally.
Step-by-Step Instructions for Making the Crochet Angel Body and Dress
Start your crochet angel pattern for decoration by creating the head. Using white or cream yarn, make a magic ring and crochet 6 SC into it. Pull the ring closed and place a stitch marker in the first stitch. This small circle forms the foundation of the angel’s head.
Round 2: Work 2 SC into each stitch around. You should now have 12 stitches. Round 3: Repeat the sequence of 1 SC in the first stitch followed by 1 INC in the next stitch. Continue around until you have 18 stitches.
Rounds 4–7: Work 1 SC into every stitch around without increasing. This creates the rounded shape of the head. If you want to give your angel a more three-dimensional appearance, add a small amount of polyester stuffing before closing the piece. Make sure the stuffing is distributed evenly.
Round 8: Work 1 SC in the first stitch, followed by 1 DEC in the next two stitches, repeating around as appropriate for your stitch count. Continue decreasing until the opening becomes small. Fasten off, leaving a long yarn tail for attaching the head to the body.
Now begin the body using the same white or cream yarn. Make a magic ring and crochet 6 SC into it. Close the ring carefully. Round 2: Work 2 SC into each stitch around to create 12 stitches. Round 3: Repeat 1 SC followed by 1 INC around, producing 18 stitches.
Rounds 4–6: Work 1 SC into every stitch. These rounds form the upper body. To create the beginning of the dress, change to your preferred dress color, such as white, light blue, pink, or lavender. Continue crocheting with the new color.
For the dress, work a round of increases to create a wider lower section. Repeat the sequence of 2 SC followed by 1 INC around. On the following round, work 1 SC into each stitch. Continue alternating increase rounds and plain rounds until the dress reaches your desired length.
To create a decorative skirt, finish with a round of HDC or DC stitches. You can also work a simple scalloped edge by making small groups of stitches separated by slip stitches. This adds movement and gives the crochet angel dress a delicate handmade appearance.
When the body is complete, fasten off and leave enough yarn for assembly. If you prefer a firmer figure, add a small amount of stuffing before closing the bottom section. Attach the head to the upper part of the body using a yarn needle and several secure stitches. Make sure the head is centered and firmly attached.
Creating the Wings, Halo, and Decorative Details
The wings are one of the most recognizable features of a crochet angel pattern for decoration. To make a simple pair of wings, use white yarn and create a magic ring. Crochet 6 SC into the ring, close it, and work a round of increases to reach 12 stitches. This creates a small rounded foundation for each wing.
For the next round, work HDC and DC stitches to create a soft curved shape. A possible sequence is 1 SC, 1 HDC, 2 DC in the next stitch, 1 HDC, and 1 SC. Adjust the sequence according to the shape you want. Fasten off, leaving a yarn tail for attaching the wing to the body.
Repeat the same instructions to create the second wing. Place both pieces side by side and check that they have similar sizes. If one wing appears larger, adjust the stitches before attaching them. Symmetry helps the finished angel look balanced and attractive.
To make the halo, use yellow or gold yarn. Create a chain of approximately 16 stitches and join the ends with a slip stitch to form a small ring. Work a round of SC stitches around the chain to give the halo a more defined appearance. Fasten off and leave a long tail for sewing.
Attach the wings to the back of the angel’s body. Position them at approximately shoulder height, making sure they are evenly spaced. Sew each wing securely using small stitches through the center and lower edges. Avoid pulling the thread too tightly, as this can distort their shape.
Position the halo above the angel’s head and sew it carefully into place. You can also create a small loop using matching yarn if you want to hang the decoration on a Christmas tree or decorative branch. If the angel will stand on a shelf, make sure the halo does not interfere with its balance.
Now add the final details. Use embroidery thread to create small eyes and a delicate mouth. You can make simple embroidered eyes using two tiny stitches or leave the face without facial features for a minimalist appearance. Add a small ribbon around the neck or waist, and use a little gold yarn to decorate the dress. These finishing touches transform your handmade crochet angel decoration into a unique decorative piece.
Customization Ideas, Care Tips, and Frequently Asked Questions
One of the most enjoyable aspects of this crochet angel pattern for decoration is the possibility of creating different styles. A classic white angel with golden details looks beautiful during Christmas, while pastel colors can create a soft and delicate decoration suitable for bedrooms, nurseries, and special celebrations.
You can also experiment with different wing designs. Instead of making simple rounded wings, try using lace-inspired stitches or small shell patterns. These techniques add texture and create a more detailed appearance. If you prefer a minimalist project, keep the wings simple and allow the shape of the angel to stand out.
Another creative idea is to make angels in different sizes. Use thinner yarn and a smaller hook for miniature ornaments, or choose thicker yarn to create larger decorative figures. A collection of angels in coordinated colors can look especially beautiful when displayed together on a shelf, table, or Christmas tree.
If you want your angel to stand independently, make sure the lower part of the dress is sufficiently wide and stable. You can also add a small, lightweight base made from firm felt or crocheted fabric. This helps distribute the weight and prevents the decoration from falling over easily.
For cleaning, follow the care instructions of the yarn you used. Cotton and acrylic decorations can often be gently hand washed, but embroidered details and attached embellishments may require extra attention. Allow the angel to dry completely before storing it to prevent moisture from damaging the yarn.
When storing your crochet angel ornament, place it in a clean container and protect the wings from being bent or crushed. Soft tissue paper can help maintain the shape of the decorative details. Keeping the piece away from excessive sunlight also helps preserve the original yarn colors.
Frequently Asked Questions (FAQ)
1. Is this crochet angel pattern for decoration suitable for beginners?
Yes! This project is suitable for beginners who already know basic crochet stitches. The pattern uses single crochet, increases, decreases, chains, and simple decorative techniques. Beginners can work on each piece separately and assemble everything at the end.
2. What is the best yarn for crocheting an angel?
Cotton yarn is an excellent choice because it creates defined stitches and helps the angel maintain its shape. Acrylic yarn is another suitable option, especially if you want a wider variety of colors. Choose a yarn that is comfortable to work with and appropriate for your crochet hook.
3. What crochet hook size should I use?
A hook between 2 mm and 3 mm is a useful starting point for lightweight cotton yarn. However, the ideal size depends on the thickness of your material and your personal tension. If the stitches are too loose, try a smaller hook.
4. Can I make this crochet angel without stuffing?
Yes. You can make a flat angel by crocheting two body-shaped panels and sewing them together around the edges. The wings can also be made as flat pieces. This is a good alternative if you want a lightweight ornament for hanging.
5. How long does it take to complete a crochet angel?
The time depends on your crochet experience and the amount of detail you add. A simple angel may take a few hours, while a more elaborate design with detailed wings, hair, and decorative accessories may require additional time.
6. How do I make the angel’s wings look more delicate?
Use lightweight cotton yarn and a slightly smaller crochet hook. You can also experiment with shell stitches, chain spaces, and lace-inspired patterns. Blocking the finished wings gently, when appropriate for the yarn, can help improve their shape.
7. Can I change the color of the angel’s dress?
Absolutely! You can use white, cream, pink, blue, lavender, red, or any color that matches your decoration. Changing the dress color is one of the easiest ways to create a personalized crochet angel.
8. How can I attach the wings securely?
Use a yarn needle and matching yarn to sew the wings to the back of the body. Make several small stitches through the center and lower edges of each wing. Check that both pieces are firmly attached before displaying the angel.
9. Can I use this crochet angel as a Christmas tree ornament?
Yes. Simply add a small hanging loop to the top of the head or behind the halo. Make sure the loop is securely attached and that the angel is lightweight enough to hang safely from a tree branch.
10. How do I make the angel stand upright?
Create a wider and flatter bottom section for the dress. You can also add a small firm felt or crocheted base underneath. Distribute the stuffing evenly and check the balance before finishing the project.
11. Can I add hair to my crochet angel?
Yes. Use yellow, brown, beige, or another yarn color to create small strands of hair. You can attach short pieces around the top and sides of the head, then arrange them into a simple hairstyle. Secure every strand carefully.
12. Is a crochet angel a good handmade gift?
Yes! Handmade crochet angels can make thoughtful gifts for Christmas, birthdays, religious celebrations, and other special occasions. Their decorative appearance and handmade character make them memorable presents for people who appreciate crafts.
Conclusion
Creating a Crochet angel pattern for decoration is a wonderful way to combine crochet skills, creativity, and the beauty of handmade decorations. Throughout this tutorial, you learned how to prepare your materials, understand the crochet abbreviations, create the angel’s head and body, shape the dress, crochet delicate wings, and assemble the different components.
You also discovered how to add a halo, embroider facial details, personalize the colors, and finish your angel with decorative accessories. With a few simple techniques and carefully chosen materials, you can create a beautiful handmade piece that complements your home and special celebrations.
The best part of this project is that every angel can be different. You can experiment with colors, sizes, wing shapes, and decorative details to create a collection that reflects your personal style. Whether you display your angel during Christmas, use it as a gift, or keep it as part of your handmade decoration collection, it is a project worth making.Now we would love to hear from you! Have you tried this crochet angel pattern for decoration? What colors and details would you choose for your handmade angel? Leave your honest opinion, questions, and suggestions in the comments. Your feedback can inspire other crochet lovers and help everyone discover new creative possibilities!