
Fabric Christmas tree pattern is a wonderful sewing project for anyone who loves handmade decorations and wants to bring a cozy, festive atmosphere into their home.
One of the best things about this Fabric Christmas tree pattern is how easy it is to personalize. You can choose traditional Christmas fabrics in green, red, white, and gold, or experiment with modern combinations such as beige, cream, dusty pink, and natural linen.
Whether you are an experienced sewing enthusiast or a beginner interested in learning new fabric crafts, this fabric Christmas tree sewing project offers an enjoyable way to practice cutting, stitching, shaping, and assembling fabric pieces. The finished decoration can be made in different sizes and styles, depending on your preferences and the materials available. In this tutorial, you will learn how to prepare the fabric, create the Christmas tree template, sew the tree sections, add stuffing, and finish your handmade decoration with beautiful festive details.
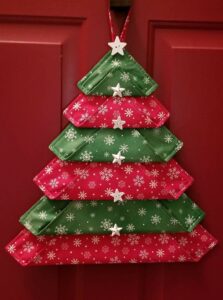
Materials and Preparation for Your Fabric Christmas Tree Pattern
Before beginning your Fabric Christmas tree pattern, gather all the materials you will need. Preparing everything in advance makes the sewing process more organized and helps you avoid interruptions. For a traditional decorative tree, medium-weight cotton fabric is an excellent choice because it is easy to cut, sew, and shape.
Choose two or three coordinating fabrics for the main tree. You can use the same fabric for both sides or combine different prints to create an interesting contrast. Green cotton with tiny stars, red plaid, cream fabric with Christmas motifs, and neutral linen are all attractive possibilities. If you prefer a colorful patchwork design, prepare several smaller fabric pieces in complementary shades.
You will also need polyester stuffing to give the tree volume and help it maintain its shape. Choose a small wooden dowel, a sturdy fabric-covered cardboard tube, or another suitable support if you want the tree to stand upright. A small wooden base can also provide additional stability for a freestanding decoration.
Other essential supplies include fabric scissors, a measuring tape, paper for the template, pins or sewing clips, a sewing machine, matching thread, an iron, and a fabric marking pencil. A hand-sewing needle will be useful for closing the final opening and attaching decorative details.
For a medium-sized fabric Christmas tree, prepare two fabric panels measuring approximately 12 inches tall and 8 inches wide at the base. These measurements are flexible and can be adjusted to create larger or smaller decorations. Draw a simple triangular tree silhouette with slightly curved sides and a flat bottom. You can also create a layered silhouette with several rounded branches for a more traditional Christmas tree appearance.
Before cutting your fabric, wash it if the manufacturer’s care instructions allow it. This helps reduce the possibility of shrinkage after the project is completed. Press the fabric carefully to remove wrinkles, then place the paper template over it and check that the fabric design is positioned correctly. Remember to include a seam allowance of approximately 1/4 to 1/2 inch around the outline.
Step-by-Step Instructions for Sewing the Fabric Christmas Tree
The first step in this Fabric Christmas tree pattern is preparing the main tree pieces. Fold your selected fabric with the right sides facing each other. Position the paper template on top and trace the outline using a fabric marking pencil. Pin the layers together to prevent them from shifting while cutting.
Cut around the traced shape carefully, keeping the seam allowance consistent. You should now have two matching fabric tree panels. If you are using different fabrics for the front and back, make sure both pieces have the correct orientation before moving to the sewing machine.
Place the two panels together with their right sides facing inward. Align the edges and secure them with pins or sewing clips. Begin sewing along one side of the tree, following the outline with a straight stitch. Continue around the opposite side and stop before closing the bottom completely. Leave an opening of approximately 2 to 3 inches for turning and stuffing.
After sewing, inspect the seams and reinforce any sections that may experience tension. Trim excess fabric from the seam allowance where necessary. If your tree has rounded or curved branch sections, make small clips in the seam allowance without cutting through the stitches. This helps the fabric turn smoothly and prevents unwanted wrinkles.
Turn the tree right side out through the opening. Use a blunt tool to gently shape the pointed top and the corners of the base. Avoid using sharp objects that could damage the fabric. Press the edges lightly with an iron, following the care instructions for your material.
Now begin adding the polyester stuffing. Start with the top point of the tree and gradually fill the wider sections. Distribute the stuffing evenly using small amounts at a time. Avoid overfilling because excessive stuffing can stretch the seams and create an uneven appearance. The goal is to create a soft but well-defined tree shape.
If you want the tree to stand upright, prepare a small support for the center. A fabric-covered cardboard tube or suitable wooden dowel can be positioned inside the lower section, depending on the design. Make sure the support is stable and does not create sharp or exposed edges. For a tree intended for children’s spaces, avoid small detachable components and use securely enclosed materials.
Once the tree has the desired shape, fold the raw edges of the opening inward and close it using a neat ladder stitch by hand. You can also use a straight machine stitch if the opening allows it. Check the entire outline to ensure the stuffing remains evenly distributed.
Your handmade fabric Christmas tree is now complete in its basic form. At this stage, you can decide whether to keep the decoration simple or add embellishments such as ribbons, buttons, small fabric stars, and decorative stitching.
Adding Decorative Details, Bases, and Finishing Touches
Decorating your Fabric Christmas tree pattern is one of the most enjoyable parts of the project. You can use different materials to create a festive appearance that matches your home decoration. Small fabric circles, embroidered stars, ribbon bows, and decorative buttons are all possibilities. Choose embellishments that are lightweight and securely attached.
To create a decorative garland, use a narrow ribbon or a strip of contrasting fabric. Wrap it gently around the tree in a spiral arrangement, starting near the top and moving toward the base. Secure the ribbon at several points with small stitches so it does not slide out of position. Avoid wrapping it too tightly because this can distort the tree shape.
You can also make miniature fabric ornaments. Cut small stars, circles, hearts, or other simple shapes from coordinating fabric. Place two matching pieces together, sew around the edges, turn them right side out if necessary, and add a small amount of stuffing for a dimensional effect. Attach these details carefully to the tree.
For a more elegant appearance, add a small star at the top. You can cut two star shapes from felt, sew them together around the edges, and attach the finished decoration to the pointed tip. Another option is to create a simple fabric bow using a narrow strip of cotton. Secure the bow firmly so it remains in place.
The base is particularly important if you want your fabric Christmas tree decoration to stand independently. A small wooden base, fabric-covered cardboard support, or another stable structure can help keep the tree upright. Make sure the base is wide enough to support the decoration and that all components are firmly attached.
If you prefer a softer design without a rigid support, you can create a flat-bottomed fabric tree with additional stuffing around the lower section. Another option is to make a hanging version by attaching a sturdy ribbon loop at the top. This allows you to use the same basic sewing technique for a completely different decorative purpose.
Finally, inspect the entire decoration. Check the seams, the bottom opening, the ribbon attachments, and all decorative elements. Remove loose threads and adjust any areas where the fabric looks uneven. A careful final inspection gives your fabric Christmas tree sewing pattern a polished handmade finish.
Customization Ideas, Care Tips, and Frequently Asked Questions
One of the biggest advantages of this Fabric Christmas tree pattern is the freedom to customize the finished decoration. For a traditional Christmas look, use dark green fabric with red and gold details. If you prefer a modern style, choose neutral colors such as cream, beige, and soft gray. You can also create a colorful collection using different prints and fabric combinations.
Another interesting idea is to make a patchwork Christmas tree. Instead of using two large fabric panels, join several smaller fabric pieces to create a decorative patchwork surface. You can arrange the pieces in horizontal rows, triangles, or irregular sections. This technique is especially useful for using leftover cotton fabrics from previous projects.
You can also change the size of the tree according to your decorating needs. Small versions are ideal for shelves, gift displays, and table centerpieces. Larger fabric trees can become decorative focal points in living rooms, craft spaces, or holiday displays. When changing the dimensions, remember to adjust the template, seam allowance, stuffing quantity, and support system.
For a rustic appearance, use natural cotton, burlap-style fabric, or linen-inspired materials. Combine them with simple wooden details and neutral ribbons. For a more playful design, use bright prints, colorful buttons, and contrasting bows. The possibilities are practically endless.
To keep your handmade fabric Christmas tree looking attractive, store it in a clean and dry container after the holiday season. Protect delicate decorations from being crushed, and avoid placing heavy objects on top. If the tree becomes dusty, use a soft brush or follow the appropriate cleaning instructions for the fabric.
If washing is necessary, check the care instructions for all materials used in the project. Some decorations may contain cardboard, wood, stuffing, or embellishments that are not suitable for machine washing. Spot cleaning with an appropriate method may be more suitable for these designs.
Frequently Asked Questions (FAQ)
1. Is this Fabric Christmas tree pattern suitable for beginners?
Yes! This project is suitable for beginners who have basic sewing skills. The main construction involves tracing a template, cutting two fabric pieces, sewing around the outline, turning the fabric, and adding stuffing. You can begin with a simple triangular design before trying more detailed shapes.
2. What is the best fabric for making a fabric Christmas tree?
Medium-weight cotton is an excellent choice because it is easy to sew and available in many festive prints. Linen-style fabric and suitable quilting cotton are also good options. Choose materials that hold their shape and are compatible with your sewing machine.
3. How much fabric do I need for this project?
For a medium-sized decorative tree, approximately half a yard of main fabric may be sufficient, depending on the template and the arrangement of the pieces. You may need additional fabric for contrasting panels, decorations, and a fabric-covered base.
4. Can I make a fabric Christmas tree without a sewing machine?
Yes. You can sew the project by hand using small, consistent stitches. Hand sewing takes longer, but it allows you to create a beautiful decoration without specialized equipment. Reinforce the seams carefully, especially around the pointed top and base.
5. How do I make the tree stand upright?
Use a stable internal support, such as a suitable wooden dowel or fabric-covered cardboard tube, combined with a firm base. Make sure the support is centered and securely enclosed. The base should be wide enough to prevent the decoration from tipping over.
6. What can I use instead of polyester stuffing?
Depending on the design, you can use suitable clean textile scraps or another washable stuffing material. Make sure the filling is distributed evenly and does not create hard lumps. Avoid materials that may deteriorate or retain moisture.
7. Can I make a patchwork fabric Christmas tree?
Absolutely! Join several fabric pieces into a larger panel before cutting the tree shape. You can use squares, rectangles, or triangles in different Christmas colors. This is a creative way to use fabric leftovers and create a unique decoration.
8. How can I decorate my fabric Christmas tree?
You can use fabric stars, ribbon garlands, embroidered details, small bows, felt shapes, and securely attached buttons. Choose lightweight materials that complement the fabric colors. Keep the decorations evenly distributed for a balanced appearance.
9. Can I make different sizes using the same pattern?
Yes. Simply enlarge or reduce your paper template. Adjust the fabric measurements and the quantity of stuffing accordingly. If you are making a standing tree, remember that larger versions may require a stronger support and wider base.
10. How do I prevent the fabric from fraying?
Use a suitable seam allowance and finish exposed raw edges with a zigzag stitch or another appropriate method when necessary. Keep the seams secure and avoid cutting too close to the stitching. This helps the decoration remain in good condition.
11. Is this fabric Christmas tree suitable as a handmade gift?
Yes! A handmade fabric tree can be a thoughtful holiday gift for friends and family members who appreciate creative decorations. You can personalize the fabric colors and embellishments to match the recipient’s style.
12. How should I store my fabric Christmas tree after the holidays?
Place it in a clean, dry storage container. Protect delicate decorations and avoid compressing the stuffing. If your tree has a removable base or accessories, store those components separately when practical.
Conclusion
Creating a Fabric Christmas tree pattern is a delightful way to combine simple sewing techniques with creativity and festive decoration. Throughout this tutorial, you learned how to choose suitable fabrics, prepare a paper template, cut and sew the main tree panels, turn and stuff the decoration, and add a stable base when necessary.
You also discovered how to personalize your handmade tree with ribbon garlands, fabric stars, bows, patchwork details, and different color combinations. By following the steps carefully and paying attention to the finishing details, you can create a beautiful decoration that complements your holiday style.
The best part of this project is that every fabric Christmas tree can have its own personality. You can make small versions for shelves, larger decorations for tables, or several coordinated trees to create a charming Christmas display. It is also a wonderful opportunity to use leftover fabrics and transform them into something beautiful and useful.Now we would love to hear your honest opinion! Did you enjoy this fabric Christmas tree sewing pattern? Which fabrics, colors, and decorative details would you choose for your project? Leave your questions, sincere feedback, and suggestions in the comments. Your ideas can inspire other sewing enthusiasts to create their own handmade Christmas decorations!