
The Pattern for making a fabric Christmas tree is a wonderful way to bring handmade charm, creativity, and warmth into your holiday decorations.
One of the best things about a fabric Christmas tree pattern is that it can be adapted to different sizes and decorative styles.
This tutorial explains how to make a fabric Christmas tree step by step, from selecting the materials to assembling and finishing the decoration. The instructions describe a classic stuffed fabric tree with two matching tree-shaped fabric pieces, sewn together and filled to create a soft three-dimensional appearance. You can adjust the measurements and details to suit your preferences. The goal of this Pattern for making a fabric Christmas tree is to provide a practical, approachable project that encourages creativity while helping you make a handmade Christmas decoration with a polished finish.
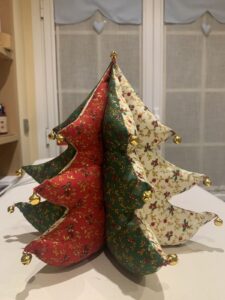
Materials and Preparation for Your Fabric Christmas Tree Pattern
Before beginning your Pattern for making a fabric Christmas tree, gather all the materials you will need. Choose cotton fabric, quilting fabric, linen, felt, or another medium-weight material that is easy to cut and sew. Christmas prints featuring stars, snowflakes, holly leaves, ornaments, or simple geometric patterns can give the finished tree a festive appearance. You will need enough fabric to cut two identical tree shapes.
Prepare a paper template in the shape of a Christmas tree. Draw a simple silhouette with a pointed top, sloping branches, and a wider bottom. The outline does not need to be complicated. A balanced shape with several gentle branch levels is usually easier to sew than one with many tiny points. If you want a larger decoration, increase the template dimensions before cutting the fabric.
Place the fabric on a flat surface and fold it with the right sides together. Position the paper template on top and secure it with pins or fabric clips. Trace around the template using tailor’s chalk or a washable fabric marker. Cut through both layers carefully so that you obtain two matching pieces. Accurate cutting is important because it helps the edges align during sewing.
You will also need matching thread, sewing scissors, pins or clips, a needle, and polyester fiberfill for stuffing. A sewing machine can make the process faster, but the project can also be completed by hand using small, even stitches. Keep a ruler nearby to check the measurements and a turning tool or blunt pencil to help shape the corners after sewing. Avoid using sharp objects that could accidentally damage the fabric.
Think about the colors and decorative details before assembling the tree. You can use one fabric for both sides or choose two coordinating prints to create a different appearance on each side. For example, one side could feature a traditional green Christmas print, while the other uses a subtle red-and-white pattern. This approach makes the decoration more versatile and allows you to change its appearance simply by turning it around.
Finally, prepare your sewing area and press the fabric if it is wrinkled. Smooth fabric is easier to trace, cut, and sew accurately. Check that both tree pieces have matching outlines before moving forward. Taking a little extra time during preparation makes the remaining steps easier and helps create a neat, attractive result.
Step-by-Step Instructions for Sewing the Fabric Christmas Tree
Begin by placing the two fabric tree pieces together with their right sides facing inward. Align the edges carefully, making sure the pointed top and branch sections match. Secure the layers with pins or clips, especially around the curves and corners. If the fabric shifts easily, use a few extra pins to keep everything in position while sewing.
Start stitching near the lower edge, leaving an opening large enough to turn and stuff the tree. Sew around the outline using a consistent seam allowance of approximately 1/4 inch to 1/2 inch, depending on the size of your project. Follow the silhouette slowly, especially around the narrow points between the branches. Smaller, controlled stitches help maintain the shape and reduce the chance of uneven edges.
When you reach the corners and pointed sections, stop with the needle down, lift the presser foot, and gently turn the fabric before continuing. This makes it easier to follow the outline without creating unwanted folds. Do not rush through the narrow areas. Smooth stitching is one of the details that gives a handmade decoration a professional appearance.
After completing the seam, trim away excess fabric around the edges, leaving the seam allowance intact. Make small diagonal clips in the seam allowance around inward corners, taking care not to cut through the stitches. This reduces bulk and helps the fabric lie flat when the tree is turned right side out. For outward points, carefully trim excess bulk so the tips can form more clearly.
Turn the tree right side out through the opening at the bottom. Use your fingers or a blunt turning tool to gently push out the pointed top and branch corners. Work slowly to avoid pulling on the seams. Once the shape is fully turned, press the edges gently with an iron if the fabric allows it. A well-shaped outline will make the finished tree look more defined.
Now fill the tree with small amounts of polyester fiberfill. Begin with the pointed top and work toward the wider branches and lower section. Distribute the stuffing evenly, using your fingers to move it into the corners. Avoid overfilling because too much stuffing can stretch the seams and create an irregular shape. When the tree looks full but remains soft, fold the raw edges of the opening inward and close it with a neat ladder stitch or another discreet hand-sewing stitch.
Finishing, Decorating, and Customizing Your Handmade Christmas Tree
Once the basic tree has been assembled, you can add decorative details to make your fabric Christmas tree unique. Small buttons, fabric stars, embroidered snowflakes, ribbons, and decorative bows are all attractive choices. Before attaching embellishments, arrange them on the surface without sewing them in place. This gives you an opportunity to experiment with spacing and balance before making the final decision.
If you want a more traditional Christmas appearance, choose red, green, gold, and cream details. Tiny bows can represent ornaments, while small embroidered stars can create a delicate festive effect. For a modern decoration, use neutral fabrics with simple stitching and minimal embellishments. A combination of beige, white, soft gray, and natural textures can create an elegant seasonal look without making the project visually crowded.
Another creative option is to use patchwork fabric. Instead of cutting both tree pieces from a single piece of material, sew together several fabric strips or squares to create a larger patchwork panel first. Press the seams flat and then trace the tree template onto the finished panel. This method is especially useful for using leftover fabric pieces and creating a colorful decoration with a handmade appearance.
You can also add a small fabric trunk to the bottom of the tree. Cut two matching rectangles from brown fabric, sew them together along three sides, turn them right side out, and lightly stuff them. Attach the trunk to the lower section of the tree by hand stitching. Alternatively, create a simple trunk from felt or a folded piece of fabric. Make sure it is securely attached before displaying the finished decoration.
For a freestanding tabletop version, consider adding a stable base. One option is to attach the lower edge of the stuffed tree to a small fabric-covered cardboard base or a lightweight wooden stand designed for crafts. Another possibility is to create a separate weighted fabric base using a small pouch filled with suitable craft weight material. Keep the base proportionate to the tree so that the decoration remains balanced. If the tree is intended for a home with young children or pets, avoid small detachable embellishments that could become choking hazards.
Before displaying your finished project, inspect the seams and decorations. Check that the opening is completely closed and that buttons, bows, and other details are firmly attached. Remove loose threads and gently reshape the stuffing if necessary. Your handmade tree can now decorate a shelf, mantel, table, or festive display. With thoughtful fabric choices and careful finishing, this Pattern for making a fabric Christmas tree can become a special decoration that you bring out every holiday season.
Frequently Asked Questions About the Pattern for Making a Fabric Christmas Tree
1. Is a fabric Christmas tree suitable for beginners?
Yes. This project is suitable for beginners who understand basic sewing techniques, such as cutting fabric, sewing a seam, turning fabric right side out, and closing an opening by hand. Starting with a simple tree silhouette and medium-weight cotton fabric makes the process easier. You can also practice the stitching on a small fabric sample before beginning the main project.
2. What is the best fabric for making a fabric Christmas tree?
Cotton fabric is an excellent choice because it is easy to cut, sew, and shape. Quilting cotton is especially useful because it comes in many festive prints and is generally manageable for home sewing projects. Felt is another option because it does not fray as much as woven fabric, although it creates a slightly different appearance.
3. Can I make a fabric Christmas tree without a sewing machine?
Absolutely. You can sew the entire project by hand using a backstitch or another secure hand-sewing technique. Keep your stitches small and consistent, particularly around the pointed branches. Hand sewing may take longer, but it allows you to complete the decoration without specialized equipment.
4. How much stuffing should I use?
Use enough polyester fiberfill to give the tree a soft, three-dimensional shape without making it overly firm. Add the stuffing gradually and distribute it evenly into the narrow points and wider sections. Overstuffing can distort the outline and place unnecessary pressure on the seams.
5. How can I make my fabric Christmas tree stand upright?
A separate weighted base or a small craft stand can help support the decoration. You can also attach the fabric tree to a stable base made from suitable craft materials. Make sure the base is secure and proportionate to the size of the tree. A simple stuffed fabric tree without a base is better suited to lying flat or leaning against another decorative object.
6. Can I use leftover fabric scraps for this project?
Yes. Fabric scraps are perfect for patchwork Christmas trees. Sew smaller pieces together to create a larger panel, press the seams, and then cut out the tree shape. Try combining fabrics with complementary colors and patterns to create a coordinated design.
7. How do I prevent the tree points from looking bulky?
Trim excess seam allowance carefully around the corners and make small clips in the seam allowance at inward curves. Be careful not to cut the stitching. When turning the tree right side out, use a blunt tool to shape the points gently. These steps help create a cleaner outline.
8. Can I wash a handmade fabric Christmas tree?
Cleaning depends on the fabric, stuffing, and decorations used. For a simple cotton tree without delicate embellishments, gentle spot cleaning is often a practical option. Avoid soaking a decoration that contains cardboard, wooden parts, or materials that could lose their shape when wet. Always test a small hidden area first if you are unsure how the fabric will react.
Conclusion
The Pattern for making a fabric Christmas tree is a creative and enjoyable sewing project that transforms simple materials into a charming holiday decoration. By preparing a balanced template, cutting two matching fabric pieces, sewing around the outline, turning the shape, and adding soft stuffing, you can create a beautiful three-dimensional tree. The finishing touches, such as ribbons, buttons, embroidery, patchwork, and a decorative base, allow you to personalize the project and match it to your holiday style.
Whether you choose traditional Christmas colors, modern neutral fabrics, or a combination of leftover fabric scraps, the most important part is to enjoy the creative process and take your time with each step.
A handmade fabric Christmas tree can become a meaningful part of your seasonal decorations and a lovely project to repeat with different fabrics in future years. If you try this tutorial, leave your sincere opinion in the comments and share your suggestions. Your ideas and experiences can inspire other readers to create their own beautiful fabric Christmas trees!