
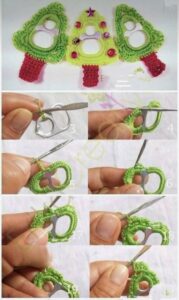
The Crochet Christmas Tree Pattern Made Using Pull Tabs is a creative and charming way to combine crochet techniques with recycled materials to make a unique Christmas decoration.
One of the most interesting features of this crochet Christmas tree pattern is the combination of soft yarn and the firm structure of pull tabs.
This Christmas tree crochet project using pull tabs is suitable for crafters who enjoy experimenting with recycled materials and learning new techniques. The instructions below explain how to prepare the pull tabs safely, crochet the tree shape, incorporate the tabs into the design, and add finishing details. The pattern uses a small cone-shaped tree worked in continuous rounds, with pull tabs arranged as decorative accents rather than exposed structural pieces. You can adjust the size, colors, and embellishments to create a design that reflects your own creativity.
Materials and Preparation for the Crochet Christmas Tree Pattern
To begin the Crochet Christmas Tree Pattern Made Using Pull Tabs, gather your materials before starting. You will need medium-weight green yarn, a crochet hook appropriate for your yarn, a yarn needle, scissors, stitch markers, and several clean aluminum pull tabs. You may also want small amounts of brown yarn for the trunk, along with white, red, or gold yarn for decorative details.
The pull tabs are the small metal rings commonly found on beverage cans. They can add a distinctive recycled-material detail to a crochet project. For this pattern, choose tabs that are clean, intact, and free from sharp edges. Never use tabs that are bent, damaged, or have rough areas. If a tab has a sharp or irregular edge, do not include it in the project. Wash and dry all selected tabs thoroughly before using them.
Because metal tabs can have edges that may catch yarn or scratch skin, they should not be left exposed in areas where they can be touched directly. This pattern uses the tabs as covered decorative accents. Each tab should be completely enclosed in a small crocheted cover or securely surrounded by stitches, with no sharp metal surface accessible. If you cannot cover a tab safely, leave it out and use a crocheted decorative ring instead.
For the tree, choose a green yarn that is easy to work with and has enough body to maintain the cone shape. Cotton or acrylic yarn can both work well. A 3.5 mm or 4 mm crochet hook is a useful starting point for medium-weight yarn, but always check your tension and adjust the hook if necessary. You will also need a small amount of stuffing or a firm, soft base to help the finished tree stand upright.
Before beginning, learn or review the basic crochet stitches used in this project. The pattern uses chain stitch (ch), slip stitch (sl st), single crochet (sc), and increases (inc). An increase means working two single crochet stitches into the same stitch. The tree is worked in continuous rounds, so using a stitch marker to identify the beginning of each round will help you keep track of your progress.
Prepare the pull tabs by arranging them in the order you plan to use them. For a small tree, approximately five to eight tabs may be enough, depending on their size and the number of decorative rows you want. Remember that the exact number is flexible. The crocheted tree should remain the main feature, with the tabs adding small accents rather than making the decoration heavy or difficult to handle.
Step-by-Step Crochet Instructions for the Christmas Tree
Start by making a magic ring with green yarn. If you prefer not to use a magic ring, you can chain two and work the first stitches into the second chain from the hook. Work six single crochet stitches into the ring and tighten it gently. Place a stitch marker in the first stitch to identify the beginning of the round. This small starting circle forms the top of your crochet Christmas tree.
Round 1: Work one single crochet into each stitch around, giving you six stitches. Do not join the round; continue working in a spiral. Round 2: Work one increase in every stitch around, giving you twelve stitches. Round 3: Repeat the sequence of one single crochet followed by one increase around. You should have eighteen stitches at the end of the round.
Round 4: Work one single crochet into each stitch around without increasing. Round 5: Repeat two single crochet stitches followed by one increase around. Round 6: Work one single crochet into every stitch. These rounds begin to create the widening shape of the tree. Keep your stitches even, and avoid pulling the yarn too tightly because the cone needs enough flexibility to maintain its shape.
Round 7: Repeat three single crochet stitches followed by one increase around. Round 8: Work one single crochet into each stitch. Round 9: Repeat four single crochet stitches followed by one increase around. Continue alternating an increase round with a plain round until the tree reaches your preferred width. For a small tabletop decoration, you can stop after approximately twelve to fourteen rounds, depending on your yarn and tension.
To create a decorative textured edge, you can add a simple round of slip stitches or a round of single crochet in a contrasting color. For a layered Christmas tree appearance, work a few stitches into the front loops only on selected rounds, then crochet a small decorative edging into the remaining loops. This creates subtle horizontal ridges that resemble branches. Keep the edges consistent so the tree looks balanced.
Once the main cone has reached the desired height and width, fasten off the yarn, leaving a long tail for sewing if needed. Weave in loose ends securely. If you want the tree to stand upright, prepare a small base using brown yarn. Make a magic ring, work six single crochet stitches into it, and increase evenly over the next rounds until the base is wide enough to support the bottom of the tree. You can also crochet a short cylindrical trunk by working several rounds without increases.
Adding Pull Tabs, Decorative Details, and the Tree Base
Now it is time to incorporate the pull tabs into your handmade decoration. Instead of attaching bare metal directly to the tree, create small crocheted covers. One simple method is to make a short chain that fits around the outer shape of a tab, then work single crochet stitches around the chain to form a narrow covering. Adjust the number of stitches according to the size of the tab. The goal is to cover all metal edges completely while keeping the piece flexible.
Make one small cover for each tab you plan to use. Check each cover carefully to ensure that no metal edge is exposed. If the tab is difficult to cover evenly, use a slightly larger hook or add a few stitches. Do not force the metal into a tight crocheted space, as this can distort the yarn or expose an edge. A fully crocheted ring made without metal is a suitable alternative if you prefer a completely soft decoration.
Arrange the covered tabs around the tree in small horizontal groups. You might place two or three accents near the lower section and a smaller group toward the middle. Use yarn to sew the crocheted covers securely onto the tree. Make sure the tabs are spaced evenly and do not overlap in a way that makes the surface bulky. Avoid placing metal accents at the very top, where they could interfere with a star or other finishing detail.
For a more traditional appearance, crochet a small star for the top of the tree. Begin with a magic ring and work a few single crochet stitches into it. Create small points by alternating chains and slip stitches around the center. Fasten off and leave a tail for sewing. You can use yellow, gold, white, or another color that complements the green yarn. Attach the star firmly to the top of the cone.
You can also add small crocheted ornaments to make the Christmas tree crochet decoration more festive. Tiny red or white circles, miniature bows, and simple yarn flowers are all suitable choices. Sew each decoration securely to the tree, keeping the overall design balanced. If the tree is intended only for display, you can add small embroidered details using yarn instead of attaching extra objects.
Finish the base by attaching the brown trunk to the bottom of the green cone. If you want the tree to stand upright, place a small amount of stuffing inside the trunk or use a firm, lightweight base completely enclosed in crochet fabric. Sew the trunk and tree together with strong, even stitches. Check that the decoration stands steadily on a flat surface. If it leans, adjust the base or add a little more enclosed support until the tree is balanced.
Finishing, Customization, and Frequently Asked Questions
After assembling the tree, inspect the entire project carefully. Check that the yarn ends are woven in, the decorative pieces are secure, and all pull tabs are completely covered. Gently handle the decoration to make sure no metal edges can be felt through the crochet. If any tab moves, remove it and sew the cover more securely or replace it with a yarn-only decorative element. Safety and durability are important parts of a successful recycled-material craft.
You can customize the Crochet Christmas Tree Pattern Made Using Pull Tabs in many ways. A classic green tree with red and gold accents creates a traditional holiday look, while cream, silver, and pale blue yarn can produce a winter-inspired design. You can also use several shades of green to create the appearance of layered branches. Choose colors that work well together and avoid adding so many details that the tree loses its simple shape.
Another idea is to make several trees in different sizes. A small version can be used as a table decoration, while a taller version can become part of a handmade holiday display. Keep the proportions similar so the trees look like a coordinated set. If you make multiple decorations, you can vary the number and placement of the covered pull-tab accents to give each one an individual appearance.
The finished project should be stored in a dry place when the holiday season is over. Keep it away from moisture, excessive heat, and areas where it could be crushed. If the tree becomes dusty, gently clean it with a soft, dry brush. Avoid soaking the decoration, especially if it contains metal pieces or materials that may not tolerate washing. Always inspect it again before displaying it in another season.
FAQ: Frequently Asked Questions About the Crochet Christmas Tree Pattern Made Using Pull Tabs
1. Can beginners make this crochet Christmas tree?
Yes. Beginners who know how to make a magic ring, chain stitches, single crochet, and increases can follow this pattern. The cone is worked in simple rounds, and the decorative elements can be kept basic. If you are new to crochet, practice the stitches on a small sample before beginning the tree.
2. What are pull tabs used for in this crochet project?
Pull tabs are recycled aluminum rings from beverage cans. In this project, they are used as decorative accents that add an unusual texture and recycled-material detail. They should always be cleaned, checked for damage, and completely covered with crochet fabric so that no metal edges are exposed.
3. How many pull tabs do I need?
For a small tree, approximately five to eight pull tabs may be enough. The exact number depends on the size of the decoration and the arrangement you prefer. You can use fewer tabs for a minimalist design or replace some of them with crocheted rings.
4. Can I make the tree without using metal pull tabs?
Absolutely. You can crochet small rings or circles from yarn and attach them in the same positions. This creates a similar decorative effect without metal. It is also a convenient option if you cannot find tabs that are clean, intact, and suitable for covering.
5. Which yarn is best for a crochet Christmas tree?
Medium-weight cotton or acrylic yarn is suitable for this project. Cotton can provide a defined stitch texture, while acrylic offers a wide variety of colors and is easy to find. Choose a yarn that maintains its shape and works comfortably with your crochet hook.
6. How can I make the Christmas tree stand upright?
A firm crocheted base and a short trunk can help support the tree. You can add a small amount of stuffing inside the trunk or use a lightweight support that is completely enclosed. Make sure the base is wide enough to balance the cone without making the decoration too heavy.
7. Can I make this pattern in different sizes?
Yes. To make a larger tree, continue adding increase rounds until the cone reaches your preferred width, then work additional rounds to increase its height. For a smaller tree, stop the increase sequence earlier. Keep the proportions balanced so the finished decoration maintains a recognizable tree shape.
8. How do I attach the pull tabs securely?
First, cover each tab completely with crochet fabric. Then sew the covered piece onto the tree using matching yarn and a yarn needle. Check that it cannot slide out or expose the metal. If you cannot secure a tab safely, use a crocheted ring instead.
9. Can I use this crochet tree as a Christmas gift?
Yes. A handmade crochet Christmas tree can be a thoughtful seasonal gift, especially for someone who appreciates handmade decorations and creative reuse. Before gifting it, inspect every detail, confirm that the tabs are fully covered, and make sure all decorative pieces are securely attached.
10. How should I store the finished decoration?
Store the tree in a clean, dry container where it will not be crushed by heavier objects. Keep it away from damp areas and excessive heat. A little tissue paper around the decoration can help protect its shape and prevent the crocheted details from becoming flattened.
Conclusion
The Crochet Christmas Tree Pattern Made Using Pull Tabs brings together crochet, creativity, and the reuse of everyday materials in one festive project. Throughout this tutorial, you learned how to prepare the yarn and pull tabs, crochet a cone-shaped tree using basic stitches and increases, cover the metal accents safely, and assemble the trunk, base, and decorative details. You also explored ways to customize the colors, create different sizes, and care for the finished decoration.
The most important part of this project is combining careful crochet work with safe preparation of the recycled materials. Every pull tab must be clean, intact, securely covered, and firmly attached.
If you prefer a softer decoration, crocheted rings can replace the metal pieces while preserving the overall design. I hope this tutorial inspires you to experiment with your own holiday color combinations and create a Christmas decoration that reflects your personality. Please leave your sincere opinion about this pattern and share any suggestions or creative ideas you would add to your own crochet Christmas tree!