
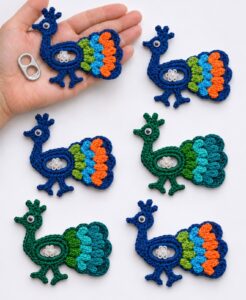
The Crochet peacock pattern using pull tabs is a creative and colorful craft project that combines traditional crochet techniques with the clever reuse of aluminum can pull tabs. This decorative project is a wonderful way to explore handmade art while transforming small everyday objects into something beautiful and meaningful.
One of the most interesting aspects of the Crochet peacock pattern using pull tabs is the combination of different materials.
Another reason to enjoy this Crochet peacock pattern using pull tabs is its versatility. You can choose traditional peacock colors, such as turquoise, royal blue, green, and golden yellow, or experiment with softer shades for a more contemporary appearance. The finished piece can be adapted into a small decorative ornament, a wall decoration, or a handmade accessory, depending on its size and construction. Throughout this guide, you will learn about the necessary materials, how to prepare the pull tabs, and how to follow a practical step-by-step crochet process. The instructions use standard US crochet terminology and provide a flexible construction method that you can adjust to your preferred dimensions and creative style.
Understanding the Crochet Peacock Pattern Using Pull Tabs and Preparing Your Materials
The first step in making a Crochet peacock pattern using pull tabs is understanding how the different materials work together. The pull tabs serve as decorative structural elements, while the crochet fabric creates the colorful appearance of the peacock. Rather than treating the metal pieces as ordinary crochet stitches, you will incorporate them into the project using yarn and carefully planned connections. This approach makes the finished design interesting because it combines recycled materials with traditional handmade techniques.
For this project, gather medium-weight cotton yarn in turquoise, dark blue, emerald green, yellow, and a small amount of black. You will also need a crochet hook appropriate for your yarn, a yarn needle, scissors, stitch markers, and approximately 10 to 15 clean aluminum pull tabs, depending on the desired size of your design. Keep a few additional tabs available in case you decide to expand the decorative feather section. The exact number will depend on the arrangement and dimensions you choose.
Preparing the pull tabs correctly is particularly important. Wash them with warm water and mild soap, remove any remaining residue, and allow them to dry completely. Inspect every tab carefully to make sure there are no sharp edges, damaged sections, or rough areas that could catch the yarn or scratch your hands. Do not use tabs with sharp projections or exposed metal points. If a tab cannot be made safe, discard it rather than incorporating it into the project.
Before starting the crochet work, organize the pull tabs according to their shape and size. Consistency will help you create a balanced design, especially when arranging the peacock feathers. Place the tabs on a flat surface and experiment with a fan-shaped arrangement. This simple preparation allows you to visualize the finished project before attaching anything permanently and makes it easier to distribute the decorative elements evenly.
The main crochet stitches used in this pattern are the chain stitch (ch), single crochet (sc), half double crochet (hdc), double crochet (dc), and slip stitch (sl st). These stitches are useful for creating the body, decorative feather sections, and borders. If you are unfamiliar with any of them, practice a small sample before beginning the main project. Consistent tension is more important than crocheting quickly.
You should also prepare a small practice piece to test how your yarn behaves around the pull tabs. Crochet a few stitches around a sample tab without forcing the hook through any metal opening. The yarn should sit comfortably against the metal without becoming excessively tight or loose. This test will help you choose the right hook size and connection method before working on the actual peacock.
Step-by-Step Crochet Peacock Pattern Using Pull Tabs
Begin the Crochet peacock pattern using pull tabs by making the main body. Using turquoise yarn, create a foundation chain of 12 stitches. Insert your hook into the second chain from the hook and work one single crochet in each chain across. Chain one and turn your work. Continue with single crochet rows until you have a small rectangular piece approximately 3 to 4 inches long. This rectangle will form the foundation of the peacock’s body.
To create a slightly rounded body, work additional rows while gradually decreasing one stitch at each end when appropriate. For example, you can work two single crochet stitches together at the beginning and end of selected rows. This technique is called single crochet decrease (sc2tog). It helps produce a tapered shape without complicated construction. Adjust the number of rows according to the size you want.
Next, create the peacock’s head and neck using the same turquoise yarn. Attach the yarn near one end of the body and chain approximately 8 stitches. Work single crochet stitches back along the chain, then continue with another row to give the neck a little more width. Shape the upper section gently so it resembles a curved neck rather than a straight rectangle. A few slip stitches can help create a smooth transition between the neck and body.
For the head, work a small rounded section with single crochet stitches. You can begin with a magic ring and work 6 single crochet stitches into the ring. In the next round, increase in each stitch to reach 12 stitches. Continue with one or two rounds of single crochet, depending on the size you prefer. Finish with a slip stitch and leave a yarn tail for sewing. Attach the head securely to the top of the neck.
Now create the peacock’s colorful feathers. These are the most recognizable part of the design and provide an opportunity to combine several crochet techniques. Using emerald green yarn, chain 8 stitches. Work a combination of single crochet, half double crochet, and double crochet stitches along the chain to form a slightly pointed feather shape. For example, work 1 sc, 2 hdc, 3 dc, and 1 sc, adjusting the stitch placement to suit the length of your foundation chain. Make approximately 8 to 10 feather motifs in different colors.
To incorporate the pull tabs, arrange them in a semicircle behind the body. Position each tab so that the openings are aligned in a visually balanced arrangement. Use a separate crochet connection or a suitable yarn wrapping technique to secure each tab to a reinforced crochet backing. Do not force the hook through the metal or use sharp tools to create new openings. The tabs should remain securely covered or positioned so that their edges cannot damage the yarn.
Once the tabs are arranged, attach the individual crochet feather motifs around the backing. Alternate turquoise, green, blue, and yellow to create the traditional peacock color combination. Each feather can be sewn onto the crochet base using a yarn needle. Make sure the stitches pass through the crochet fabric rather than relying on an unsecured metal edge. This creates a more stable structure and helps the decorative fan maintain its shape.
The next step is creating the characteristic eye-like details on the feathers. Use small circles made with blue, turquoise, and yellow yarn. To make a simple circle, work 6 single crochet stitches into a magic ring, then increase in every stitch on the next round to reach 12 stitches. Add a smaller contrasting circle in the center using a different color. Sew one decorative circle onto each selected feather motif. These details give the Crochet peacock pattern using pull tabs its recognizable appearance.
After completing the feathers, attach the body to the center of the fan. Position it carefully so that the head and neck remain visible and the feathers spread evenly behind it. Use strong sewing stitches to connect the body to the reinforced backing. Check that the pull tabs do not move excessively and that the crochet fabric covers or separates any potentially rough metal surfaces. This is an important step for both appearance and durability.
Finishing Techniques, Color Combinations, and Creative Variations
Once the main structure of your Crochet peacock pattern using pull tabs is complete, focus on the finishing details. Embroider a small black eye on the head using a yarn needle and black yarn. You can also create a tiny golden-yellow beak using a few embroidery stitches. These small details make the peacock look more expressive without adding unnecessary complexity to the design.
Consider adding decorative borders around the feather fan. A simple single crochet border in turquoise or emerald green can help unify the different sections. To create a slightly more elaborate finish, work a round of slip stitches followed by a round of single crochet stitches. Keep the tension even so that the fan remains flat and does not curl at the edges.
Color selection has a major influence on the finished appearance. Traditional peacock colors include deep blue, emerald green, turquoise, and golden yellow. These shades create a vibrant design that resembles the natural colors of peacock feathers. However, pastel combinations such as lavender, mint green, pale blue, and cream can create a softer decorative piece. Choosing a consistent color palette helps the different materials look intentional and coordinated.
You can also experiment with different feather arrangements. A symmetrical fan creates a classic peacock appearance, while a slightly asymmetrical arrangement can produce a more artistic and contemporary result. If you want a larger decoration, increase the number of crochet feather motifs and pull tabs while maintaining an even distribution. For a smaller ornament, reduce the number of motifs and use thinner yarn.
Another creative option is adding a hanging loop to the back of the finished piece. Chain approximately 15 stitches with strong cotton yarn, join the ends securely, and sew the loop onto the reinforced crochet backing. This makes it easier to display the peacock on a wall or decorative hook. If you prefer a tabletop decoration, you can instead attach the piece to a suitable lightweight backing or stand, ensuring that the structure is stable.
Finally, inspect every part of the finished project. Check the attachment points, loose yarn ends, decorative circles, and metal components. Trim excess yarn only after securing the ends properly. Make sure there are no exposed sharp edges and that the pull tabs remain firmly positioned. A careful finishing process makes the handmade decoration look more polished and helps it remain in good condition over time.
Frequently Asked Questions About the Crochet Peacock Pattern Using Pull Tabs
1. What is a Crochet peacock pattern using pull tabs?
A Crochet peacock pattern using pull tabs is a mixed-material craft project that combines crocheted yarn sections with recycled aluminum can pull tabs. The tabs provide decorative structural elements, while the yarn creates the peacock’s body, colorful feathers, and ornamental details. The result is a unique handmade decoration that combines crochet creativity with material reuse.
2. How many pull tabs do I need for this crochet peacock?
For a small decorative project, approximately 10 to 15 pull tabs can be a useful starting point. However, the quantity depends on the size of the feather fan and the arrangement you choose. Larger projects may require additional tabs, while miniature designs can use fewer.
3. Is this Crochet peacock pattern suitable for beginners?
Yes, this project can be adapted for beginners who know basic crochet stitches. The main body and feather motifs use accessible techniques such as chain stitches, single crochet, half double crochet, and double crochet. Beginners should take extra care when preparing and handling the metal tabs.
4. What type of yarn works best for a crochet peacock?
Medium-weight cotton yarn is a good choice because it provides stitch definition and holds its shape well. Cotton is also suitable for colorful decorative motifs. You can use acrylic yarn if you prefer a softer appearance, but make sure the finished fabric is sufficiently firm to support the decorative components.
5. Can I use different colors instead of traditional peacock colors?
Absolutely. Although turquoise, emerald green, royal blue, and golden yellow are traditional choices, you can experiment with lavender, pink, cream, white, or pastel shades. The most important thing is choosing colors that complement each other and create a visually balanced design.
6. How do I attach pull tabs without damaging the yarn?
The safest approach is to position the tabs against a reinforced crochet backing and secure them with yarn wrapping or sewing techniques. Avoid forcing the crochet hook through metal or creating additional holes. Make sure the metal edges are smooth and safely covered or separated from the yarn.
7. Can I make the peacock larger?
Yes. You can increase the size by making a larger body, adding more feather motifs, and expanding the fan arrangement. You may also increase the number of pull tabs to maintain the proportions of the design. Plan the layout before attaching the components.
8. How can I make the peacock feathers look more realistic?
Use different shades of green and blue, create slightly pointed feather shapes, and add small circular details to imitate the characteristic eye-like markings of peacock feathers. Combining different crochet stitches can also give the motifs more texture and dimension.
9. Can this crochet peacock be used as a handmade gift?
Yes. A finished peacock decoration can be a thoughtful handmade gift for someone who appreciates crochet, colorful decorations, and creative recycled crafts. You can personalize it with the recipient’s favorite colors and add a hanging loop for display.
10. How should I store and clean my crochet peacock?
Keep the decoration in a dry place away from excessive moisture. Remove dust gently with a soft brush or dry cloth. Avoid soaking the project, particularly because it contains metal components. Inspect the pull tabs occasionally to make sure they remain secure and free from corrosion.
11. Can I turn this pattern into a wall decoration?
Yes. Add a securely attached hanging loop to the reinforced backing or mount the piece onto a suitable lightweight support. Make sure the attachment can support the entire decoration without placing excessive tension on individual pull tabs.
12. What should I do if the feathers do not look symmetrical?
Arrange the feathers on a flat surface before sewing them permanently. Compare the spacing on both sides of the fan and adjust the position of individual motifs. Using stitch markers or temporary pins can help maintain symmetry while you assemble the design.
Conclusion
The Crochet peacock pattern using pull tabs is an enjoyable way to combine traditional crochet skills with creative material reuse. Throughout this tutorial, you learned how to prepare the materials, select suitable yarn, create the peacock’s body and head, crochet colorful feather motifs, incorporate aluminum pull tabs, and finish the project with decorative details. You also discovered how different color combinations, feather arrangements, and finishing techniques can transform a simple handmade idea into a beautiful decorative piece.
The most important elements of this project are patience, careful preparation, consistent crochet tension, and secure construction. By following each step and adapting the dimensions to your preferences, you can create a unique peacock decoration that reflects your personal creativity. Remember to inspect all metal components carefully and ensure that no sharp edges remain exposed.
Now that you have explored this Crochet peacock pattern using pull tabs, I would love to hear your thoughts! Have you tried combining crochet with recycled materials before? What colors would you choose for your peacock, and would you make a small ornament or a larger decorative piece? Please leave your honest opinion, share your experience, and suggest any improvements or new ideas for future patterns. Your feedback and suggestions can inspire even more creative handmade projects!