
The Crochet Santa Claus pattern made using pull tabs is a wonderful handmade Christmas project that combines traditional crochet techniques with creative recycling.
One of the most appealing features of the Crochet Santa Claus pattern made using pull tabs is that it offers an opportunity to create something festive while reusing materials that might otherwise be discarded.
Whether you are an experienced crocheter or someone who enjoys trying new handmade techniques, this Crochet Santa Claus pattern made using pull tabs can be adapted to different sizes and styles. You can make a small ornament for a Christmas tree, a decorative piece for a shelf, or a larger Santa Claus figure for your seasonal display. In this tutorial, you will discover which materials are useful, how to prepare the pull tabs safely, and how to crochet each part of Santa Claus step by step. The instructions use standard US crochet terminology and provide a practical construction method that you can personalize with your favorite Christmas colors and embellishments.
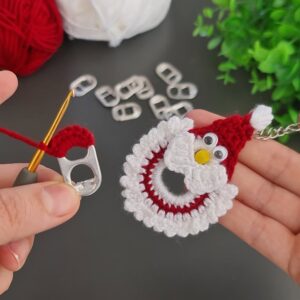
Materials and Preparation for the Crochet Santa Claus Pattern Made Using Pull Tabs
The first step in making your Crochet Santa Claus pattern made using pull tabs is gathering all the necessary materials. You will need medium-weight yarn in red, white, cream or skin tone, black, and a small amount of pink. Cotton yarn is an excellent choice because it provides good stitch definition and creates a firm fabric. You will also need a crochet hook suitable for your yarn, scissors, a yarn needle, stitch markers, and approximately 8 to 12 clean aluminum pull tabs, depending on the size and arrangement of your project.
The aluminum pull tabs are the recycled components that make this craft different from an ordinary crochet Santa Claus. They can be incorporated into the backing or decorative structure to add texture and support. Before using them, wash each tab with warm water and mild soap. Rinse thoroughly and allow them to dry completely. Inspect every piece for sharp edges, cracks, or damaged areas. Never use a tab with exposed sharp metal, and do not attempt to force your crochet hook through the metal. If a pull tab cannot be made safe, discard it.
Organize the materials by color before beginning. Place the red yarn in one container, the white yarn in another, and keep the smaller quantities of black, pink, and cream nearby. This simple organization makes the process easier because Santa Claus includes several small details that require frequent color changes. You can also arrange the pull tabs on a flat surface to determine where they will be positioned within the finished decoration.
The basic crochet stitches used in this project include chain stitch (ch), single crochet (sc), half double crochet (hdc), double crochet (dc), and slip stitch (sl st). These stitches are useful for creating Santa’s body, hat, beard, and decorative borders. You may also need single crochet increase (inc) and single crochet decrease (sc2tog) to shape rounded sections. Practicing these techniques on a small sample before beginning will help you maintain consistent tension.
For the main body, choose a crochet hook that produces a relatively firm fabric without making the stitches uncomfortable to work. A tightly crocheted fabric is useful because it helps the finished decoration maintain its shape. However, avoid pulling the yarn too tightly, as excessive tension can make it difficult to insert the hook into the stitches. If necessary, experiment with a slightly different hook size until you achieve a balanced result.
Finally, decide how you want the pull tabs to be incorporated. For this tutorial, they will be arranged behind a reinforced crochet backing and secured using yarn wrapping and sewing techniques. This allows the metal pieces to contribute to the decorative structure without becoming exposed or interfering with the crochet stitches. Planning this arrangement before starting will make the assembly process much more organized.
Step-by-Step Crochet Santa Claus Pattern Made Using Pull Tabs
Start the Crochet Santa Claus pattern made using pull tabs by creating the main body with red yarn. Make a magic ring and work 6 single crochet stitches into the ring. Pull the yarn tail gently to close the center. In the second round, work 2 single crochet stitches into each stitch, giving you 12 stitches. In the third round, work 1 single crochet in the first stitch and an increase in the next stitch, repeating this sequence around for a total of 18 stitches.
Continue increasing the body gradually. In the fourth round, work 2 single crochet stitches followed by an increase, repeating around to reach 24 stitches. In the fifth round, work 3 single crochet stitches followed by an increase, repeating around to reach 30 stitches. Continue with several rounds of single crochet without increasing to create the desired height. This section will form Santa’s rounded red coat and body.
To create the lower part of the outfit, work a few additional rounds using red yarn. If you want the body to have a slightly wider base, you can add another increase round. Otherwise, continue crocheting evenly. Finish with a slip stitch and leave a long yarn tail for assembly. You can lightly stuff the body with fiberfill if you want a three-dimensional Santa Claus decoration. Make sure the stuffing is evenly distributed and does not distort the crochet fabric.
Next, create Santa’s face using cream or skin-tone yarn. Make a magic ring and work 6 single crochet stitches into it. In the next round, increase in every stitch to reach 12 stitches. Continue increasing evenly until the circle reaches a size that fits the upper portion of the red body. Work one or two additional rounds without increases to create a slightly oval shape if desired. Fasten off, leaving a long tail for sewing.
Attach the face to the upper section of the red body using a yarn needle. Position it centrally and sew around the edges with small, secure stitches. The face should be placed high enough to leave space for the beard underneath. For the eyes, use black yarn to embroider two small dots. A tiny line of pink yarn can create a subtle nose or rosy cheeks. Embroidery is a good option because it avoids loose plastic pieces on a decorative item.
Now make Santa’s beard using white yarn. Chain approximately 12 stitches, then work single crochet stitches along the chain. On the next row, use half double crochet stitches to add a little volume. To create a rounded beard shape, decrease one stitch at each end of selected rows. Continue until the piece has a curved lower edge. You can also add small pointed sections using chains and slip stitches to create a more textured beard. Sew the beard beneath the face, covering the lower portion of the face and the upper part of the red body.
The Santa Claus hat is another important feature. Using red yarn, make a magic ring and work 4 single crochet stitches into it. In the following rounds, increase gradually to create a small cone. For example, work one single crochet in each stitch in the first round, then alternate single crochet stitches and increases in subsequent rounds. Continue until the lower opening is wide enough to fit the top of Santa’s head. Finish with a white border by working one round of single crochet or half double crochet in white yarn. Add a small white pom-pom made from a tiny crochet ball or a short bundle of yarn secured firmly at the tip.
To incorporate the pull tabs, place them behind the main crochet body in a balanced arrangement. A semicircular arrangement can create a decorative frame around Santa Claus, while a smaller group can be used to form a subtle metallic background. Cover or separate the metal edges with crochet fabric and secure each tab to a reinforced backing using yarn wrapping and sewing. Do not pierce the tabs or rely on unsecured metal edges to hold the project together. Check that every component is firmly attached before continuing.
Once the pull tabs are secured, sew the crochet body onto the reinforced backing. Make sure the Santa Claus figure is centered and that the metal pieces are distributed evenly around it. You can add a few white crochet snowflakes or small green leaves to the surrounding area to create a more festive appearance. These decorative elements are optional but can make the finished piece look more detailed and personalized.
Finishing, Decoration, and Creative Ideas for Your Crochet Santa Claus
After assembling the main sections, focus on the finishing details of your Crochet Santa Claus pattern made using pull tabs. Check the beard, face, hat, and body to ensure that all the pieces are firmly attached. Use a yarn needle to weave in loose ends carefully. Avoid cutting the yarn too close to the stitches, as this could cause the fabric to unravel over time. A neat finish makes the entire decoration look more professional.
You can create Santa’s belt using black yarn. Chain a length that fits around the lower part of the red body, then work one or two rows of single crochet. Sew the belt horizontally around the body. Add a small yellow or golden crochet rectangle in the center to represent the buckle. This simple detail adds contrast and makes Santa’s outfit more recognizable.
Another attractive detail is the white trim around Santa’s coat. Attach white yarn to the lower edge of the red body and work a round of single crochet stitches. If you prefer a thicker border, use half double crochet stitches instead. Keep the tension consistent so that the border does not become wavy. You can also add a small white trim around the sleeves if your design includes arms.
For the arms, make two small red crochet tubes. Start with a short chain, join it into a round, and work several rounds of single crochet. Add small white cuffs using white yarn. Attach the arms to the sides of the body using a yarn needle. If you prefer a simpler ornament, you can leave out the arms and focus on the face, beard, and hat.
The colors you choose can make a significant difference to the final result. Traditional Christmas red and white create the classic Santa Claus appearance, while green, gold, and silver can be used as complementary decorative colors. You can also use slightly different shades of red to add depth to the outfit. Try to maintain a consistent palette so that the recycled pull tabs and crochet elements look like parts of one coordinated design.
Finally, decide how you want to display the finished project. To create a Christmas tree ornament, attach a strong crochet hanging loop to the reinforced backing. For a shelf decoration, use a stable support that can hold the weight of the entire piece. You can also make several Santa Claus figures in different sizes and arrange them together as part of a handmade Christmas display. Always check the stability of the backing and the safety of the metal components before displaying the decoration.
Frequently Asked Questions About the Crochet Santa Claus Pattern Made Using Pull Tabs
1. What is a Crochet Santa Claus pattern made using pull tabs?
A Crochet Santa Claus pattern made using pull tabs is a handmade Christmas craft that combines crocheted yarn sections with recycled aluminum can pull tabs. The yarn is used to create Santa’s body, face, beard, hat, and decorative details, while the pull tabs are incorporated into a reinforced backing or decorative structure. It is a creative way to combine traditional crochet with material reuse.
2. How many pull tabs are needed for this project?
Approximately 8 to 12 pull tabs can be a useful starting point for a small decoration. The exact number depends on the size of the Santa Claus figure and how you want to arrange the metal pieces. Larger decorations may require more tabs, while miniature ornaments can use fewer.
3. Is this crochet Santa Claus project suitable for beginners?
Yes. Beginners who know basic crochet stitches can follow this project by completing one section at a time. The body, face, beard, and hat use accessible stitches such as single crochet, half double crochet, and chain stitches. The pull-tab preparation and assembly require additional attention, especially when handling metal components.
4. What type of yarn should I use?
Medium-weight cotton yarn is a practical option because it produces defined stitches and creates a relatively firm fabric. Acrylic yarn can also work if you prefer a softer texture. Choose yarn that is easy to handle and suitable for the crochet hook you have available.
5. Can I make this Santa Claus without stuffing?
Yes. You can make a flat Santa Claus decoration by working the body and face as separate crochet pieces and sewing them onto a reinforced backing. Stuffing is optional and is mainly useful if you want a rounded, three-dimensional appearance.
6. How do I attach the pull tabs safely?
Clean and inspect every pull tab before using it. Position the tabs behind a reinforced crochet backing and secure them using yarn wrapping or sewing techniques. Never force a crochet hook through the metal, and do not use tabs with sharp or damaged edges. The metal should not have exposed edges that can scratch the user or damage the yarn.
7. Can I use different colors for Santa’s outfit?
Yes. Although red and white are traditional Christmas colors, you can personalize the outfit with burgundy, cream, green, gold, or other festive shades. You can also use metallic-colored yarn for small decorative details.
8. How can I make the Santa Claus beard look fuller?
Use a combination of single crochet and half double crochet stitches to create a thicker fabric. You can also make several small crochet sections and layer them carefully. White yarn with a slightly textured appearance can help create a fuller beard effect.
9. Can I turn this project into a Christmas tree ornament?
Absolutely. Add a securely sewn crochet loop to the reinforced backing. Make sure the loop supports the entire decoration and that all metal components are firmly attached. A smaller design is generally more convenient for hanging on a Christmas tree.
10. How do I make the Santa Claus hat stay in place?
Position the hat centrally over the head and sew it securely around the lower edge using matching red yarn. You can also add a few discreet stitches near the top if necessary. The white border helps define the hat and gives it a classic Christmas appearance.
11. Can children participate in making this craft?
Children can participate in choosing yarn colors, arranging crochet decorations, and helping with simple nonhazardous tasks under adult supervision. However, preparing, cleaning, inspecting, and handling the metal pull tabs should be done by an adult. Keep small metal components away from young children because they can present sharp-edge and choking hazards.
12. How should I store my crochet Santa Claus decoration?
Store the finished project in a clean, dry container when the Christmas season is over. Avoid placing heavy objects on top of it, as this can deform the crochet sections or damage the backing. Check the metal components before storing and again before displaying the decoration the following year.
13. Can I make a larger Santa Claus using the same pattern?
Yes. You can increase the number of stitches in the body and face, add more rounds to the hat, and enlarge the beard. You may also need a larger reinforced backing and additional pull tabs to maintain the proportions of the decoration.
14. What can I do if my crochet Santa Claus looks uneven?
Check your stitch tension and compare the dimensions of each section before assembly. Use stitch markers to keep track of increases and decreases, and arrange the pieces on a flat surface before sewing them together. Small adjustments during assembly can make a significant difference to the finished appearance.
Conclusion
The Crochet Santa Claus pattern made using pull tabs is a creative and enjoyable way to bring crochet techniques and recycled materials together in a festive handmade project. In this tutorial, you learned how to prepare the necessary materials, create Santa’s body and face, crochet his beard and hat, incorporate aluminum pull tabs safely, and add finishing details such as a belt, cuffs, and decorative borders.
By following the instructions step by step, you can create a personalized Christmas decoration that reflects your own style and creativity. Remember that careful preparation, consistent stitches, secure assembly, and attention to metal safety are essential for achieving a beautiful result. You can also experiment with different sizes, colors, and decorative arrangements to make every Santa Claus unique.
I would love to know what you think about this Crochet Santa Claus pattern made using pull tabs! Have you tried making Christmas decorations with recycled materials before? Would you choose traditional red and white or experiment with different colors? Leave your honest opinion in the comments and share your suggestions for improving this pattern. Your ideas and experiences are always welcome and can inspire other crochet lovers to create something special this Christmas!