
The Crochet Christmas Tree Pattern for Decoration is a beautiful handmade project that brings warmth, creativity, and festive charm to your home during the holiday season.
One of the best things about making a Crochet Christmas Tree Pattern for Decoration is that you can adapt the design to different sizes and levels of difficulty.
This Crochet Christmas Tree Pattern for Decoration will guide you through the materials, preparation, and step-by-step crochet instructions needed to create your own festive ornament. You will learn how to shape the tree, build its branches, make a decorative trunk, and add beautiful finishing touches. The tutorial uses standard US crochet terminology and includes practical suggestions for adjusting the size and appearance of your project. Even if this is your first Christmas crochet decoration, you can follow the instructions gradually and enjoy the process of turning a simple ball of yarn into a lovely seasonal ornament.
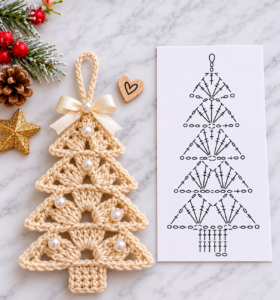
Materials and Basic Techniques for Your Crochet Christmas Tree Pattern for Decoration
Before beginning your Crochet Christmas Tree Pattern for Decoration, prepare all the materials you will need. Choose medium-weight yarn in green for the main tree, brown for the trunk, and optional colors such as white, red, gold, and yellow for the decorations. Cotton yarn is particularly useful because it creates defined stitches and helps the finished tree maintain its shape. Acrylic yarn is another good option if you prefer a softer texture and a wider selection of colors.
You will also need a crochet hook suitable for your yarn, scissors, a yarn needle, stitch markers, and a small amount of fiberfill if you plan to make a stuffed three-dimensional tree. For additional decoration, prepare small crochet circles, miniature bows, embroidery thread, or lightweight decorative elements. If you are making a standing tree, a suitable firm base can help it remain upright.
The main stitches used in this Crochet Christmas Tree Pattern for Decoration are chain stitch (ch), single crochet (sc), half double crochet (hdc), double crochet (dc), and slip stitch (sl st). These stitches are enough to create the basic tree shape and its decorative branches. You may also use single crochet increase (inc) to expand the fabric and single crochet decrease (sc2tog) to create tapered sections.
Another important technique is working in rows or rounds. A flat Christmas tree can be crocheted in rows, with increases and decreases used to form a triangular silhouette. A three-dimensional tree is usually worked in continuous rounds or separate circular layers. Both methods can produce attractive results, so choose the construction style that best matches the decoration you have in mind.
For this tutorial, the main design uses a three-dimensional cone-shaped tree with decorative layered branches. The cone creates the central structure, while the additional crochet layers give the tree a fuller appearance. You can make the tree as small or large as you like by adjusting the number of rounds and the amount of yarn used. Beginners may prefer starting with a smaller version to become familiar with the shaping process.
Before starting the main project, make a small crochet sample to check your tension. Your stitches should be firm enough to support the tree without making the fabric stiff or difficult to work. If the stitches are too loose, the stuffing may become visible. If they are too tight, you may struggle to insert the hook into each stitch. Adjust your hook size if necessary.
Step-by-Step Crochet Christmas Tree Pattern for Decoration
Start your Crochet Christmas Tree Pattern for Decoration by making the top of the tree. Using green yarn, create a magic ring and work 4 single crochet stitches into the ring. Pull the yarn tail to close the center. In the next round, work 2 single crochet stitches into every stitch, giving you 8 stitches. Continue working in continuous rounds, increasing gradually to create a small cone.
For the third round, work 1 single crochet in the first stitch, followed by an increase in the next stitch. Repeat this sequence around to reach 12 stitches. In the fourth round, work 2 single crochet stitches followed by an increase, repeating around to reach 16 stitches. Continue increasing in this manner until the cone reaches the width you want for the upper section of your tree.
Once you have reached the desired width, work several rounds without increasing. This creates a straight section and gives the tree a more defined shape. Keep your tension consistent and use a stitch marker to identify the beginning of each round. If you want a taller tree, simply add more rounds before beginning the next increase section.
To create the layered branches, you can crochet separate circular or semicircular pieces and attach them around the cone. For a simple branch layer, chain 15 stitches using green yarn. Work single crochet stitches along the chain, then add half double crochet stitches in the middle section and double crochet stitches toward the outer edge. This creates a gently curved decorative strip. Make several strips in different lengths to represent the branches at different levels of the tree.
Attach the first branch layer around the lower part of the cone using a yarn needle. Position the strip so that its upper edge follows the shape of the tree and its lower edge extends outward slightly. Sew it securely with matching green yarn. Repeat the process with shorter branch layers as you move toward the top. Leave enough space between the layers so that the tree maintains a balanced triangular silhouette.
For a fuller appearance, you can make small scalloped edges along each branch layer. To create a simple scallop, work 3 double crochet stitches into one stitch, skip the next stitch, and make a slip stitch into the following stitch. Repeat this sequence along the edge. The scallops create a decorative branch effect and add texture to the finished tree.
Next, make the trunk using brown yarn. Start with a magic ring and work 6 single crochet stitches into it. Increase evenly until the circular base reaches the width of the tree’s bottom opening. Work several rounds of single crochet without increasing to create a short cylindrical trunk. If you want a standing decoration, insert a small amount of fiberfill or place a suitable firm support inside the trunk before attaching it to the tree.
Sew the trunk securely to the bottom of the green cone. If you prefer a flat decoration rather than a standing ornament, you can replace the cylindrical trunk with a small rectangular crochet piece. Make a foundation chain of 6 stitches, work single crochet rows until the piece reaches your preferred length, and sew it beneath the tree.
To create the star for the top, use yellow or golden yarn. Make a magic ring and work a small number of single crochet stitches into it. For each point of the star, chain 4 stitches, work a slip stitch into the second chain from the hook, then use single crochet and half double crochet stitches along the remaining chain. Join the points to the center with slip stitches. Fasten off and sew the star securely onto the top of the tree.
The next step is adding Christmas ornaments. You can make tiny crochet balls using red, white, gold, and blue yarn. Start with a magic ring and work 6 single crochet stitches into it. Increase in the next round to create 12 stitches, then work one round evenly. Decrease gradually to close the ball, adding a small amount of fiberfill if you want a three-dimensional ornament. Make several miniature decorations and sew them onto the branches.
You can also create small decorative bows using red or gold yarn. Chain approximately 8 stitches, work a row of single crochet, and fasten off. Wrap a small piece of yarn around the center to create the bow shape. Attach the bows between the branches, distributing them evenly so that the tree looks festive without becoming overcrowded.
Finishing Touches, Decoration Ideas, and Personalization
Once the main structure is complete, inspect your Crochet Christmas Tree Pattern for Decoration and make any necessary adjustments. Check that the branch layers are evenly spaced and that the cone maintains a balanced shape. If some sections appear uneven, gently reposition them before securing the remaining stitches. Taking time to refine the structure will make your finished decoration look more polished.
One of the easiest ways to personalize your Christmas tree is by experimenting with different colors. Traditional dark green combined with red and gold creates a classic holiday appearance. For a winter-inspired decoration, choose white, cream, pale blue, and silver. If you prefer a modern style, try pastel pink, mint green, beige, or lavender. A consistent color palette helps the tree look coordinated and attractive.
Texture is another way to make your Crochet Christmas Tree Pattern for Decoration more interesting. You can use fluffy yarn for a snowy effect, textured stitches for the branches, or a combination of different green shades to create depth. Alternating single crochet and double crochet sections can also produce subtle variations in the surface. These small details can transform a simple tree into a distinctive handmade decoration.
If you want to create a larger centerpiece, increase the number of rounds in the central cone and make wider branch layers. You can also add additional decorative elements, such as crochet snowflakes, miniature presents, or small stars. Keep the proportions balanced so that the ornaments do not make the branches too heavy. A well-proportioned tree will look attractive from different angles.
For a smaller decoration, reduce the number of rounds and use thinner yarn with an appropriately sized crochet hook. Miniature trees are especially useful for decorating desks, shelves, Christmas table arrangements, and gift packages. You can make several small trees in different colors and group them together to create a charming seasonal display.
Finally, finish the project by weaving in all loose yarn ends and checking the stability of the base. If you want your tree to stand independently, make sure the trunk and support are secure. You can also attach a small hanging loop to the top if you prefer to use the design as a Christmas tree ornament. Store the finished decoration in a dry place when the holiday season is over to help preserve its shape and color.
Frequently Asked Questions About the Crochet Christmas Tree Pattern for Decoration
1. Is the Crochet Christmas Tree Pattern for Decoration suitable for beginners?
Yes. This pattern can be adapted for beginners who know basic crochet stitches such as chain stitch, single crochet, double crochet, and slip stitch. The project is divided into manageable sections, allowing you to create the cone, trunk, branches, and decorations separately. Starting with a smaller tree can make the process easier.
2. What type of yarn is best for a crochet Christmas tree?
Medium-weight cotton yarn is a great choice because it provides good stitch definition and helps the tree maintain its shape. Acrylic yarn is also suitable, especially if you want a softer finish. The most important thing is choosing a yarn that works well with your crochet hook and produces a firm fabric.
3. How much yarn do I need to make a crochet Christmas tree?
The amount depends on the size of the tree, the thickness of the yarn, and the number of decorative layers. A small tabletop tree may require only a small amount of green yarn and a few additional colors. Larger trees will naturally require more material. It is always helpful to have extra yarn available for finishing and embellishments.
4. How do I make my crochet Christmas tree stand upright?
You can create a firm trunk and use a suitable lightweight support inside the base. A small amount of fiberfill can help maintain the shape, but a more rigid internal support may be necessary for taller decorations. Make sure the base is stable and wide enough to support the tree.
5. Can I make a flat crochet Christmas tree instead?
Absolutely. You can crochet two triangular tree panels using single crochet stitches and sew them together around the edges. Alternatively, you can make a single flat panel and add embroidered ornaments and a small rectangular trunk. This version is ideal for wall decorations, gift embellishments, and Christmas garlands.
6. How can I make the branches look fuller?
Create multiple layered branch strips and attach them around the cone. You can also use scalloped edges, textured stitches, or different shades of green. Overlapping the branch layers slightly can give the tree a fuller appearance.
7. What can I use to decorate my crochet Christmas tree?
Popular options include tiny crochet balls, bows, stars, snowflakes, embroidered ornaments, and small decorative flowers. You can also use different yarn textures to create a snowy effect. Choose lightweight decorations that do not pull the branches out of shape.
8. How do I make a crochet star for the top of the tree?
You can create a small star using a magic ring, single crochet stitches, and chain-based points. Make five evenly spaced points around the center and finish with slip stitches. Use yellow or golden yarn for a traditional Christmas appearance.
9. Can I wash my crochet Christmas tree?
Cleaning depends on the yarn and any additional materials used. For most decorations, gentle surface cleaning with a soft cloth is preferable. If the tree contains stuffing, a rigid support, or glued embellishments, avoid soaking it. Always check the yarn care instructions before cleaning.
10. Can I sell handmade crochet Christmas trees?
Yes, handmade crochet Christmas decorations can be offered as seasonal craft products. If you decide to sell your creations, pay attention to the quality of the stitching, the stability of the base, and the safety of any decorative components. Clear product descriptions and photographs can also help customers understand the size and construction of each piece.
11. How can I make a miniature crochet Christmas tree?
Use thinner yarn, a smaller crochet hook, and fewer rounds when creating the central cone. Reduce the size of the branch layers and use tiny decorative ornaments. Miniature trees are excellent for small spaces and handmade Christmas arrangements.
12. Why does my crochet Christmas tree curl or lose its shape?
This can happen when the crochet tension is inconsistent or the tree does not have enough structural support. Try using a smaller hook to create firmer stitches, check the number of increases, and make sure the branch layers are attached evenly. For a three-dimensional tree, a suitable internal support can help maintain its shape.
13. Can I make this pattern in colors other than green?
Definitely. White, cream, red, pink, blue, and pastel shades can all create beautiful Christmas decorations. You can also combine two or three shades to give the tree more depth. Personalizing the colors is one of the most enjoyable parts of handmade crochet projects.
Conclusion
The Crochet Christmas Tree Pattern for Decoration is a wonderful project for anyone who wants to create a personalized handmade ornament for the holiday season. Throughout this tutorial, you learned how to select the right materials, use basic crochet stitches, shape a three-dimensional tree, create decorative branches, make a trunk and star, and add colorful Christmas ornaments. You also discovered different ways to adjust the size, texture, and color combinations to match your decorating style.
With patience and attention to detail, you can turn simple yarn into a charming Christmas decoration that brings warmth and personality to your home. Whether you choose a traditional green tree or experiment with modern colors, every handmade piece can become a special part of your holiday celebrations. Remember to finish each section carefully, secure the decorative elements, and make sure the base is stable if your tree is designed to stand upright.
Now I would love to hear your opinion! Did you enjoy this Crochet Christmas Tree Pattern for Decoration? Which colors would you choose for your own version, and would you prefer a small tabletop tree or a larger centerpiece? Leave your honest feedback in the comments and share your suggestions for future crochet patterns. Your ideas and creativity can inspire other crochet enthusiasts to make beautiful handmade Christmas decorations!