
The Fabric Christmas gnome pattern is a charming handmade decoration that brings warmth, personality, and a festive atmosphere to any home during the holiday season.
One of the most attractive features of a Fabric Christmas gnome pattern is its versatility. You can experiment with different fabrics, hat shapes, beard materials, colors, and decorative accessories to create a unique character that matches your Christmas style.
In this tutorial, you will learn how to make a beautiful Fabric Christmas gnome pattern step by step, from preparing your materials to assembling and decorating the finished project. The instructions are designed around a classic standing fabric gnome with a soft body, a pointed hat, a beard, and a rounded nose. You will discover how to choose suitable materials, prepare your fabric pieces, sew the main components, and add the finishing details that make the decoration look professional. Even if you have limited sewing experience, following each stage carefully will help you achieve a lovely result. Most importantly, this handmade Christmas gnome can become a personalized decoration for your home or a thoughtful gift for someone who appreciates creative holiday crafts.
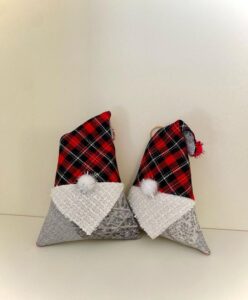
Materials and Preparation for Your Fabric Christmas Gnome Pattern
Before starting your Fabric Christmas gnome pattern, gather all the materials you will need. Preparing everything in advance makes the sewing process easier and helps you avoid interruptions. You do not need expensive supplies, and many of the materials can be found in your existing sewing collection.
For the main body, choose a medium-weight cotton fabric, felt, or another fabric that is easy to sew and holds its shape. Christmas prints, neutral colors, and rustic textures are all excellent options. A fabric measuring approximately 30 by 40 centimeters is generally enough for a small gnome, although the amount will depend on your chosen dimensions.
You will also need fabric for the pointed hat. Red, green, gray, cream, and plaid fabrics work beautifully for a traditional Christmas appearance. Felt is another convenient option because it does not fray easily and is simple to shape. Choose a fabric that complements the body rather than competing with the other decorative elements.
For the beard, prepare white faux fur, white fleece, wool roving, or another soft material with a fluffy appearance. The beard is one of the most recognizable features of a Christmas gnome, so choosing a material with an attractive texture can make a significant difference. Cut it into a rounded triangular shape that will fit comfortably beneath the hat.
Polyester fiberfill is useful for stuffing the gnome and creating a soft, rounded body. You may also use clean fabric scraps if you prefer a recycled craft project. If you want the gnome to stand more securely, consider adding a small amount of stuffing material or a suitable weighted insert inside the lower body, making sure it is safely enclosed.
Other useful supplies include sewing thread, a needle, fabric scissors, pins or sewing clips, a ruler, fabric marking chalk, and a sewing machine if available. A small wooden bead or fabric-covered ball can serve as the nose. Optional decorations include miniature bells, ribbons, buttons, small fabric stars, and Christmas-themed embellishments.
Before cutting anything, decide how tall you want your finished gnome to be. A small tabletop version can measure approximately 20 to 25 centimeters, while a larger decorative gnome can be made by increasing the pattern dimensions proportionally. Draw simple templates for the body, hat, and beard on paper, and remember to include approximately 0.5 to 1 centimeter of seam allowance around fabric pieces that will be sewn together.
Step-by-Step Instructions for Making a Fabric Christmas Gnome Pattern
The first step in your Fabric Christmas gnome pattern is preparing the body. Draw a rounded rectangular or slightly tapered body shape on paper, depending on the appearance you prefer. Transfer the template onto your selected fabric and cut two identical pieces. Place them together with the right sides facing inward, align the edges, and secure them with pins or sewing clips. This preparation helps keep the pieces from shifting during sewing.
Next, sew around the sides and bottom of the body, leaving the upper edge open for stuffing. Use small, even stitches to create a strong seam that will hold the filling securely. If you are using a sewing machine, choose a straight stitch with a moderate stitch length. Once the sewing is complete, trim excess fabric from the seam allowance and carefully turn the body right side out. Gently push out the corners and curves using a suitable blunt tool.
Now it is time to stuff the body. Add small portions of polyester fiberfill through the opening, distributing the material evenly to avoid large lumps. Continue filling until the body feels soft but firm enough to maintain its shape. Avoid overstuffing, as excessive filling can stretch the seams or create an uneven appearance. Once you are satisfied with the shape, fold the raw edges inward and close the opening with a neat hand-sewn ladder stitch.
The pointed hat is the next important component of the Fabric Christmas gnome pattern. Draw a tall triangular template with a slightly curved lower edge. The width of the triangle should be large enough to fit around the upper part of the stuffed body. Cut two matching pieces from your chosen hat fabric, place them with the right sides together, and sew along the two long sides, leaving the bottom open. Trim the seam allowance carefully and turn the hat right side out.
To create the characteristic pointed appearance, gently shape the top of the hat with your fingers. You can bend the tip slightly to one side for a playful look or leave it upright for a more traditional Scandinavian style. If you want additional structure, a small amount of soft filling can be placed inside the upper section. Avoid making the hat too stiff because its relaxed shape is part of the charm of a handmade Christmas gnome.
The beard gives your gnome its distinctive personality. Place the white faux fur or fleece on a flat surface and draw a rounded triangular shape on the back of the material. Cut carefully from the backing rather than cutting deeply into the fibers. This helps preserve the fluffy texture. Position the beard on the front of the stuffed body, making sure the upper edge will be covered by the hat. Secure it with a few hand stitches or suitable fabric adhesive, following the product instructions if you choose adhesive.
Assembling and Decorating Your Handmade Fabric Christmas Gnome
Once the body, hat, and beard are ready, you can begin assembling the main pieces of your Fabric Christmas gnome pattern. Start by placing the beard on the front of the body and checking that it is centered. The beard should extend downward without covering the entire lower portion of the gnome. This creates a balanced appearance and leaves enough room for additional decorative details.
Next, prepare the nose. A small wooden bead, pom-pom, or fabric-covered ball can work beautifully. If you want a completely fabric-based decoration, cut a small circle from skin-tone or beige fabric, sew around its edge using a running stitch, add a little stuffing, and pull the thread gently to form a rounded shape. Secure the nose above the beard, approximately where the beard meets the lower edge of the hat.
Now position the pointed hat over the upper part of the body. The lower edge should overlap the top of the beard slightly, creating the traditional appearance of a gnome with a large hat covering its face. Adjust the hat until it sits evenly and looks proportional to the body. Once you are happy with the placement, attach it with small hand stitches around the lower edge or another suitable sewing method.
At this stage, examine your gnome from different angles. Make sure the hat is secure, the beard is centered, and the nose is positioned naturally. Small adjustments can make a significant difference in the final appearance. If the hat looks too wide or too narrow, reposition it before completing the attachment. Taking a few extra minutes to check the proportions helps create a more polished handmade decoration.
You can now personalize your Fabric Christmas gnome pattern with festive accessories. A miniature ribbon around the base of the hat, a small fabric star, decorative buttons, or a tiny bell can give your project extra character. Plaid fabric is especially attractive for rustic Christmas decorations, while velvet and felt can create a softer, more traditional holiday appearance. Keep embellishments securely attached, particularly if the gnome will be displayed in a home with children or pets.
Finally, check all the seams and attachments. Trim loose threads, remove visible fabric markings, and gently adjust the stuffing if necessary. If you want your gnome to stand upright, make sure its lower section has a stable shape and add an appropriate enclosed weight if needed. You can also create a flat base from sturdy fabric or felt to improve stability. Allow any fabric adhesive to dry completely before moving the decoration to its final display location.
Creative Variations, Care Tips, and Display Ideas for Your Fabric Christmas Gnome Pattern
One of the best things about a Fabric Christmas gnome pattern is the opportunity to experiment with different styles. You can make a traditional Christmas gnome using a bright red hat, a white beard, and a neutral body. This combination creates a familiar festive appearance that works well with classic Christmas decorations. Adding a small green ribbon or a miniature bell can make the design even more seasonal without making it look overcrowded.
For a rustic farmhouse version, choose natural beige, brown, cream, and gray fabrics. A linen-look body combined with a plaid hat and a soft white beard creates a warm, understated decoration. You can also use wooden buttons and simple cotton ribbons to reinforce the handmade appearance. This version works particularly well with wooden Christmas ornaments, neutral table decorations, and natural greenery.
Another idea is to make a Scandinavian-inspired gnome with a long, soft hat and a minimalistic body. Choose neutral fabrics and avoid excessive embellishments. A slightly curved hat tip and a fluffy beard are enough to create an attractive character. Making two or three gnomes in different heights can produce an appealing decorative arrangement for a mantel, shelf, or entryway table.
If you enjoy recycling materials, consider making a Fabric Christmas gnome pattern using leftover cotton, felt, or fabric scraps from previous sewing projects. Different pieces can be combined to create a colorful patchwork hat or a contrasting body. This is a practical way to reduce fabric waste while producing something creative. Just make sure that the fabric pieces are clean, compatible in weight, and securely joined.
These gnomes also make lovely handmade gifts. You can create a personalized version using colors that match the recipient’s home or favorite Christmas decorations. A small gnome can be used as a shelf ornament, while a larger version can become a decorative centerpiece. If you are making several as gifts, consider varying the hats and accessories so that every character has a distinctive appearance.
To care for your finished decoration, keep it away from excessive moisture, direct heat, and dusty areas. Because faux fur, felt, and stuffed fabric may require different cleaning methods, always check the care instructions for the materials you used. For general maintenance, gently remove dust with a soft brush or a clean, dry cloth. Store your gnome in a clean, dry container after the holiday season, preferably with enough space to prevent the hat and beard from becoming crushed.
Frequently Asked Questions About the Fabric Christmas Gnome Pattern
1. Is the Fabric Christmas gnome pattern suitable for beginners?
Yes! This project is suitable for beginners who have basic sewing skills. The main components are relatively simple shapes, including a stuffed body, a triangular hat, and a beard. You can sew the pieces by hand or use a sewing machine. Taking your time with the cutting and assembly stages will help you achieve a beautiful result.
2. What is the best fabric for making a Christmas gnome?
Cotton, felt, fleece, and linen-look fabrics are popular choices. Cotton is easy to sew and comes in many Christmas prints, while felt is convenient because it does not fray easily. Faux fur and fleece are especially useful for creating a fluffy beard.
3. Can I make a Fabric Christmas gnome pattern without a sewing machine?
Absolutely! You can complete the entire project using a needle and thread. A simple backstitch works well for joining the body and hat pieces. Hand sewing may take a little longer, but it allows you to create a charming decoration without specialized equipment.
4. What can I use instead of polyester fiberfill?
Clean fabric scraps, cotton filling, and other suitable textile stuffing materials can be used as alternatives. Make sure the filling is distributed evenly so the gnome maintains a balanced shape. Avoid materials that could become damp, develop unpleasant odors, or create an unstable base.
5. How do I make the gnome stand upright?
Use a firm, evenly stuffed lower body and consider adding a securely enclosed weighted insert. You can also sew a sturdy fabric or felt base to help distribute the weight. Check that the finished decoration rests on a flat surface without tipping easily.
6. How can I make the beard look fuller?
Choose a suitable long-pile faux fur or soft fleece with a fluffy texture. Cut the backing carefully to avoid shortening the fibers. You can gently separate and arrange the fibers with your fingers after attaching the beard to create a fuller appearance.
7. Can I change the size of the Fabric Christmas gnome pattern?
Yes. You can enlarge or reduce the body, hat, and beard templates to create different sizes. The most important thing is to maintain balanced proportions. If you make the body taller, increase the hat dimensions accordingly so the finished decoration looks harmonious.
8. What decorations can I add to my Christmas gnome?
Popular options include small bells, ribbons, wooden buttons, miniature stars, fabric flowers, and decorative stitching. Plaid patterns and Christmas-themed prints can also add personality. Choose embellishments that complement the fabric colors without making the design too crowded.
9. Can I make these gnomes as handmade Christmas gifts?
Definitely! Handmade fabric gnomes are thoughtful gifts because they can be personalized with different colors, fabrics, and accessories. You can make a collection of small characters for friends and family or create a larger decorative piece for someone who enjoys handmade Christmas decorations.
10. How should I store my fabric Christmas gnome after the holidays?
Store the gnome in a clean, dry container away from moisture and direct sunlight. Avoid placing heavy objects on top of it, as this can flatten the beard or permanently bend the hat. A little care will help preserve its appearance for many Christmas seasons.
Conclusion
Creating a Fabric Christmas gnome pattern is a wonderful way to bring creativity and handmade charm into your holiday decorations. Throughout this tutorial, you learned how to choose the right materials, prepare the body and hat templates, sew and stuff the main pieces, attach the fluffy beard, and add the nose and festive accessories. You also discovered different ways to personalize your gnome, from traditional Christmas colors to rustic farmhouse and Scandinavian-inspired designs.
The most enjoyable part of this project is that every handmade gnome can have its own personality. By experimenting with fabrics, sizes, colors, and decorative details, you can create unique Christmas characters that complement your home or become special gifts for loved ones. Remember that careful preparation, neat stitching, and balanced proportions are the keys to achieving a beautiful result.
Now it is your turn to bring this Fabric Christmas gnome pattern to life! Have you tried making a fabric Christmas gnome before? Which colors and decorations would you choose for your project? Leave your honest opinion, share your experience, and feel free to suggest other creative ideas for future Christmas crafts. Your comments and suggestions are always welcome and can inspire even more beautiful handmade projects!