
The Fabric Bird Pattern is a delightful sewing project that allows you to transform simple pieces of fabric into charming handmade decorations. Fabric birds are popular among DIY enthusiasts because they are versatile, relatively easy to make, and suitable for many decorative styles.
Whether you enjoy creating rustic home accessories, seasonal decorations, handmade gifts, or charming ornaments, this project offers an opportunity to combine creativity with practical sewing skills. With a few basic materials, carefully prepared templates, and simple stitching techniques, you can create beautiful fabric birds in different sizes, colors, and patterns. Each finished bird can have its own personality, making this craft especially enjoyable for anyone who loves handmade decorations.
One of the most attractive features of a Fabric Bird Pattern is how easily it can be customized. You can choose floral cotton, colorful patchwork fabrics, linen, felt, gingham, or even leftover materials from previous sewing projects.
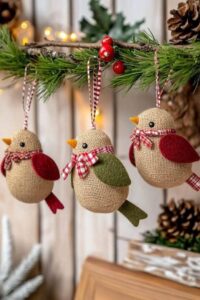
The bird’s body can be made from a single fabric or from two contrasting prints to create an interesting visual effect. Small details, such as embroidered eyes, decorative wings, fabric beaks, and ribbon tails, give the finished piece an expressive appearance. Depending on the materials and dimensions you select, your fabric birds can become shelf decorations, hanging ornaments, centerpiece accessories, or thoughtful handmade presents. You can also create an entire collection using coordinated colors to decorate different areas of your home.
In this tutorial, you will learn how to make a beautiful Fabric Bird Pattern step by step, from preparing the sewing materials to assembling and decorating the finished bird. The instructions focus on a classic stuffed fabric bird with a rounded body, two decorative wings, a small beak, and a charming tail.
You will discover how to draw or adapt a simple bird template, cut the fabric accurately, sew the body, add the stuffing, and attach the decorative details. The project is suitable for beginners who are learning basic sewing techniques, as well as experienced crafters looking for a relaxing and creative activity. By following each stage carefully, you can create a personalized fabric bird that reflects your favorite colors and handmade style.
Materials and Preparation for Your Fabric Bird Pattern
Before beginning your Fabric Bird Pattern, organize all the materials you will need. Preparing your supplies in advance makes the project easier to manage and helps you work more efficiently. You do not need expensive equipment, and many of the materials may already be available in your sewing collection.
For the bird’s body, choose a medium-weight cotton fabric that is easy to handle and comfortable to sew. Floral prints, polka dots, gingham, linen-look fabrics, and small geometric patterns are excellent choices. You will need enough fabric to cut two identical body shapes. For a small decorative bird measuring approximately 15 centimeters in length, two pieces measuring around 20 by 15 centimeters may be sufficient, depending on the template.
You should also prepare fabric for the wings and tail. These pieces can match the body or feature contrasting prints to create a more decorative appearance. For example, a bird made with cream cotton can have floral wings and a small red gingham tail. Felt is another useful material because it is easy to cut and does not fray easily. Combining different textures can make your handmade bird more interesting.
For stuffing, polyester fiberfill is a practical option because it is lightweight, soft, and easy to distribute inside small fabric shapes. You can also use clean fabric scraps if you prefer a recycled sewing project. Make sure the filling is clean and dry, and avoid adding too much material because excessive stuffing can distort the bird’s silhouette.
Other essential supplies include sewing thread, a hand-sewing needle, fabric scissors, pins or sewing clips, a ruler, fabric marking chalk, and a sewing machine if you have one. You may also want embroidery thread for the eyes and decorative details. Optional accessories include small ribbons, buttons, beads, and fabric scraps for embellishment. Any small accessories should be securely attached, especially if the finished bird will be accessible to children or pets.
The first preparation step is creating your bird template. Draw a simple side-view silhouette with a rounded body, a slightly pointed front for the beak area, and a gently curved back. The underside should have a smooth curve so the finished bird can sit naturally on a flat surface. Keep the shape simple because complicated curves can make the sewing process more difficult for beginners. Draw the wing and tail as separate paper templates.
Once your templates are ready, place them on the fabric and trace around them using fabric chalk or a washable marking pen. Cut two matching body pieces, two wing pieces, and the number of tail pieces required by your chosen design. Remember to include approximately 0.5 to 1 centimeter of seam allowance around the edges that will be sewn. Accurate cutting at this stage helps ensure that the finished Fabric Bird Pattern has balanced proportions.
Step-by-Step Instructions for Sewing Your Fabric Bird Pattern
The first step in making your Fabric Bird Pattern is assembling the main body. Place the two body fabric pieces together with their right sides facing inward. Make sure the edges are aligned correctly and secure them with pins or sewing clips. If your fabric has a directional print, check that the design faces the intended direction before sewing. This small detail can make a noticeable difference in the final appearance.
Next, sew around the body outline using a straight stitch. Follow the curved edges slowly, especially around the front and back of the bird. Leave an opening of approximately 4 to 5 centimeters along the lower section so that you can turn the fabric and add the stuffing later. If you are sewing by hand, use a neat backstitch to create a secure seam. Keep your stitches consistent to prevent gaps when the body is filled.
After sewing, trim excess fabric from the seam allowance, particularly around curved areas. Make small clips in the seam allowance where necessary, taking care not to cut through the stitching. These small adjustments help the curves sit more smoothly when the body is turned right side out. Carefully turn the body through the opening and use a blunt tool to gently shape the rounded areas.
Now begin filling the bird with polyester fiberfill. Add small portions at a time, distributing the stuffing evenly throughout the body. Start with the front and back sections before filling the central area. Use your fingers to move the filling into the smaller curves. The body should feel soft but sufficiently firm to maintain its shape. Avoid overstuffing, as this can make the seams stretch and create an uneven silhouette.
Once the body has the desired shape, fold the raw edges of the opening inward and close it with a neat ladder stitch. This hand-sewing technique helps create an almost invisible finish. Take small stitches along the folded edges, alternating from one side to the other, and gently pull the thread to close the opening. Secure the thread with a discreet knot and hide the remaining thread inside the fabric whenever possible.
The next step is preparing the wings. Place your chosen wing fabric on a flat surface and trace the wing template. Cut two matching pieces for each wing if you want slightly padded wings, or use a single layer of felt for a simpler design. If making padded wings, place the fabric pieces with their right sides together, sew around the edges, leave a small opening, and turn them right side out. Add a little stuffing if desired and close the opening. Position the wings symmetrically on both sides of the bird’s body and attach them with small hand stitches.
Adding Details and Finishing Your Handmade Fabric Bird
The decorative details are what make your Fabric Bird Pattern unique. Start by preparing the beak, which is one of the most recognizable features of a bird. You can make a small triangular beak from felt or cotton fabric. Cut two matching triangles, place them together, and sew along the edges, leaving the base open. Turn the piece right side out if necessary and attach it to the front of the body with small stitches. For a simpler design, use a folded piece of felt and secure it directly to the fabric.
Next, add the eyes. Small embroidered eyes are an excellent choice because they create a charming appearance without requiring additional hard accessories. Use black embroidery thread and make a few small stitches on each visible side of the bird. Position the eyes carefully so they appear balanced and aligned. If you prefer a minimalist design, you can leave the face without eyes or use small fabric details instead.
Now attach the wings to the body. Position one wing on each side, making sure both are placed at approximately the same height. You can angle them slightly downward or upward depending on the look you want. Secure them with small stitches around the edges or use a suitable fabric adhesive according to its instructions. Hand stitching generally provides a durable attachment and gives the project a completely handmade finish.
The tail is another opportunity to add personality to your Fabric Bird Pattern. Cut two small pieces of fabric in a leaf-shaped or rounded triangular form. Place them together, sew around the edges, and turn them right side out. You can add a little stuffing for volume or leave the tail flat for a simpler appearance. Attach it to the back of the bird, positioning it so that it extends naturally from the body.
If you want to make your bird more decorative, consider adding a small ribbon bow around its neck or a fabric flower near one wing. Embroidered lines on the wings can create the appearance of feathers, while decorative buttons can add a rustic touch. Choose details that complement the fabric rather than overwhelming the design. A balanced combination of colors and textures usually creates the most attractive result.
Finally, inspect your finished bird carefully. Check that the seams are secure, the stuffing is evenly distributed, and the wings, beak, and tail are firmly attached. Remove loose threads and clean away any remaining fabric markings. If your bird is designed to sit on a shelf, gently adjust the lower body so it rests evenly. If you want to hang it as an ornament, attach a small fabric loop or ribbon securely to the upper back before completing the final assembly.
Creative Ideas, Customization, and Care for Your Fabric Bird Pattern
One of the most enjoyable aspects of a Fabric Bird Pattern is the freedom to create different styles. For a traditional country-inspired decoration, choose floral cotton, gingham, and neutral fabrics. A combination of cream, dusty pink, light blue, and soft green can produce a delicate appearance. These colors work beautifully for spring decorations and can also be used throughout the year.
For a rustic farmhouse style, consider linen-look fabrics, brown cotton, beige felt, and simple decorative stitching. You can add small fabric patches to the wings or use a neutral color palette to create a natural appearance. These birds look attractive when displayed on wooden shelves, decorative trays, or alongside other handmade fabric ornaments.
You can also create seasonal versions of your Fabric Bird Pattern. For Christmas, choose red, green, cream, and plaid fabrics, adding a tiny ribbon or a small decorative bow. For spring, use pastel colors and floral prints. For autumn, choose warm shades such as mustard, orange, brown, and burgundy. Changing the fabric combinations allows you to reuse the same basic template for several different occasions.
Another creative possibility is making a patchwork bird. Instead of using one fabric for the entire body, combine two or three complementary cotton prints. You can also use leftover fabric scraps for the wings and tail. This approach is especially useful for reducing textile waste and creating a unique design. Make sure the different fabric pieces are joined securely before assembling the body.
These handmade birds can also become thoughtful gifts. You can create a collection of birds in different colors for friends and family or make a personalized decoration for someone who enjoys sewing and handmade accessories. A small fabric bird can be used as a shelf ornament, a decorative centerpiece, or a hanging accessory. If you are preparing several gifts, consider using different wing patterns so each bird has its own identity.
For proper care, keep your finished fabric bird away from excessive moisture and direct heat. Dust it gently with a soft, dry cloth or a clean brush. If you have used delicate materials, embroidery, or glued decorations, avoid machine washing unless the materials are specifically suitable for it. Store your finished pieces in a clean, dry container when they are not being displayed. Avoid placing heavy objects on top of them to preserve their shape and decorative details.
Frequently Asked Questions About the Fabric Bird Pattern
1. Is the Fabric Bird Pattern suitable for beginners?
Yes! This is a beginner-friendly sewing project because it uses simple shapes and basic sewing techniques. You mainly need to sew two body pieces together, add stuffing, and attach decorative elements. Beginners can start with a simple design before experimenting with more elaborate wings and accessories.
2. What is the best fabric for making fabric birds?
Medium-weight cotton is one of the most convenient choices because it is easy to cut, sew, and decorate. Felt, linen, and lightweight canvas can also work well. Choose fabrics that are not excessively stiff or stretchy so the bird maintains its shape.
3. Can I make a Fabric Bird Pattern by hand without a sewing machine?
Absolutely! All the components can be sewn by hand using a needle and thread. A backstitch is useful for joining the body pieces, while a ladder stitch is ideal for closing the stuffing opening. Hand sewing is a practical option for small decorative projects.
4. What can I use to stuff a fabric bird?
Polyester fiberfill is a popular option because it is soft, lightweight, and easy to distribute. Clean fabric scraps can also be used for a recycled project. Whatever filling you choose, distribute it evenly to avoid lumps and maintain the bird’s shape.
5. How do I make the bird look more realistic?
You can create a more detailed appearance by shaping the beak carefully, embroidering small eyes, and adding decorative stitching to the wings. Choosing fabrics with natural colors and adding subtle feather-like details can also enhance the design.
6. How can I make the wings look more attractive?
Use contrasting fabric, felt, or two coordinating prints. You can also embroider small lines across the wings to imitate feathers. Slightly padded wings create a three-dimensional effect, while flat felt wings provide a clean and simple finish.
7. Can I make different sizes using the same Fabric Bird Pattern?
Yes. Simply enlarge or reduce the paper template before tracing it onto the fabric. Remember to adjust the wing, tail, and beak dimensions as well. Maintaining balanced proportions will help the finished bird look attractive regardless of its size.
8. How can I make a fabric bird suitable for hanging?
Attach a small fabric loop or decorative ribbon to the upper back of the bird. Secure it with several strong stitches before closing the body opening, if possible. Make sure the loop is firmly attached and appropriate for the weight of the finished decoration.
9. Can I use leftover fabric scraps for this project?
Yes! Fabric scraps are excellent for making wings, tails, beaks, and even patchwork bodies. This is a creative way to reuse materials from previous sewing projects. Make sure the fabric pieces are clean and that all seams are securely finished.
10. How do I keep my handmade fabric bird in good condition?
Keep it in a dry location, remove dust gently, and avoid exposing it to excessive moisture. Store it in a clean container when not in use. If your bird has delicate decorations, protect them from pressure to prevent damage.
Conclusion
Making a Fabric Bird Pattern is a wonderful way to explore creativity while producing a charming handmade decoration. Throughout this tutorial, you learned how to select suitable fabrics and sewing supplies, prepare the body and wing templates, sew and stuff the bird, and add details such as the beak, eyes, wings, and tail. You also discovered different ways to personalize your project with seasonal fabrics, patchwork combinations, embroidery, and decorative accessories.
The beauty of this sewing project is that every bird can be completely different. By experimenting with colors, textures, sizes, and details, you can create a collection that reflects your personal style and complements your home. Whether you make one bird as a small decorative accent or several as handmade gifts, the result is a lovely example of how simple materials can become something special.
Now it is your turn to try this Fabric Bird Pattern! I would love to hear your honest opinion about this tutorial. Which fabrics would you choose, and what decorative details would you add to your handmade bird? Leave your comments, share your experience, and suggest other fabric craft projects you would like to learn. Your ideas and suggestions are always welcome!