
A Fabric sleep mask pattern is a wonderful sewing project for anyone who enjoys creating practical, beautiful, and comfortable handmade accessories. A fabric sleep mask is designed to gently cover the eyes, helping reduce exposure to unwanted light while resting, traveling, or enjoying a relaxing moment at home.
With a few basic sewing supplies, some carefully selected fabrics, and a little patience, you can create a personalized sleep mask that is both useful and attractive. Whether you are an experienced sewing enthusiast or a beginner learning how to use a sewing machine, this project is an excellent opportunity to practice simple sewing techniques.
One of the best things about making a Fabric sleep mask pattern is that it does not require expensive materials or complicated equipment. Small fabric scraps left over from previous sewing projects can become the main material for this accessory.
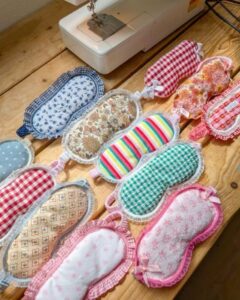
Cotton, satin, flannel, and other soft fabrics are popular choices because they can provide a pleasant feeling against the skin. You can also experiment with different colors, floral prints, delicate patterns, and decorative details to create a design that reflects your personal taste. The finished project can be simple and elegant or colorful and playful, depending on the materials you choose.
Another reason to try this Fabric sleep mask pattern is its versatility. Handmade sleep masks can be useful at home, during long journeys, on airplanes, or whenever you want to create a more comfortable resting environment.
They also make thoughtful handmade gifts for birthdays, holidays, bridal showers, and other special occasions. By following a clear step-by-step process, you can learn how to prepare the fabric, cut the correct shape, assemble the layers, sew the edges, and attach an elastic strap. The result is a reusable fabric accessory that combines creativity, practicality, and the satisfaction of making something with your own hands.
Materials and Preparation for Your Fabric Sleep Mask Pattern
Before starting your Fabric sleep mask pattern, prepare all the materials you will need. Having everything within reach makes the sewing process easier and helps prevent unnecessary interruptions. For this project, you will need two pieces of fabric for the outer layers, a piece of soft lining material, and a suitable elastic band. Choose fabrics that are comfortable against the face and easy to sew with your available equipment.
Cotton fabric is an excellent option for beginners because it is easy to handle, cut, and stitch. Satin can give your fabric sleep mask a more elegant appearance, while flannel provides a soft and cozy texture. You can also combine different materials to create an interesting design. For example, use a printed cotton fabric on the front and a plain, soft fabric on the side that touches the skin.
The next step is to prepare your pattern. You can draw a simple sleep mask shape on paper using a pencil and ruler. Create a horizontal shape that is wide enough to cover both eyes, with a gentle curve along the upper and lower edges. Add small extensions at both sides where the elastic will be attached. A typical adult sleep mask measures approximately 8 to 9 inches wide and 3 to 4 inches high, although you can adjust these measurements to suit your needs.
Once your paper template is ready, place it over the fabric and trace around the outline using tailor’s chalk or a washable fabric marker. Cut two outer fabric pieces and one lining piece, keeping the shapes as similar as possible. Remember to include a seam allowance of approximately 1/4 inch around the edges. Accurate cutting is important because it helps the layers match properly during assembly and creates a cleaner finished appearance.
For the filling, you may choose a thin layer of batting or another lightweight, soft material. This layer gives the Fabric sleep mask pattern a slightly padded appearance and helps the mask sit comfortably over the eyes. Avoid using excessively thick materials, as they can make the finished accessory bulky. A lightweight construction is generally easier to sew and more comfortable for everyday use.
Before sewing, organize your pieces in the correct order. Place the two outer fabric pieces together with their right sides facing each other, then position the batting or padding according to your chosen construction method. If you are including a separate lining, make sure the layers are arranged so that the soft lining will eventually face the skin. Pin or clip the pieces together carefully, keeping the edges aligned.
Step-by-Step Instructions for Sewing a Fabric Sleep Mask
Now that the materials are prepared, it is time to begin assembling your Fabric sleep mask pattern. Start by placing the fabric layers together according to your planned construction. Check that the printed or decorative sides are facing inward when using a traditional turned construction. Use sewing clips or pins to hold the layers in place, especially around the curved sections.
The next step is to prepare the elastic strap. Measure a piece of soft elastic that comfortably reaches from one side of the mask, around the back of the head, to the opposite side. The exact measurement depends on the wearer and the elasticity of the material. For many adult masks, approximately 12 to 14 inches can be a useful starting point, but it is important to test the fit before permanently attaching it.
Position one end of the elastic between the fabric layers at one side of the mask. Make sure the elastic is not twisted and that its raw edge extends slightly inside the seam allowance. Secure it with a pin or clip. Repeat the process on the opposite side, checking that both ends are positioned at approximately the same height. This preparation helps create a balanced strap.
Using a sewing machine, stitch around the mask outline with a straight stitch and a seam allowance of approximately 1/4 inch. Begin near the lower edge, leaving a small opening of around 2 inches for turning the project right side out. Sew slowly around the curved sections, keeping the fabric smooth and adjusting it gently as needed. Reinforce the stitching where the elastic ends are attached because these areas receive additional tension during use.
After completing the stitching, carefully trim away excess fabric around the curves. Make small clips into the seam allowance along curved areas, taking care not to cut through the stitching. This technique helps the fabric lie more smoothly when the mask is turned. Avoid trimming too close to the seam, particularly near the elastic attachment points.
Turn the mask right side out through the opening. Use a blunt turning tool or your fingers to gently shape the curved edges. Avoid using sharp objects that could damage the fabric. Once the shape is properly formed, press the mask gently with an iron at a temperature suitable for the selected materials. Fold the raw edges of the opening inward and secure them with pins.
Finishing, Customizing, and Improving Your Fabric Sleep Mask
The next stage of your Fabric sleep mask pattern is closing the opening and giving the project a professional finish. You can use a sewing machine to stitch close to the edge, making sure the folded fabric is secured. Alternatively, use a discreet hand-sewing technique, such as a ladder stitch, for an almost invisible finish. Work carefully so that the opening blends naturally with the rest of the seam.
Topstitching around the entire mask is another useful finishing technique. Sew a line approximately 1/8 inch from the outer edge to help keep the layers in position. This detail can improve the appearance of the finished mask while helping prevent the fabric from shifting during regular use. Choose thread that matches the fabric for a subtle result or a contrasting color for a decorative effect.
You can make your fabric sleep mask unique by choosing different combinations of colors and prints. Floral cotton, soft pastel fabrics, geometric designs, and seasonal patterns are all attractive possibilities. If you prefer a minimalist style, use a single neutral color with matching thread. For a more playful appearance, consider combining two complementary prints or adding a small decorative fabric detail.
Embroidery is another way to personalize the finished project. You might add a small initial, a simple flower, or a delicate decorative motif to the outer fabric. However, avoid placing raised or bulky decorations on the side that touches the face. The inside should remain smooth and comfortable, without hard details that could cause irritation or pressure around the eyes.
Pay special attention to the elastic strap. It should hold the mask securely without pulling too tightly around the head. If the elastic feels uncomfortable, shorten or lengthen it as needed before completing the project. Soft, fabric-covered elastic can be a pleasant option because it has a smooth surface and can complement the overall appearance of the handmade accessory.
Finally, inspect the entire mask before using it. Check that all seams are secure, the elastic is firmly attached, and there are no loose threads or exposed sharp edges. Make sure the mask fits comfortably without pressing against the eyes. A carefully finished Fabric sleep mask pattern should feel lightweight, flexible, and pleasant to wear. These small finishing details can make a noticeable difference in the quality of your handmade creation.
Care Instructions, Creative Ideas, and Frequently Asked Questions
Taking proper care of your handmade sleep mask helps maintain its appearance and usability. Before washing, check the care instructions for every material used in the project. Cotton fabrics are often suitable for gentle machine washing, while delicate satin or decorative materials may require hand washing. Using a mild detergent and cool water can help preserve the fabric and reduce the risk of fading or shrinking.
Allow the mask to dry completely before storing or wearing it again. If the project contains batting or multiple fabric layers, make sure moisture has not remained trapped inside. Avoid excessive heat when ironing, especially if you have used elastic or synthetic materials. Proper maintenance helps keep your Fabric sleep mask pattern looking attractive over time.
This sewing project can also be adapted for different occasions. A collection of handmade sleep masks in coordinated colors can make lovely gifts for friends and family. You can create seasonal versions using Christmas prints, romantic floral fabrics, or cheerful summer colors. Small fabric accessories like these are also a practical way to use leftover materials from larger sewing projects.
Another creative possibility is making a matching set with a fabric pouch. A small drawstring bag or simple envelope-style case can protect the sleep mask when it is stored in a handbag or suitcase. Choose a coordinating fabric and use the same thread colors to create a harmonious handmade set. This additional accessory is optional, but it can make your finished gift feel even more complete.
Frequently Asked Questions
1. Is a fabric sleep mask suitable for sewing beginners?
Yes! A Fabric sleep mask pattern is a beginner-friendly project because it uses basic sewing techniques, including tracing, cutting, straight stitching, and turning fabric. Beginners can practice working with curved edges without needing advanced sewing skills. Taking your time with the pattern and checking the fabric alignment before sewing will help you achieve a better result.
2. What is the best fabric for making a sleep mask?
Cotton is one of the easiest fabrics to work with, making it a popular choice for beginners. Satin can provide a smooth, elegant finish, while flannel offers a soft texture. The most important consideration is choosing a material that feels comfortable against your skin and is suitable for regular cleaning.
3. How much fabric do I need for one sleep mask?
You only need a relatively small amount of fabric. Two outer pieces and one lining piece can usually be cut from fabric scraps measuring approximately 10 by 10 inches each, depending on the pattern dimensions. This makes the project economical and ideal for using leftover materials.
4. Can I make a sleep mask without a sewing machine?
Yes. You can sew the entire project by hand using a backstitch or another suitable hand-sewing technique. However, it may take longer to complete. Keep your stitches small and consistent, especially around the curved edges and elastic attachment points.
5. What type of elastic should I use?
Soft, flexible elastic is generally a good choice. It should stretch comfortably without becoming too tight around the head. Fabric-covered elastic is another option if you want a softer appearance that coordinates with the outer fabric.
6. How do I make the sleep mask comfortable?
Choose soft materials, avoid bulky decorations on the inside, and use lightweight padding if desired. The elastic should be adjusted to hold the mask in place without creating uncomfortable pressure. The finished mask should rest gently around the eye area rather than pressing directly against the eyes.
7. Can I wash a handmade fabric sleep mask?
Yes, provided that the materials used are washable. Follow the care recommendations for the fabric, lining, and elastic. Gentle washing is usually preferable, and the mask should be completely dry before being used again.
8. Can I customize the size of the pattern?
Absolutely. You can make the mask wider or narrower, adjust the height, and change the elastic length to accommodate different head sizes. If you are creating a pattern for someone else, consider testing the paper template before cutting the final fabric pieces.
9. Do I need batting or padding for this project?
No. Padding is optional. A simple mask made from two fabric layers can be lightweight and comfortable. Adding a thin layer of batting creates a slightly fuller appearance, but the choice depends on your preferred design and the materials available.
10. How can I make my fabric sleep mask look more professional?
Careful cutting, even stitching, matching thread, accurate elastic placement, and neatly finished edges all contribute to a professional result. Pressing the fabric gently and adding consistent topstitching can also improve the overall appearance.
11. Can I make this sleep mask as a handmade gift?
Definitely! A personalized Fabric sleep mask pattern makes a thoughtful gift for birthdays, holidays, travel occasions, and other celebrations. You can choose fabrics based on the recipient’s favorite colors and create a matching storage pouch for an extra-special presentation.
12. How long does it take to complete this sewing project?
For someone familiar with basic sewing techniques, the project may take approximately 30 to 60 minutes. Beginners may need additional time to prepare the template, cut the fabric, and practice stitching around the curves. Working carefully is more important than finishing quickly.
Conclusion
Creating a Fabric sleep mask pattern is a simple and rewarding sewing project that combines creativity, practicality, and the opportunity to develop useful sewing skills. Throughout this tutorial, we explored how to choose suitable materials, prepare a paper template, cut the fabric pieces, assemble the layers, attach the elastic strap, and finish the edges for a neat appearance. We also discussed ways to customize the design with different fabrics, colors, embroidery, and decorative details while keeping the inside soft and comfortable.
One of the greatest advantages of this handmade project is its versatility. You can create different sizes, experiment with beautiful fabric combinations, and transform leftover materials into something useful. Whether you are making your first sleep mask or adding another project to your sewing collection, following these instructions can help you achieve a lovely handmade result.
Now it is your turn to get creative! Try this Fabric sleep mask pattern, choose your favorite fabrics, and enjoy the process of making something special with your own hands. If you have already tried this project, please leave your honest opinion in the comments. We would also love to hear your suggestions, favorite fabric combinations, and ideas for improving this pattern. Your feedback can inspire other sewing enthusiasts and help everyone discover new ways to enjoy handmade creations!