
Looking to add a handmade touch to your Christmas decor? This Santa Claus Coaster Tutorial – Step by Step Tutorial is perfect for beginners and seasoned crafters alike. Whether you’re planning to gift your creations or decorate your home, this cheerful coaster is a fun and festive project that brings joy and warmth to any table setting. With the right materials and a little time, you can make a charming Santa face that will impress guests and spread holiday cheer.
This article will walk you through every detail of the process, from the materials you’ll need to each crochet or crafting step required. We’ll also highlight the best practices for shaping, assembling, and finishing your Santa Claus Coaster, ensuring a clean and professional look. Even if you’ve never tried a Christmas-themed craft project before, this guide will make you feel confident and inspired.
Using Santa Claus Coaster Tutorial – Step by Step Tutorial as a starting point, you’ll learn about key crafting terms, tips, and creative customization ideas. We’ll cover everything you need to know and explain how to bring this adorable project to life. Whether you’re decorating for a holiday dinner or looking for a cozy handmade gift, these coasters are a heartwarming solution for your Christmas crafting checklist.
Materials and Tools Needed for the Santa Claus Coaster
Creating your own Santa Claus Coaster is easier when you gather all the right materials in advance. Most of what you need can be found at local craft stores or online, and you might even have some of these items already at home.
Start with yarn in classic Santa colors—red, white, black, and a skin-tone or beige color for the face. Use 100% cotton yarn if possible, as it holds shape well and absorbs moisture better than acrylics. Cotton is ideal for coasters since it’s durable and easy to clean.
You’ll also need a crochet hook if you’re crocheting the coaster. A common size is 3.5mm (E-4), but check your yarn label for the recommended hook size. Having a tapestry needle on hand is useful for sewing parts together and weaving in yarn ends neatly.
Other tools include scissors, stitch markers (to help you keep track of rows), and a measuring tape to ensure your coaster is the right size. Optional but fun additions include small black buttons for eyes or even tiny pom-poms for Santa’s nose or hat tip.
Finally, you’ll want to prepare a workspace with good lighting and a comfortable chair. Having everything within arm’s reach will make the entire process more enjoyable and efficient. With all tools ready, you’re set to begin your Santa Claus Coaster Tutorial – Step by Step Tutorial.
Step-by-Step Instructions to Crochet the Santa Claus Coaster
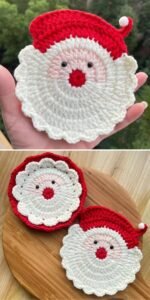
Creating this festive coaster involves several parts: the face, the hat, the beard, and the finishing details. Each part adds personality and charm to your Santa Claus Coaster, and following these steps carefully will give you a beautiful finished product.
Start with the face circle by creating a magic ring and working in rounds using your chosen skin-tone yarn. Typically, 6 single crochets into the ring followed by even increases will give you the right base size for the face. Work around until your circle measures approximately 4 inches across.
Next, move on to Santa’s hat. Switch to red yarn and create a triangle shape that curves slightly at the top for a realistic look. You can either stitch the hat onto the top of the face or crochet it directly into the face circle by working partial rounds in red.
For the beard, use white yarn and create loops or scalloped stitches around the bottom half of the face. This gives Santa his fluffy, jolly look. You can make the beard more pronounced by using puff stitches or picot edges to simulate texture and volume.
Add facial features like eyes, nose, and mouth. Use black yarn or tiny black buttons for the eyes. Embroider a small smile and add a red or pink nose for a pop of color. These small details bring Santa’s expression to life and make the coaster more inviting.
Finish by adding a white brim to the hat using single or half-double crochets, and don’t forget the pom-pom or puff stitch at the tip. This final detail completes the iconic Santa hat look and ties the whole design together.
Secure all yarn ends using a tapestry needle and give your coaster a gentle block (if needed) to smooth out any curling edges. Once finished, your Santa Claus Coaster will be ready to charm your guests or wrap up as a handmade gift.
Tips for Customizing Your Santa Claus Coaster
The best part about following a Santa Claus Coaster Tutorial – Step by Step Tutorial is how customizable it can be. You don’t have to stick to one style or color. With a little creativity, you can create an entire set of unique Santas.
Try using variegated yarns for the hat to create a whimsical or vintage effect. You could also use glitter yarn for a sparkly holiday touch. This will make your coasters pop on a Christmas table setting or party tray.
Want to make Santa more playful? Add small googly eyes or a tiny red jingle bell instead of a pom-pom. These creative accents are especially popular with kids and make your coaster feel more animated and fun.
For a more elegant or rustic aesthetic, opt for neutral or muted tones. A cream-colored beard with a burgundy hat gives a timeless look. You can even use faux fur yarn for the beard to add texture and a touch of luxury.
If you’re gifting these coasters, consider adding a backing with felt or cork. This adds durability and prevents the coaster from slipping on smooth surfaces. It’s also a great way to hide the back stitches and yarn ends.
You can also stitch your initials or year on the back as a signature. This turns your project into a keepsake or collectible holiday item. Your friends and family will appreciate the handmade touch and personal detail.
Finally, think beyond coasters! You can use the same Santa motif as ornaments, gift tags, or even wall hangings. With a little resizing and creativity, this tutorial can serve as a foundation for many holiday crafts.
Why You Should Try This Santa Claus Coaster Tutorial
There are many reasons to follow this Santa Claus Coaster Tutorial – Step by Step Tutorial, especially during the holiday season. Crafting handmade items is more than just fun—it’s fulfilling, personal, and sustainable.
First, it’s a budget-friendly project. With just a few materials, you can create several coasters. This is especially helpful if you want to give small gifts to coworkers, teachers, or neighbors during the holidays.
Second, it helps reduce holiday stress. Taking time to sit and craft can be calming and meditative. Instead of rushing through shopping malls, you can relax at home and create something meaningful with your own hands.
Third, it’s a wonderful activity to do with kids or friends. Set up a cozy crafting evening with hot cocoa and carols playing in the background. Sharing the process makes it even more memorable and joyful.
You’ll also be able to reuse and repurpose leftover yarn, which helps minimize waste. These small projects are great for using scraps and turning them into something festive and functional.
This tutorial also helps build your skills if you’re a beginner. You’ll learn to follow patterns, work in rounds, switch colors, and stitch with precision. It’s a simple yet rewarding entry point into the world of crafting.
Lastly, your finished product is not just practical, but full of holiday spirit. It tells a story of care and creativity, and everyone who sees it will feel the love and effort you’ve put into each stitch.
FAQ – Frequently Asked Questions About Santa Claus Coaster
1. Is this Santa Claus Coaster suitable for beginners?
Yes! This Santa Claus Coaster Tutorial – Step by Step Tutorial is perfect for beginners. It includes basic techniques like single crochet, color changes, and simple shaping, which are all great for learning and practicing.
2. How long does it take to make one coaster?
On average, it takes about 1 to 2 hours depending on your experience level. Once you get the hang of the pattern, you can create multiple coasters in one afternoon.
3. Can I wash these coasters?
Yes. If made with cotton yarn, they can be gently hand-washed or machine-washed on a delicate cycle. Air-dry flat to maintain their shape and prevent shrinkage.
4. What size should the finished coaster be?
The typical size is around 4 to 5 inches in diameter. This is a perfect size for mugs, cups, or small holiday treats.
5. Can I sell the finished coasters I make using this tutorial?
Absolutely! Handmade Santa Claus coasters are popular at craft fairs and online markets. Just be sure to credit the original idea if you’re using a specific designer’s pattern.
6. What if I don’t crochet—can I still make this?
Yes! You can adapt the tutorial to use felt pieces sewn or glued together. The design remains the same, and it’s a great no-sew option for non-crocheters.
Conclusion
This complete Santa Claus Coaster Tutorial – Step by Step Tutorial offers everything you need to bring the joy of the holidays into your home through crafting. From simple stitches to personalized decorations, this coaster is a small project with a big impact. We covered the tools, techniques, and creative ideas to make your Santa coaster stand out, all while keeping it beginner-friendly and fun.
Whether you’re creating one for yourself or making a set to gift, the experience of crafting your own holiday decor is something truly special. Let your imagination guide you, and don’t be afraid to make it your own with colors, textures, or embellishments.
If you’ve tried this tutorial, please leave a sincere comment below! We’d love to hear how your Santa Claus Coasters turned out and what ideas you have for future projects. Your suggestions help us grow and bring more creative inspiration to the crafting community!