
If you’re searching for a creative and festive sewing project this fall, look no further than this pumpkin coasters to sew – Step by Step Tutorial. Perfect for beginners and experienced sewists alike, this tutorial guides you through each stage of making adorable, functional, and seasonal fabric coasters. These charming little pumpkins make great additions to your autumn decor and serve as lovely handmade gifts for family and friends.
Whether you’re decorating your Thanksgiving table, preparing for Halloween, or just want to cozy up your home with fall-themed items, sewing your own pumpkin coasters is a rewarding and practical DIY project. This pumpkin coasters to sew – Step by Step Tutorial uses basic sewing techniques, requires minimal supplies, and offers endless possibilities for customization. With just a little fabric, some thread, and a sewing machine (or hand-stitching skills), you’ll be ready to create something unique and festive.
In this article, we’ll explain how to select the right fabrics, cut the shapes, sew and stuff the coasters, and even how to embellish them for extra flair. We’ve also included helpful tips and tricks for keeping your project beginner-friendly, along with a detailed FAQ and a thoughtful conclusion to wrap up your sewing journey. Let’s dive into the world of pumpkin coasters to sew – Step by Step Tutorial, and create something beautiful and functional for the fall season.
Choosing the Right Materials and Tools
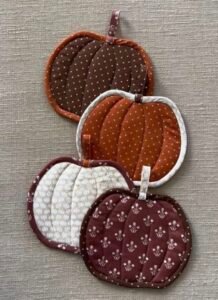
Starting your pumpkin coasters to sew – Step by Step Tutorial begins with gathering the correct materials. Using the right supplies will help you achieve neat results and a professional finish. For the fabric, it’s best to choose cotton, felt, or a cotton-linen blend. These materials are easy to sew, washable, and available in a variety of fall colors and patterns. Look for warm tones like orange, rust, mustard, or even fun prints with polka dots or leaves.
You’ll need a fabric marking pen or chalk to trace your pumpkin shape onto the fabric. A template is helpful, and you can either draw your own or print a simple pumpkin outline. Make sure your template fits a mug-sized area—around 4 to 5 inches in diameter works well for most cups or glasses.
Other essential tools include sharp fabric scissors, straight pins, and a sewing machine. If you don’t have a machine, this tutorial can still be followed using hand-sewing with a backstitch. Don’t forget matching thread for the body of the pumpkin, and green or brown thread for the stem. These color touches help bring your coaster to life.
You’ll also want batting or interfacing to give your coasters structure and absorbency. Lightweight fusible interfacing or cotton quilt batting are both good choices. These materials are sandwiched between two fabric layers and stitched together to create the final shape.
Optional materials include embroidery floss, buttons, or ribbons to decorate your pumpkin coasters. These little details can add dimension and personality to each piece. Having all your tools laid out in advance will make the process smoother and more enjoyable.
Once everything is ready, it’s time to start creating your first handmade fall decoration following this pumpkin coasters to sew – Step by Step Tutorial. Let’s move on to the actual sewing process.
How to Sew Your Pumpkin Coasters
The most exciting part of the pumpkin coasters to sew – Step by Step Tutorial is stitching the pieces together. Begin by tracing your pumpkin template onto the wrong side of your fabric. Cut out two identical pieces for each coaster—these will form the front and back.
Next, cut a piece of batting or interfacing in the same shape, slightly smaller than the fabric pieces. This inner layer adds thickness and durability to your coaster. Stack your pieces: the back fabric (right side down), batting in the center, and front fabric (right side up). Pin or clip them together to keep everything aligned.
Using your sewing machine or a needle and thread, sew around the edge of the pumpkin shape, leaving a small opening (about 1.5 inches) for turning the fabric right side out. Use a 1/4-inch seam allowance for a neat edge. If your pumpkin design has curves or indentations, take your time sewing and pivot carefully to maintain a smooth shape.
Trim the seam allowance slightly and clip any curves or corners to reduce bulk when turning. Then, turn your pumpkin coaster right side out through the opening. Use a blunt tool like a chopstick or the eraser end of a pencil to gently push out the seams and define the shape.
Press your coaster flat using an iron, making sure the opening edges are folded neatly inward. Sew a topstitch around the edge of the entire pumpkin to close the opening and add a decorative finish. This step also reinforces the coaster’s shape and helps it lay flat on a table.
To create the pumpkin’s ridges, sew curved lines from top to bottom across the coaster, mimicking the natural look of a pumpkin. Use matching or contrasting thread depending on your style. These stitched lines give your coaster structure and a charming, dimensional appearance.
Decorating and Personalizing Your Pumpkin Coasters
This pumpkin coasters to sew – Step by Step Tutorial wouldn’t be complete without ideas for personalizing your designs. Adding custom touches can make your coasters stand out and reflect your personality or home decor.
Try adding a stem and leaf at the top using felt or small fabric scraps. Stitch or glue the stem onto the top center of your pumpkin, and cut a green leaf shape to go alongside it. These details add character and help define the pumpkin shape.
Embroidering faces or initials is another great way to personalize your project. For a Halloween vibe, sew on jack-o’-lantern faces using black thread or felt. For a more elegant look, embroider your family’s initials or fall-themed words like “grateful” or “harvest.”
You can also mix and match fabrics for a patchwork pumpkin effect. Use different orange prints for each coaster and assemble them into a set. This variation looks festive and lets you use up fabric scraps creatively.
Add buttons or bows to give each pumpkin a unique style. Wooden buttons, gingham ribbon, or lace trim can elevate the design from casual to cottage-chic. These are especially fun for gifts or craft fair displays.
If you’re giving your coasters as gifts, consider attaching a handwritten tag or wrapping them in twine with a cinnamon stick for a full autumn presentation. Small packaging ideas like these can make your handmade items even more special.
The beauty of handmade coasters is that no two have to be alike. With a little creativity, your pumpkin coasters to sew – Step by Step Tutorial becomes an opportunity to express your unique crafting style.
Why Sewing Pumpkin Coasters Is a Great Fall Project
There are many reasons to love this pumpkin coasters to sew – Step by Step Tutorial, especially during the cozy autumn months. It’s more than just a sewing pattern—it’s a creative experience that brings joy and warmth into your home.
Sewing your own decor is cost-effective. You can use leftover fabric, repurpose old clothes, or buy small fabric bundles for a low price. Compared to buying seasonal decor, DIY coasters save money while letting you create something meaningful.
This project is also great for beginners. It uses straight stitching and simple shapes, making it an excellent starting point for new sewists. It’s also a manageable size, which helps build confidence without feeling overwhelming.
Homemade gifts are thoughtful and cherished. A set of pumpkin coasters sewn with care makes a heartwarming present for Thanksgiving hosts, teachers, or friends. You can customize each set to match the recipient’s tastes and make them feel truly special.
The project is perfect for seasonal craft fairs or small business ideas. Handmade coasters sell well during the fall months, especially when packaged nicely. This tutorial can be your starting point for a seasonal product line or local booth.
Crafting can also be therapeutic. The rhythm of sewing, choosing colors, and creating something with your hands provides a sense of accomplishment and mindfulness. It’s a great way to relax after a busy day.
Finally, this pumpkin coasters to sew – Step by Step Tutorial helps you connect with the season in a tactile, creative way. It brings the spirit of fall into your home in a functional, beautiful, and handmade form.
FAQ – Frequently Asked Questions
1. Can I sew these coasters without a sewing machine?
Yes! While a sewing machine speeds up the process, you can hand-sew the coasters using a strong backstitch. It may take a bit longer, but the results are just as lovely.
2. What size should each pumpkin coaster be?
Each coaster should be about 4 to 5 inches in diameter. This size is ideal for standard mugs or glasses while still showing off the pumpkin shape.
3. What type of fabric works best?
Cotton and felt are the top choices. Cotton is easy to sew and washable, while felt doesn’t fray and offers structure. You can mix both for added texture.
4. How do I wash the coasters after use?
If made with cotton or washable materials, simply hand wash or machine wash on a gentle cycle. Air dry flat to maintain their shape.
5. Can I use these coasters for hot and cold drinks?
Absolutely! The batting or interfacing inside absorbs moisture and provides insulation. Just make sure you use heat-resistant fabric like cotton for hot beverages.
6. Are pumpkin coasters suitable for kids to make?
Yes, with adult supervision. Kids can help with tracing, cutting fabric, or decorating. It’s a fun family craft for the fall season.
Conclusion
We hope you enjoyed this complete guide to pumpkin coasters to sew – Step by Step Tutorial. From selecting the right materials to adding personal decorations, this tutorial walks you through the process of creating festive, functional coasters that capture the spirit of fall. These handmade pumpkin coasters are perfect for your own table or as heartfelt gifts during the holiday season.
Whether you’re a beginner looking for a manageable sewing project or a seasoned crafter eager to personalize your autumn decor, this tutorial provides the structure and inspiration you need to succeed. Now it’s time to grab your materials and start sewing your own patch of pumpkins.
If you followed this pumpkin coasters to sew – Step by Step Tutorial, we would love to hear from you! Leave a sincere comment below with your feedback, any suggestions for future tutorials, or tips you’d like to share with fellow readers. Happy sewing and happy fall!