
If you’re looking for a fun, creative, and beginner-friendly sewing project, this Patchwork fish tutorial – Step by Step Tutorial is the perfect guide for you. Whether you want to use up your scrap fabrics or create a charming handmade gift, patchwork fish are a delightful way to combine colors, patterns, and stitching techniques. In this article, we’ll walk you through every step to make your own fabric fish, turning simple materials into something truly special.
Crafting a Patchwork fish tutorial – Step by Step Tutorial allows you to explore traditional sewing techniques with a modern twist. You’ll learn how to plan your fabric layout, stitch pieces together in a visually appealing design, and assemble your patchwork into a three-dimensional soft toy or decoration. This guide is tailored for beginners and experienced sewers alike, with detailed instructions that make the process enjoyable and stress-free.
Not only are these patchwork fish adorable, but they also serve many purposes. You can use them as nursery decorations, keychains, pincushions, or even soft toys. With your creativity and the help of this Patchwork fish tutorial – Step by Step Tutorial, the possibilities are endless. Before you begin, gather your fabrics, thread, sewing tools, and let’s dive into this aquatic-inspired project!
Choosing Fabrics and Tools for Your Patchwork Fish
The first step in any successful Patchwork fish tutorial – Step by Step Tutorial is selecting the right materials. Patchwork relies on visual texture and color balance, so consider a mix of prints, solids, and textures that complement each other. Small fabric scraps work perfectly for this project, making it a great scrap-busting activity.
Make sure to include lightweight cotton or quilting fabric, which is easy to sew and holds its shape well. Avoid heavy fabrics like denim or velvet, as they can make small pieces harder to work with. Soft felt or flannel can be used for certain details like the tail or fins if desired.
As for tools, you’ll need basic sewing supplies: scissors or a rotary cutter, sewing needles or a sewing machine, pins or clips, thread that matches your fabric, and some stuffing material like polyfill. A fabric marker or chalk is helpful for tracing your pattern pieces onto fabric.
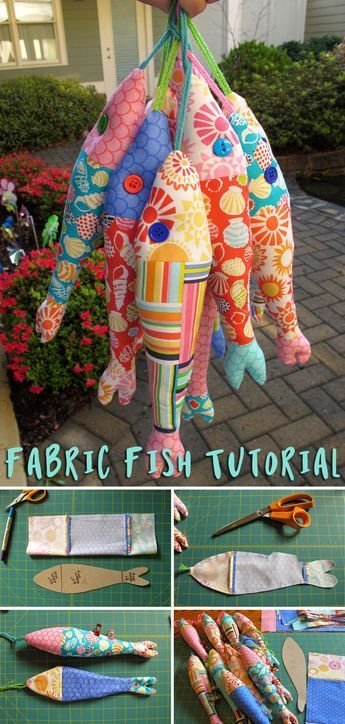
It’s a good idea to draw or print a simple fish shape as your base template. You can scale it to any size depending on how big you want your final patchwork fish to be. This pattern will help you cut the body and other parts of the fish accurately.
Once your fabric and tools are ready, lay out your fabric pieces and experiment with different combinations. Patchwork is all about playing with colors and shapes. Arrange your pieces until you’re happy with the look before moving on to stitching.
This is also a good time to iron your fabric scraps to remove wrinkles, making them easier to cut and sew. Preparation is key when following a Patchwork fish tutorial – Step by Step Tutorial, especially when working with smaller components.
Cutting and Arranging the Patchwork Pieces
Now that you’ve selected your fabrics, the next step in this Patchwork fish tutorial – Step by Step Tutorial is to cut and arrange your patchwork pieces. Precision and careful planning will help your final fish look balanced and professional.
Start by tracing your fish pattern onto a piece of paper or cardboard. Then, divide it into sections that will become your patchwork zones. These sections can be random or geometric, depending on the look you’re going for. Each section will be cut from a different fabric piece.
Using your template, cut small pieces of fabric that correspond to each patch. Leave a small seam allowance (usually about 1/4 inch) around each piece to make sewing easier. Be sure each piece is labeled or placed in order so you don’t lose track of the design.
Arrange your fabric pieces on the table or pin them directly to your fish template. Check the color placement and visual harmony of the patches. This step allows you to refine your layout before sewing everything together.
Once satisfied with the layout, begin sewing the pieces together using a straight stitch. Start with two pieces, right sides together, and continue joining them piece by piece. Press the seams flat as you go to keep everything neat.
Assemble all the patchwork sections until you have a completed fish-shaped fabric block. If you’ve used smaller patchwork shapes, the final result will have a charming quilted effect. This is the core of the Patchwork fish tutorial – Step by Step Tutorial.
After sewing, trim the block to match your original fish shape. This ensures that your fish has clean edges and is symmetrical before you sew the front and back together.
Assembling and Stuffing the Patchwork Fish
With your patchwork front complete, the next phase of the Patchwork fish tutorial – Step by Step Tutorial involves assembling and stuffing your fish. This step transforms your flat design into a plush, three-dimensional creation.
Place your patchwork fish piece right side up, then cut a matching back piece from a solid or complementary fabric. Pin the front and back pieces together with right sides facing in. Don’t forget to include any fins or tails between the layers, positioning them so they will stick out when the fish is turned right side out.
Sew around the edge of the fish, leaving a small opening at the bottom or side. This opening will allow you to turn the fish right side out and stuff it. Be careful when sewing around curves—take your time to ensure smooth lines.
Once sewn, clip the curves and corners to reduce bulk and allow the fabric to turn smoothly. Then, gently turn the fish right side out through the opening. Use a pencil or chopstick to push out the edges and fin details.
Now it’s time to stuff your fish. Use small amounts of stuffing at a time to ensure even filling. Don’t overstuff, especially around the seams, as it may distort the shape. Aim for a soft but firm texture that holds its shape well.
After stuffing, hand-stitch the opening closed using a ladder stitch or slip stitch for a neat finish. Congratulations—you’ve completed the main construction of your patchwork fish! But the Patchwork fish tutorial – Step by Step Tutorial isn’t over yet; let’s add some finishing touches.
Adding Embellishments and Final Touches
The final step in this Patchwork fish tutorial – Step by Step Tutorial is all about adding personal touches. These details will bring your patchwork fish to life and make it uniquely yours.
Consider sewing on a button or embroidered eye to give your fish some personality. Be sure it’s secure, especially if the fish will be used by a child. You can also use safety eyes or felt circles for a soft and safe option.
Use embroidery thread to add details like gills, scales, or decorative lines. These small elements can enhance the handmade feel and give your fish a whimsical appearance. Feel free to get creative here—there are no limits!
Add a ribbon loop or keyring attachment if you want to use your fish as a keychain or hanging ornament. This is a fun way to display your patchwork project or give it as a gift.
If your fish is part of a series, consider making several in different colors or sizes. Displaying them together adds visual impact and shows off your creativity. The more you make, the more confident you’ll feel with each new Patchwork fish tutorial – Step by Step Tutorial.
You can also use scented stuffing or essential oils inside the filling to create a fish-shaped sachet for drawers or closets. This gives your creation a practical and aromatic function.
Lastly, take pride in your finished product! Share it with friends or on social media, and inspire others to try the Patchwork fish tutorial – Step by Step Tutorial themselves. Handmade crafts have a special charm that’s always worth celebrating.
FAQ – Patchwork Fish Tutorial – Step by Step Tutorial
Q: What fabrics are best for a patchwork fish?
A: Lightweight cotton or quilting fabrics work best for this project. They’re easy to sew and provide a smooth finish. Avoid stretchy or heavy fabrics for better results.
Q: Can I make a patchwork fish without a sewing machine?
A: Absolutely! Hand stitching works well for smaller fish. Just make sure your stitches are tight and even, especially when assembling the body.
Q: How do I make the fish pattern?
A: You can draw a simple fish shape on paper or cardboard. Divide it into patchwork sections for fabric cutting. The shape can be customized depending on your design preferences.
Q: What size should the patchwork fish be?
A: That depends on your intended use. Small fish (4-6 inches) work well for keychains, while larger ones (10-12 inches) make great toys or decorations.
Q: How can I clean a patchwork fish?
A: If made with cotton and filled with washable stuffing, you can gently hand wash it in warm soapy water. Avoid machine washing unless securely sewn and free of embellishments.
Q: Can kids help with this project?
A: Yes! Children can help choose fabrics, arrange patterns, or stuff the fish. Supervise them during cutting and sewing for safety.
Q: What are some creative uses for patchwork fish?
A: Use them as gifts, nursery decorations, pincushions, lavender sachets, or part of a handmade mobile. Their versatility is one of their best features.
Conclusion
In this Patchwork fish tutorial – Step by Step Tutorial, we’ve explored every part of the process: from choosing fabrics and cutting pieces, to assembling, stuffing, and adding decorative elements. Whether you’re new to sewing or a seasoned quilter, this project is both fun and fulfilling.
These charming patchwork fish are more than just cute—they’re a creative outlet and a great way to repurpose fabric scraps. Each fish tells its own story through colors, patterns, and personal touches. With a little time and imagination, you can create a sea of handmade joy.
If you followed along and created your own patchwork fish, we’d love to hear from you! Please share your honest opinion and feel free to leave suggestions for future tutorials. Your feedback helps make each project better and more inspiring for everyone. ]
Happy sewing!