
Creating a crochet souvenir holder – step by step tutorial is a fun and practical way to preserve your travel memories while exploring your creativity. Whether you’re new to crochet or already a yarn enthusiast, this project combines both functionality and beauty. Handmade items like this add a personalized touch to any space and can become cherished keepsakes or heartfelt gifts.
The beauty of a crochet souvenir holder lies in its versatility. You can customize the size, color, and style to reflect a specific trip, location, or season. Plus, it’s a great way to use leftover yarn, making it an eco-friendly craft. As you follow this step by step tutorial, you’ll learn how to create a unique item that keeps your small mementos safe, organized, and visually appealing.
This detailed guide will walk you through all the essential steps to make your own crochet souvenir holder from start to finish. We’ll cover tools, techniques, customization ideas, and finishing touches. By the end of this article, you’ll not only have a finished product but also the skills to make more in the future. Let’s dive into the world of yarn and stitches together.
Materials You Will Need
To begin this crochet souvenir holder – step by step tutorial, you’ll need a few basic materials. Most of these are beginner-friendly and easy to find. The holder is a small project, so it won’t require large amounts of yarn or expensive tools.
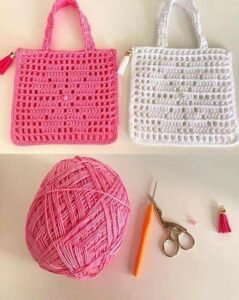
Start by selecting the yarn. Cotton or acrylic yarn is ideal for durability and structure. Choose colors that match your personal style or represent the memories you want to store. A medium-weight yarn (worsted weight) works best for this project, offering both stability and ease of use.
You’ll need a crochet hook that matches your yarn’s recommended size. Typically, a 4mm to 5mm hook is suitable for medium-weight yarn. Using the right hook ensures your stitches are even and the final holder has a sturdy structure.
Scissors and a yarn needle are essential for trimming and weaving in ends. You might also want to include a zipper, button, or drawstring for closing your souvenir holder, depending on your design preference.
Some optional embellishments include beads, appliqués, or embroidered patches that can be sewn onto the finished product. These extras can represent specific places or memories, adding more sentiment to your piece.
A stitch marker is helpful for tracking your rounds if you’re working in a circular pattern. This small tool can prevent you from losing your place and ensures accuracy throughout your work.
Before starting, make sure you have a clean and well-lit workspace. Organizing your tools in advance will make the process smoother and more enjoyable. Once you’ve gathered everything, you’re ready to start crocheting your very own crochet souvenir holder.
Basic Steps to Crochet the Souvenir Holder
The first step in our crochet souvenir holder – step by step tutorial is to create the base of your holder. Start with a magic ring or chain 4 and join with a slip stitch to form a loop. This loop will serve as the center of your circular base.
Now begin working in the round. Use single crochet (sc) or half double crochet (hdc) stitches to build out from the center. Increase evenly in each round by adding extra stitches—typically, two stitches in each previous round’s stitch. This keeps the base flat and stable.
Once the base reaches your desired size (around 4–5 inches in diameter), stop increasing. Begin working upwards by continuing in the round without increases. This forms the sides of your souvenir holder. You can choose the height depending on what kind of items you want to store—ticket stubs, shells, keychains, etc.
To shape the opening, consider adding a row of single crochet to stabilize the top edge. If you’d like a flap or lid, crochet a separate rectangle and attach it to one side of the holder. A button or drawstring can be added here to keep it closed.
Finish off by weaving in the loose ends with a yarn needle. Be sure to check your stitches and reinforce any weak spots. You can also add a small loop or handle for hanging or carrying.
With these simple steps, you’ve completed the main structure of your crochet souvenir holder. This base can be easily adapted to create different versions—square, oval, or even heart-shaped holders—all following the same principles.
Creative Ideas and Customization Tips
Now that you’ve completed the base, let’s explore how to personalize your crochet souvenir holder. Adding your creative touch will make each piece uniquely yours, turning it into a one-of-a-kind keepsake.
Consider using multiple yarn colors to create stripes or patterns. Color changes are a fun way to symbolize different destinations or seasons. For example, use blue and white for a beach-themed trip or red and green for holiday memories.
Crochet appliqués like hearts, stars, or travel icons can be sewn onto the front of the holder. These add a layer of texture and meaning. You can find small appliqué patterns online or create your own with simple shapes.
Embroider names, dates, or messages directly onto the crochet fabric using contrasting yarn. This personal detail is great for marking milestones or commemorating special vacations.
You could also incorporate small pockets inside the holder by crocheting smaller pieces and attaching them to the lining. These are useful for sorting tiny items like pins, coins, or jewelry.
If you want to make your crochet souvenir holder more structured, line it with fabric. Choose a cotton or felt lining to provide extra support and a polished look. Sew it in using a whip stitch or backstitch, ensuring it’s securely fastened.
Don’t forget the closures! A button loop, magnetic snap, or drawstring adds functionality. Not only does this keep your souvenirs secure, but it also gives the holder a professional finish that elevates its design.
Why a Crochet Souvenir Holder is the Perfect DIY Gift
The crochet souvenir holder – step by step tutorial doesn’t just help you make an item for yourself—it’s also the perfect handmade gift. Personalized, practical, and filled with love, these holders are ideal for birthdays, holidays, or “just because” surprises.
Gifting someone a holder made from your own hands speaks volumes. It shows thoughtfulness and creativity, something store-bought gifts often lack. Plus, it’s a wonderful way to encourage others to cherish their own travel memories.
You can tailor the design for the recipient. For example, a pastel-colored holder with flower appliqués might suit a friend who loves spring getaways. A bold, geometric design could appeal to someone with modern taste.
These crochet holders are compact and lightweight, making them easy to mail or carry. If you’re crafting ahead of the holidays or special occasions, they’re an excellent stocking stuffer or add-on to a larger gift.
Children especially love having a special place to keep their treasures. You can make a smaller version for them to hold seashells, stickers, or ticket stubs. The hands-on aspect may even inspire them to learn to crochet themselves.
Crocheting gifts also benefits you, the maker. It’s relaxing, boosts mental health, and gives you a sense of accomplishment. There’s something incredibly satisfying about creating something useful with your own two hands.
FAQ: Crochet Souvenir Holder – Step by Step Tutorial
Q: What type of yarn is best for a crochet souvenir holder?
A: Medium-weight cotton or acrylic yarn is ideal. It provides durability and structure while remaining easy to work with for both beginners and advanced crocheters.
Q: How long does it take to make a crochet souvenir holder?
A: Depending on your skill level and the complexity of your design, it can take anywhere from 2 to 5 hours. Simpler designs are quicker, while customized holders may require more time.
Q: Can beginners follow this step-by-step tutorial?
A: Yes! This crochet souvenir holder – step by step tutorial is beginner-friendly. The stitches used are basic, and the pattern allows for creative flexibility as you gain confidence.
Q: How can I clean my crochet souvenir holder?
A: Hand wash gently with mild soap and cold water. Avoid wringing or using harsh detergents. Lay flat to dry to maintain shape and quality.
Q: Can I sell crochet souvenir holders that I make?
A: Absolutely. These holders make great handmade products for craft fairs, online shops, or local markets. Just be sure to use original patterns or add your unique twist if using a public tutorial.
Q: What can I store inside a crochet souvenir holder?
A: You can store small keepsakes like postcards, photos, travel tickets, coins, jewelry, or tiny trinkets from your adventures.
Conclusion
In this comprehensive crochet souvenir holder – step by step tutorial, we covered everything from materials and basic stitches to creative customization and gift ideas. Whether you’re making it for yourself or a loved one, this charming crochet project adds personal value to any collection of memories.
Crochet is more than a craft—it’s a form of storytelling. Through each stitch, you’re preserving the memories and moments that matter most. Now that you’ve finished your first holder, the possibilities for future designs are endless.
We hope you enjoyed this tutorial and feel inspired to start crafting. Please leave a sincere comment below with your thoughts, experiences, or suggestions. Your feedback helps us continue to create meaningful and helpful content for the crafting community.