
If you’ve ever wondered how to make colorful amigurumi fish – step by step tutorial, you’re in the right place. Whether you’re new to crochet or an experienced crafter looking for a fun and vibrant project, this guide is tailored to help you master the art of crocheting adorable amigurumi fish. Using soft yarn and basic crochet techniques, you’ll learn how to bring these charming underwater creatures to life while creating a beautiful handmade keepsake.
How to make colorful amigurumi fish – step by step tutorial is more than just a crafting process; it’s an opportunity to express creativity through color, shape, and design. These mini crochet fish make excellent gifts, keychains, decorations, or even educational toys. Their appeal lies in their simplicity and cheerful appearance, making them a favorite for kids and adults alike.
In this guide, we’ll walk you through every stage—from materials to final assembly—ensuring that you feel confident and inspired as you create your very own colorful amigurumi fish. Designed with beginners in mind but enjoyable for all levels, this tutorial provides clear instructions and tips that follow the best practices of crochet crafting. So gather your supplies and let’s get started on this joyful journey.
Materials and Tools Needed
Before diving into the project, it’s important to have all the essential tools and materials ready. The good news is that this project requires only a few basic items that are easy to find in any craft store or even in your existing crochet kit.
To start how to make colorful amigurumi fish – step by step tutorial, you will need a selection of colorful yarn. Choose lightweight or medium-weight yarn for easier handling and a soft finish. Opt for vibrant shades that contrast well—think oranges, blues, purples, and yellows—for that playful, eye-catching look.
You’ll also need a crochet hook appropriate for your chosen yarn, usually size 2.5mm to 3.5mm for amigurumi projects. Smaller hooks help achieve tighter stitches, which is perfect for making sturdy and detailed miniatures like fish.
Other materials include stuffing (fiberfill), safety eyes or embroidery thread for features, a yarn needle for sewing pieces together, and scissors. Optional but helpful tools include stitch markers to keep track of your rounds, especially for beginners.
When following the how to make colorful amigurumi fish – step by step tutorial, having these tools at your fingertips will streamline the crafting process. A well-prepared workstation also allows you to fully enjoy the creative experience without interruptions.
Color coordination is key. Try laying out your yarn in the desired pattern before you begin. This visual preview can spark new ideas and help maintain harmony in your design.
Lastly, make sure you’re working in a well-lit, comfortable space. A cozy environment makes crocheting more enjoyable and helps reduce eye strain, especially when working with smaller stitches and vibrant colors.
Step-by-Step Instructions: Creating the Fish Body
The body is the largest part of your amigurumi fish and sets the foundation for the rest of your creation. In this section of how to make colorful amigurumi fish – step by step tutorial, we’ll guide you stitch by stitch through building the rounded, cheerful body.
Start by creating a magic ring and working six single crochets into the ring. Pull the ring tight and join with a slip stitch. This will form the starting point at the nose of the fish.
In the next several rounds, you will increase gradually to expand the body. Typically, you add six stitches evenly per round until you reach about 36–42 stitches in total, depending on how large you want your fish to be.
Once you’ve reached the desired width, continue with even rounds (no increases) to build length. This is where you can experiment with color changes, using stripes or gradients to make your fish more vibrant and playful.
Begin decreasing to shape the tail end of the fish by reducing six stitches evenly per round until you’re back to around 6 stitches. Stuff the fish firmly before completely closing the tail with a needle.
Using how to make colorful amigurumi fish – step by step tutorial as your guide, don’t be afraid to pause and adjust the shape by adding or removing stuffing as needed. Symmetry and balance are key for a pleasing design.
Finish the fish body by securely fastening off the yarn and weaving in the ends. You now have a basic but beautifully colorful fish shape ready for details and personality.
Adding Fins, Tail, and Details
With the body complete, it’s time to add the features that truly bring your fish to life. The how to make colorful amigurumi fish – step by step tutorial wouldn’t be complete without focusing on the fins and tail that give each fish its unique flair.
For the side fins, crochet two small oval shapes using single crochets. You can use the same color as the body or pick a contrasting one to make the fins pop. Sew them evenly on both sides of the fish.
The dorsal fin (top fin) is often triangular or slightly rounded. Start with a small chain, then work single crochets in rows to form a curved triangle. Attach it along the top of the fish, positioned closer to the front for a realistic look.
The tail can be crocheted in a fan or split shape. Use increases to widen the base, then split into two sections that narrow to form the tail tips. Sew the tail securely to the back of the fish.
Embroider or attach safety eyes near the head. If you prefer a cartoon-like style, embroider small smiles or blush spots using pink or black yarn for a charming finish.
You can also add scales using surface crochet or embroidery, using a contrasting yarn. This adds texture and detail, elevating your project beyond the basics.
When you follow the how to make colorful amigurumi fish – step by step tutorial, remember that personal touches make each piece special. Play with textures, colors, and placement to create a fish that reflects your personality or matches your decor.
Creative Uses and Display Ideas
Now that you’ve completed your crochet masterpiece, what can you do with it? One of the best things about following a how to make colorful amigurumi fish – step by step tutorial is the versatility of the final product. These fish are not only cute but also functional in many ways.
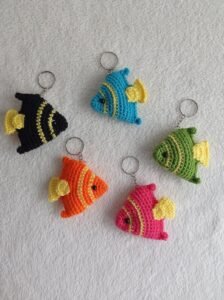
Turn your amigurumi fish into a keychain by attaching a small ring to the top. It’s a practical and adorable way to carry your creation everywhere you go.
Use your fish as part of a baby mobile or nursery decor. The soft texture and playful colors make it perfect for children’s spaces, and hanging several in a row can create a soothing underwater theme.
You can also add a magnet on the back and use them as fridge decorations. They’re lightweight and can bring a pop of color and charm to your kitchen or workspace.
Consider making a garland of amigurumi fish for party decor or to hang across a window. Alternate colors and sizes to create a dynamic, ocean-inspired vibe.
These fish also make wonderful handmade gifts. Whether for birthdays, baby showers, or holidays, a small crocheted fish shows thoughtfulness and creativity.
Finally, try using them as educational toys. The tactile quality and bright colors are great for sensory play, and they can help teach children about sea life in a fun and interactive way.
FAQ – Frequently Asked Questions
What is the best yarn to use for amigurumi fish?
A lightweight or medium-weight cotton yarn is ideal. It holds shape well, is soft, and offers a clean finish. You can also experiment with acrylic yarns for a wider range of colors.
Can beginners follow this tutorial?
Yes! The how to make colorful amigurumi fish – step by step tutorial is designed for all skill levels. With clear instructions and basic stitches, even beginners can successfully complete this project.
How long does it take to make one fish?
Depending on your skill level, one fish can take 1 to 3 hours. Once you get used to the pattern, you can make multiple fish more quickly.
What size will the finished fish be?
The typical finished size is about 4 to 6 inches in length, depending on your yarn and hook size. You can scale the size by adjusting these variables.
Do I need to know how to do color changes in crochet?
Basic color changes are helpful but not mandatory. The tutorial includes suggestions for simple methods to switch yarns and create beautiful striped or patterned fish.
Is stuffing necessary?
Yes, stuffing is essential for giving the fish its 3D shape. Use polyester fiberfill for best results, and make sure to stuff firmly before closing.
Conclusion
Learning how to make colorful amigurumi fish – step by step tutorial is a joyful and rewarding experience. This project allows you to express your creativity through yarn, color, and design while crafting something both beautiful and useful. Whether you’re making one fish or an entire school, the process offers fun and relaxation in every stitch.
We covered everything from materials and the fish body to adding fins, personal details, and creative ways to use your finished amigurumi. With patience and imagination, your colorful fish will bring smiles to anyone who sees them.
If you tried this tutorial, we’d love to hear from you! Please leave your honest opinion and suggestions below—your feedback helps us grow and inspires future projects. Happy crocheting!